background image

4

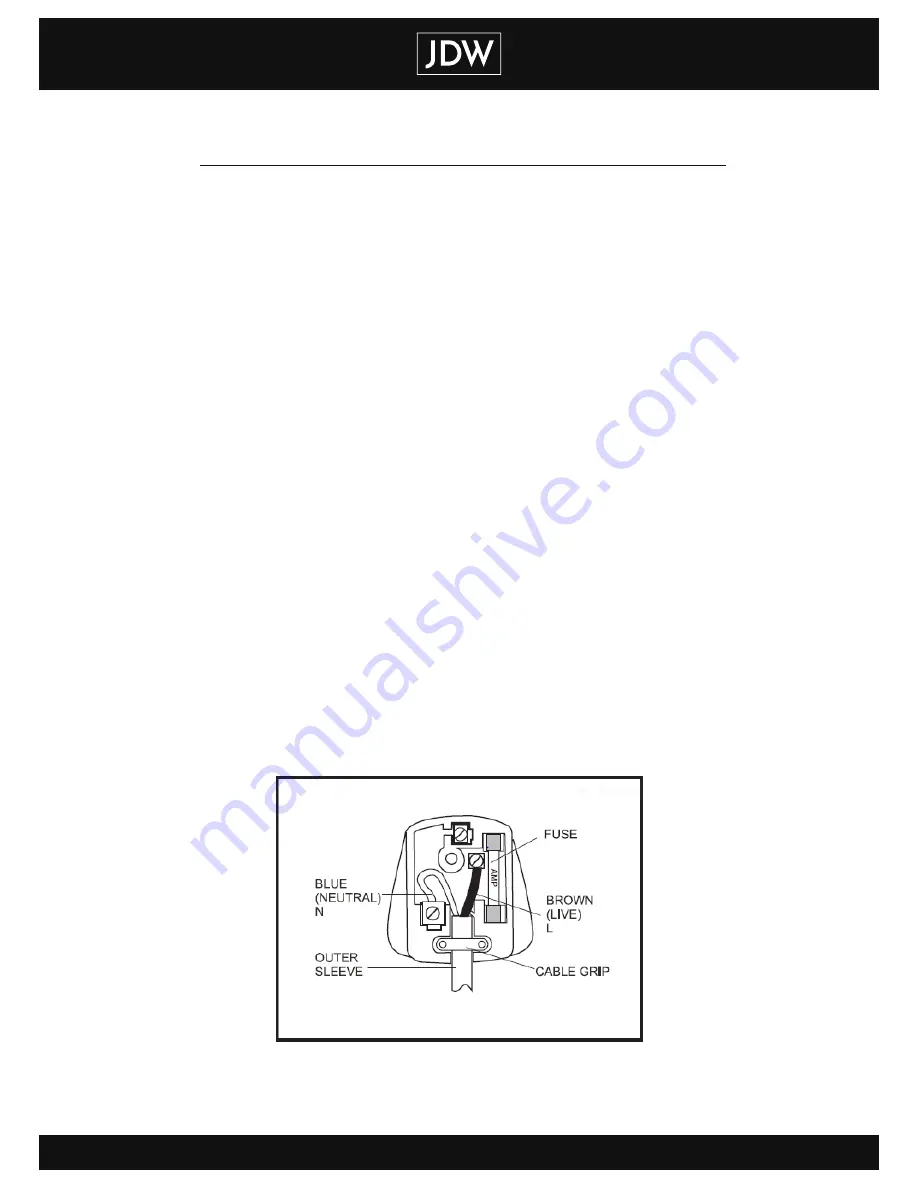
Plug Fitting

Note: The product is fitted with a standard UK mains outlet 3 pin plug. If a moulded plug is 

fitted and has to be removed take great care in disposing of the plug and severed cable, it must 

be destroyed to prevent engaging into a socket. If the supply cord is damaged it must only be 

replaced by a qualified person. If you need to fit a new plug follow the instructions below. If in

doubt consult a qualified electrician

IMPORTANT!

The wires in the mains lead are colored in accordance with the following code:

Blue - Neutral Brown - Live

As the colours of the wires in the mains lead of this appliance may not correspond with the 

colored markings identifying the terminals in your plug, proceed as follows:

• The wire colored BROWN must be connected to the terminal that is marked with the letter 

“L”.

• The wire colored BLUE must be connected to the terminal that is marked with the letter “N”.

• This product is a class II product. No connection is to be made to the earth terminal which is 

marked “E” or If a (BS 1363/A) plug is used, a 13 amp fuse must be fitted, or if any other type of 

plug is used a 13 Amp fuse must be fitted, either in the plug, or adaptor or on the distribution 

board.

Содержание EQ747

Страница 1: ...1 Cordless Hedge Trimmer EQ747 Assembly Instructions Please Read All Instructions Thoroughly Before Starting Assembly...

Страница 2: ...2 Components 1 Blade 2 Protector 3 Locked front handle 4 Front switch handle 5 Back switch handle 6 Battery pack...

Страница 3: ...rvision or instruction concerning use of the appliance by a person responsible for their safety Only use the product in the manner and for the functions described in these instructions Work area safet...

Страница 4: ...dance with the following code Blue Neutral Brown Live As the colours of the wires in the mains lead of this appliance may not correspond with the colored markings identifying the terminals in your plu...

Страница 5: ...al injury Do not overreach Keep proper footing and balance at all times This enables better control of the power tool in unexpected situations Dress properly Do not wear loose clothing or jewelry Keep...

Страница 6: ...TRIMMER SAFETY WARNNINGS 1 Keep all parts of the body away from the cutter blade Do not remove cut material or hold material to be cut when blades are moving Make sure the product is switched off whe...

Страница 7: ...es and ear muffs while operating X Always wear substantial footwear and long trousers Do not operate the equipment when barefoot or wearing open sandals X Always wear suitable working clothes during w...

Страница 8: ...in The following dangers can arise in connection with the structure and design of this product 1 Health defects resulting from vibration emission if the product is being used over longer period of tim...

Страница 9: ...ct checked by a qualified professional and repaired if necessary before you put it into operation again Safety Warnings and Instructions Batteries X Do not disassemble or open drop mechanical abuse cr...

Страница 10: ...Make sure cord is located so that it will not be stepped on tripped over or otherwise subjected to damage or stress 7 An extension cord should not be used unless absolutely necessary Use of improper...

Страница 11: ...oving the battery from the charger may ignite the dust or fumes 13 If battery contents come into contact with the skin immediately wash area with mild soap and water If battery liquid gets into the ey...

Страница 12: ...ction Wear safety shoes for preventing slipping CHARGING PROCEDURE IMPORTANT The battery packs not fully charged at the factory Before attempting to charge them thoroughly read all of the safety instr...

Страница 13: ...as sent from the factory in an uncharged condition Before attempting to use it it must be charged 2 CAUTION To reduce the risk of damage to the batteries NEVER charge them in an air temperature below...

Страница 14: ...ith its batteries in a depleted condition Recharge discharged batteries promptly 6 To maximize battery life a Do not fully discharge batteries b Fully recharge batteries after each use c Store tool in...

Страница 15: ...two switch handles will make the machine a sudden stop in that case you will see sparkle from the ventilation slot do not worry this is normal phenomenon and will not damage the machine You will proba...

Страница 16: ...hedge trimmer is designed to cut soft new growth and should only be used to cut such materials Maintenance and care Always remove the battery pack from the machine before carrying out any work on the...

Страница 17: ...17 Please Retain Instructions For Future Use J D WILLIAMS CO LTD 40 LEVER STREET MANCHESTER UK M60 6ES...

Отзывы: