background image

Part No. 960-000193R_Rev. A

© 2017 JCM American Corporation

1 4

GEN5™ Printer

JCM® Training Overview

September, 2017

USING THE JCM DFU DOWNLOADER

To update the GEN5 Printer Firmware, proceed as follows:

1. Connect a USB Cable between the USB Update Port on the right side of the 

GEN5 Printer (refer to Figure 2 

on page 4) and the PC.

2. Apply power to the GEN5 Printer.
3. From the PC Desktop, double-click on the 

JCM DFU Downloader Application


icon.
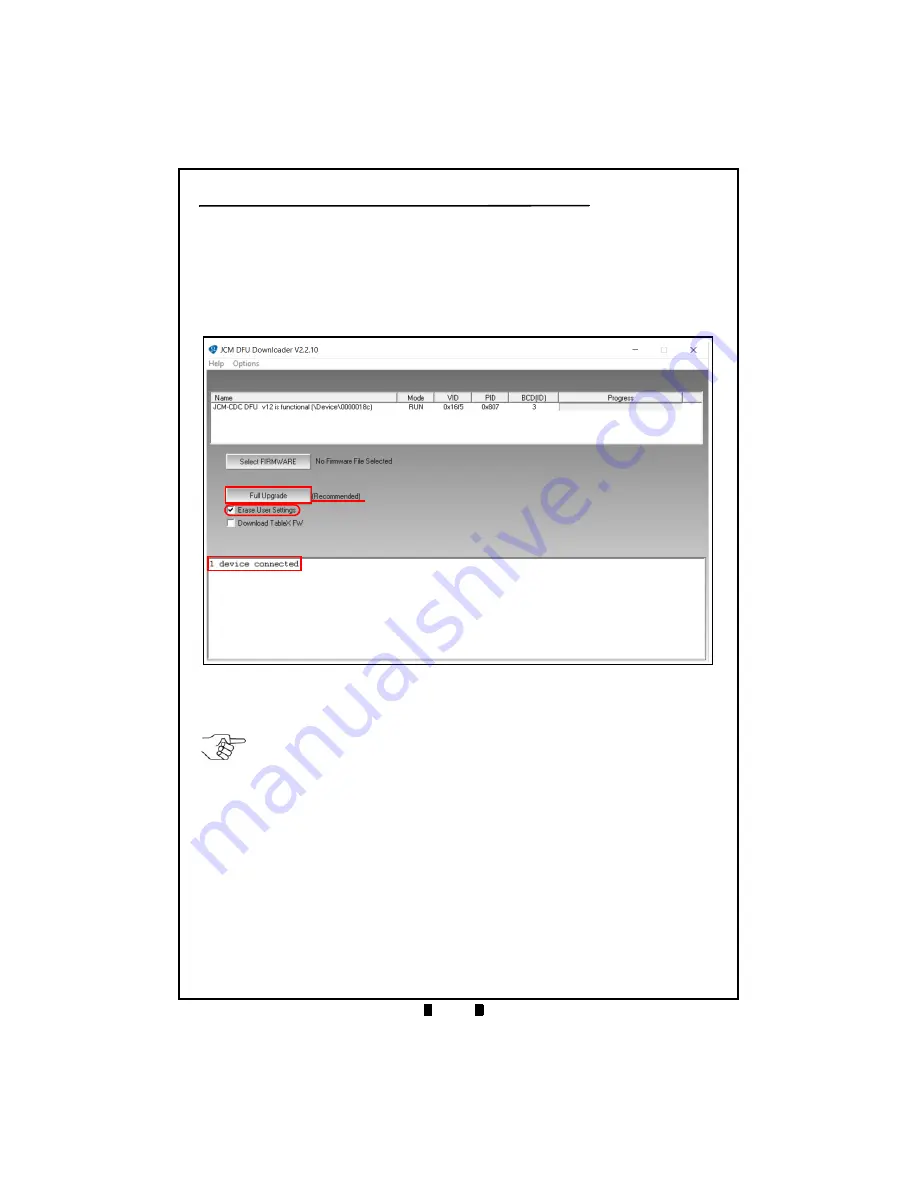
The Printer status will display as 

1 device connected 

(Figure 12


a

).

4. If no Printer is detected, Drivers will need to be installed. (Drivers are installed 

automatically when the Printer is connected to a PC.)

5. Click on 

Select FIRMWARE

.

The PC’s web browser opens automatically.

6. Select the proper Firmware version.

The 

JCM DFU Downloader

 screen will indicate the following information:

File Name

File Type (DFU, SHA)

Printer Model Format

7. Ensure the 

Erase User Settings

 check box is selected (Figure 12


b

).

a

b

c

 Figure 12 

JCM DFU Downloader Application UI

NOTE: If Printer Drivers need to be installed manually, contact JCM Technical Support 
at (800) 683-7248.

Содержание GEN5 Series

Страница 1: ...Part No 960 000193R_Rev A September 2017 2017 JCM American Corporation Phone 800 683 7248 702 651 0000 Fax 702 651 0214 E mail support jcmglobal com www jcmglobal com JCM TRAINING OVERVIEW GEN5 Printe...

Страница 2: ...mmunications 9 Disabling The Ticket Low Sensor 9 Printing a Configuration Ticket 10 JCM Printer Basic Driver 11 About GEN5 Firmware 13 GEN5 Firmware Identification 13 GEN5 Firmware Identification IGT...

Страница 3: ...ing JCM GEN5 models GEN5 PRINTER UNIT Figure 1 illustrates the GEN5 Printer Unit Table 1 GEN5 Printer Versions Device Version Difference PSA 66 ST5 RS 232 Netplex USB NOTE The GEN5 protocol is configu...

Страница 4: ...igure 2 k The DIP Switches are used to set operational parameters and vary by manufacturer Figure 2 GEN5 Printer Component Names e l b a c d f g h j k i a RS232 USB Coil Interface Cable b Coil Interfa...

Страница 5: ...er Tray Sensor Figure 4 a Ticket Low Sensor Figure 4 b Lid Open Sensor Figure 4 d Ticket Taken Sensor Figure 4 e 3 Use non flammable Compressed Air to clean the Paper Out Index Mark Sensor refer to Fi...

Страница 6: ...017 4 Rotate the Print Head Release Lever Figure 5 a leftward then gently press down on the Lever to lower the Print Head 5 Wipe the Print Head surface clean using a new cleaning swab refer to Figure...

Страница 7: ...clean the Print Head Rollers Figure 7 a and the Presenter Assembly s Feed Rollers Figure 7 b turn the Rollers by hand while wiping them with a new Clean ing Wipe or a clean Microfiber cloth slightly d...

Страница 8: ...ive packaging 5 Insert the Cleaning Card into the Ticket In Slot Figure 8 b It will automati cally load in the proper position 6 Press and hold the Feed Button Figure 8 c to feed the Cleaning Card thr...

Страница 9: ...ollows 1 Pull the Ticket Figure 9 a out of the GEN5 Printer Ticket In Slot Figure 9 b 2 Press the Upper Lid Release Lever Figure 9 c toward the rear of the GEN5 Printer to open the Upper Lid 3 Place t...

Страница 10: ...Lecture Notes PRINTING A CONFIGURATION TICKET To print a Ticket with the current Configuration and Firmware information proceed as follows 1 Ensure Ticket Paper is loaded into the GEN5 Printer 2 Pres...

Страница 11: ...ply power to the GEN5 Printer Unit 4 From the PC Desktop double click on the JCM Printer Basic Driver icon The JCM Printer Basic Driver Opening Screen is displayed Figure 10 5 Click to select the Comm...

Страница 12: ...t Information Confirm that Tickets feed through the Printer properly 8 Check for an Active condition in the Printer Status section Figure 11 b An Active condition for a Sensor or Printer Error e g Pap...

Страница 13: ...ode 3 digits 5RUSA USA Manufacturer 2 digits 5RUSABA Bally units Version number Remaining characters variable length 5RUSABA22 dfu GEN5 RS 232 USA Bally units Version 22 Table 4 GEN5 Firmware Identifi...

Страница 14: ...Printer status will display as 1 device connected Figure 12 a 4 If no Printer is detected Drivers will need to be installed Drivers are installed automatically when the Printer is connected to a PC 5...

Страница 15: ...17 JCM Training Overview GEN5 Printer Lecture Notes 8 Click on Full Upgrade refer to Figure 12 c on page 14 9 When the Printer status indicates Printer Successfully Updated Figure 13 a the Firmware Up...

Страница 16: ...nter s USB Update Port refer to Figure 2 k on page 4 2 Turn the BlueWaveDX Tool s Power Switch ON Figure 15 b 3 When the Firmware Update screen appears press the OK Button Figure 15 c 4 Press the UP a...

Страница 17: ...D Indications Bezel Display Status Solid ON Printer is ready and in idle Slow Blink Paper Low or Printer Error Fast Blink Ticket Printing Ticket in Chute OFF Printer Power is OFF Table 7 Status LED In...

Страница 18: ...cable connection The Printer will automatically resume operation after the Power Supply is detected to be within range Print Head Results when the Printer senses an internal error due to connectivity...

Страница 19: ...r Lecture Notes MAINTENANCE EQUIPMENT Table 9 Maintenance Equipment JAC No Description 350 00292 100 Cleaning Kit 150 00013 100 Evaluation Harness 350 00258 100 24VDC Power Supply 302 100010R USB Cabl...

Страница 20: ...gistered trademark of JCM American Corporation All other product names mentioned herein may be registered trademarks or trademarks of their respective companies Furthermore and are not always mentione...

Отзывы: