background image

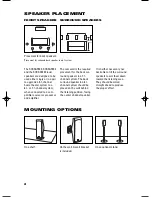
MOUNTING OPTIONS

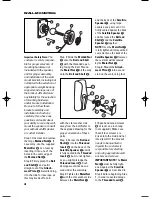
On a shelf.

On the wall. A wall bracket
is included.

On an optional stand.

2

SPEAKER PLACEMENT

    1.5 – 1.8m

   5 – 6 ft

FRONT SPEAKERS

SURROUND SPEAKERS

The SCSSAT500, SCSSAT300
and the SCSSAT200 loud-
speakers are designed to be
used either singly or in a pair
to upgrade a 5.1-channel
home theater system to a
6.1- or 7.1-channel system,
when connected to a com-
patible receiver or processor
and amplifier. 

The rear wall is the required
placement for the back sur-
round speakers in a 7.1-
channel system. The back
surround speaker in a 6.1-
channel system should be
placed on the wall behind
the listening position, facing
the center channel speaker. 

It is neither necessary nor
desirable to tilt the surround
speakers to aim them down
toward the listening area.
They should be aimed
straight ahead to produce
the proper effect.

Placement for back speakers.

Placement for surround back speaker in a 6.1 system. 

SCS-SAT500,300,200 OM  4/25/07  11:39 AM  Page 4

Содержание SCS-SAT500

Страница 1: ...a moment to register your product on our Web site at www jbl com It enables us to keep you posted on our latest advance ments and helps us to better understand our customers and build products that m...

Страница 2: ...of DTS Inc Declaration of Conformity We Harman Consumer Group Inc 2 route de Tours 72500 Ch teau du Loir France declare in own responsibility that the products described in this owner s manual are in...

Страница 3: ...ted to a com patible receiver or processor and amplifier The rear wall is the required placement for the back sur round speakers in a 7 1 channel system The back surround speaker in a 6 1 channel syst...

Страница 4: ...ing the weight and proportions of these loudspeakers in a safe and stable manner JBL disclaims any liability for the selection of suitable floor stands and or correct compatibility between the selecte...

Страница 5: ...from the ball Refer to the exploded drawing for the proper orientation of these parts Step 4 Screw the Ball and Shaft into the Threaded Insert on the back of the Satellite Speaker until it is fully se...

Страница 6: ...the wire into the hole below the cap and release the cap Gently tug on the wire to make sure that it is fully inserted Such damage would not be covered under the warranty Step 7 Holding the Satellite...

Страница 7: ...6 1 system If you have added two SCSSAT500 300 200 speakers to a 5 1 channel system reconfigure it as a 7 1 system The SCSSAT500 300 200 should be set to Small If your receiver allows you to set the c...

Страница 8: ...lifier and speakers Make sure all wires are connected Make sure none of the speaker wires are frayed cut or punctured or touching each other If more than one pair of main speakers is being used check...

Отзывы: