background image

ENGLISH

OPERATION MANUAL

JB SYSTEMS

®

3/36

SOLAR WHITE/RGB

DESCRIPTION:

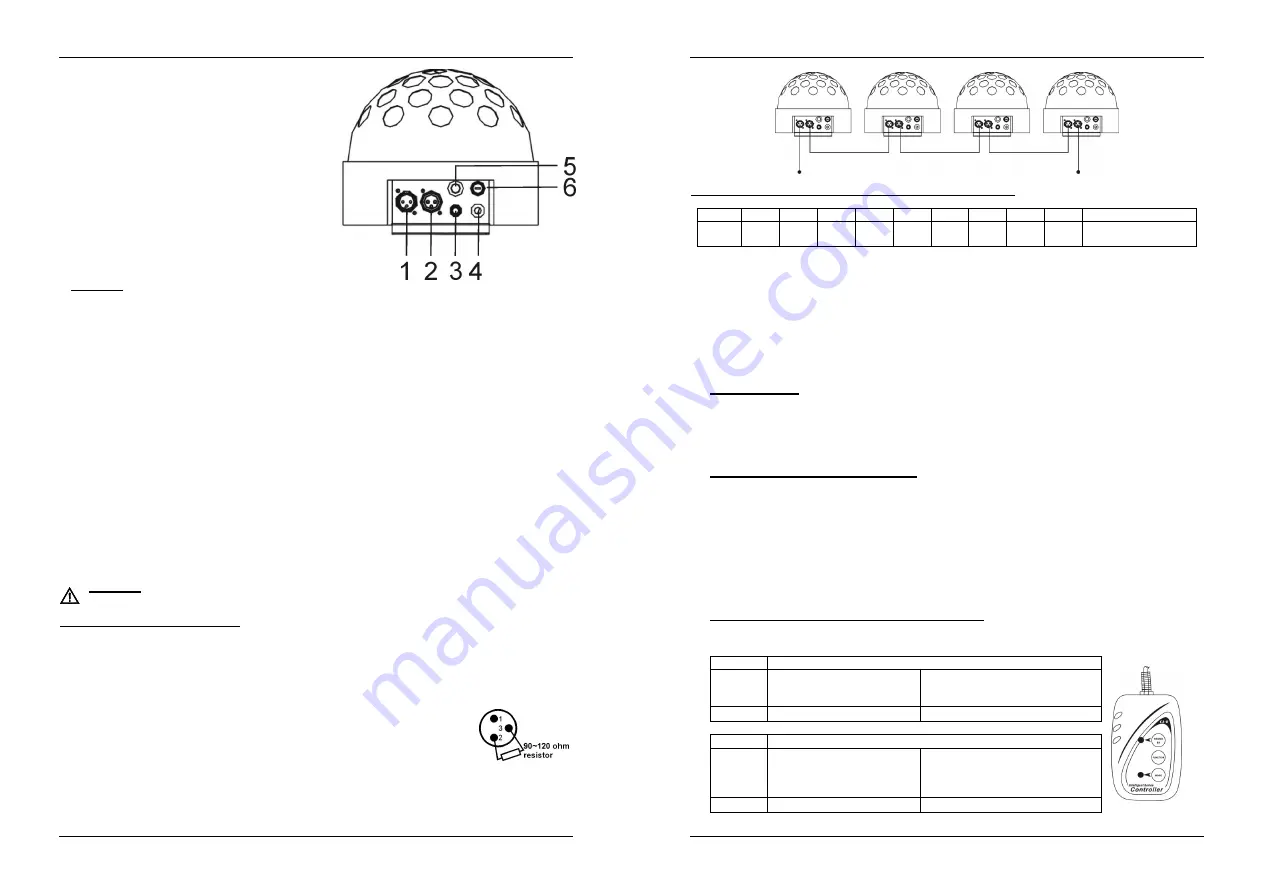
1. DMX input: 3pin male XLR-connector used to

connect universal DMX-cables. This input receives
instructions from a DMX-controller or from another
Solar in master/slave mode.

2. DMX output: 3pin female XLR-connector used to

connect the solar White/RGB with the next unit in
the DMX chain or with another Solar white/RGB
when used in master/slave mode.

3. ¼” jack to connect the optional CA-8 controller.
4. Mains cable
5. Internal microphone
6. Fuse holder

OVERHEAD RIGGING

Important: The installation must be carried out by
qualified service personal only. Improper installation can result in serious injuries and/or damage
to property.

Overhead rigging requires extensive experience! Working load limits should be

respected, certified installation materials should be used, the installed device should be inspected
regularly for safety.

Make sure the area below the installation place is free from unwanted persons during rigging, de-rigging
and servicing.

Locate the fixture in a well ventilated spot, far away from any flammable materials and/or liquids. The
fixture must be fixed

at least 50cm

from surrounding walls.

The device should be installed out of reach of people and outside areas where persons may walk by or be
seated.

Before rigging make sure that the installation area can hold a minimum point load of 10times the device’s
weight.

Always use a certified safety cable that can hold 12times the weight of the device when installing the unit.
This secondary safety attachment should be installed in a way that no part of the installation can drop
more than 20cm if the main attachment fails.

The device should be well fixed; a free-swinging mounting is dangerous and may not be considered!

Don’t cover any ventilation openings as this may result in overheating.

The operator has to make sure that the safety-relating and machine-technical installations are approved by
an expert before using them for the first time. The installations should be inspected every year by a skilled
person to be sure that safety is still optimal.

ELECTRICAL INSTAL ADDRESSING

Important: The electrical installation should be carried out by qualified personal only,
according to the regulations for electrical and mechanical safety in your country.

Electrical installation in DMX-mode:

The DMX-protocol is a widely used high speed signal to control intelligent light equipment. You need to
“daisy chain” your DMX controller and all the connected units with a good quality balanced cable.

Both XLR-3pin and XLR-5pin connectors are used, however XLR-3pin is more popular because these
cables are compatible with balanced audio cables.
Pin layout XLR-3pin:

Pin1 = GND ~ Pin2 = Negative signal (-) ~ Pin3 = Positive signal (+)

Pin layout XLR-5pin:

Pin1 = GND ~ Pin2 = Negative signal (-) ~ Pin3 = Positive signal (+) ~ Pins4+5 not used.

To prevent strange behavior of the light effects, due to interferences, you must use
a 90

Ω

to 120

Ω

terminator at the end of the chain. Never use Y-splitter cables, this

simply won’t work!

Make sure that all units are connected to the mains.

Each light effect in the chain needs to have its proper starting address so it knows
which commands from the controller it has to decode. In the next section you will learn how to set the
DMX addresses.

ENGLISH

OPERATION MANUAL

JB SYSTEMS

®

4/36

SOLAR WHITE/RGB

How to set the DIP-switches to obtain the right starting address:

Each of the first 9 DIP-switches correspond to a certain DMX-value:

DIP

#1

#2

#3

#4

#5

#6

#7

#8

#9

#10

Value

1

2

4

8

16

32

64

128

256

Slave inversion not

used in DMX-mode

You can combine the values of these switches to become any starting address between 1 and 512:
Begin address = 01

switch 1=ON

values: 1

Begin address = 05

switch 1+3=ON

values: 1+4 = 5

Begin address = 09

switch 1+4=ON

values: 1+8 = 9

Begin address = 13

switch 1+3+4=ON

values: 1+4+8 = 13


Begin address = 62

switch 2+3+4+5+6=ON

values: 2+4+8+16+32 = 62

HOW TO OPERATE THE UNIT

1. Standalone 1unit:
Important: The DMX address MUST be set to 001.

(first DIP switch = ON, all other are OFF)

Dipswitch 2 has two functions:

OFF: Performs the built-in programs automatically to the rhythm of the music.
ON: Auto mode. Eight Chases (dip switch 3 changes the direction of rotation, dip switch 4,5,6 changes the
speed)

2. Two or more units in master/slave setup:

Connect 2 or more units together using good quality balanced XLR microphone cables. The unit that has no
cable connected to its input will react as master, the others are the slave units.

Important: On the master unit the DMX address MUST be set to 001.

(first DIP switch = ON, all other are

OFF)

The slave units can have any DMX address value but NOT 001!

You can inverse the behavior of one or more slave units by changing the position of DIP-switch n°10 on
these slaves. Just try it and see if the effect becomes better. Changing DIP-switch n°10 on the master has
no effect.

Notice: when you use Solar White and Solar RGB together in Master/Slave mode, you should set a Solar
RGB unit as Master. If you set a Solar White as Master, the colors of the Solar RGB units will not change
automatically.

3. Connect the optional CA-8 controller for more control:

The CA-8 controller can only be used in standalone or master/slave mode. Connect the controller to the jack
input of the first unit (master). Now you can control all the connected units:

Stand by

Blackout the

SOLAR WHITE

unit (LED ON)

Function

Push for

1. strobe function
2. 2 light strobe

Rotation & speed selection

Mode

Musical mode (LED OFF)

automatic mode(LED ON)

Stand by

Blackout the

SOLAR RGB

unit (LED ON)

Function

Push for

1. strobe function
2. 2 light strobe
3. Sound strobe

Rotation & speed selection

Mode

Musical mode (LED OFF)

automatic mode(LED ON)

Содержание SOLAR LED

Страница 1: ... cva Reproduction or publication of the content in any manner without express permission of the publisher is prohibited Operation Manual Mode d emploi Gebruiksaanwijzing Bedienungsanleitung Manual de instrucciones Manual do utilizador EN FR NL DE ES PT ...

Страница 2: ... as normas vigentes no seu país WARNING DANGER never expose the lens to direct sunlight even for a short period This may damage the light effect or even cause fire ATTENTION DANGER n exposez jamais la lentille directement aux rayons de soleil même pendant un bref instant Ceci peut endommager l intérieur de l appareil ou même causer un incendie OPGELET GEVAAR stel de lens nooit bloot aan direct zon...

Страница 3: ...l objects or spill liquid inside the unit Electric shock or malfunction may result If a foreign object enters the unit immediately disconnect the mains power Locate the fixture in a well ventilated spot away from any flammable materials and or liquids The fixture must be fixed at least 50cm from surrounding walls Don t cover any ventilation openings as this may result in overheating Prevent use in...

Страница 4: ...n3 Positive signal Pin layout XLR 5pin Pin1 GND Pin2 Negative signal Pin3 Positive signal Pins4 5 not used To prevent strange behavior of the light effects due to interferences you must use a 90Ω to 120Ω terminator at the end of the chain Never use Y splitter cables this simply won t work Make sure that all units are connected to the mains Each light effect in the chain needs to have its proper st...

Страница 5: ...d monthly The interior of the device should be cleaned annually using a vacuum cleaner or air jet The cleaning of internal and external optical lenses and or mirrors must be carried out periodically to optimize light output Cleaning frequency depends on the environment in which the fixture operates damp smoky or particularly dirty surroundings can cause greater accumulation of dirt on the unit s o...

Страница 6: ...a condensation empêche l appareil de fonctionner manière optimale et elle peut même causer des dommages Cet appareil est destiné à une utilisation à l intérieur uniquement Ne pas insérer d objet métallique ou renverser de liquide dans l appareil Aucun objet contenant un liquide tels que des vases ne peut être placé sur cet appareil Cela risquerait de provoquer une décharge électrique ou un dysfonc...

Страница 7: ...lations techniques et de sécurité sont bien approuvées par un expert avant la première utilisation Les installations doivent être inspectées chaque année par du personnel qualifié pour assurer une sécurité optimale FRANÇAIS MODE D EMPLOI JB SYSTEMS 10 36 SOLAR WHITE RGB INSTALLATION ELECTRIQUE ADRESSAGE Important L installation électrique doit uniquement être effectué par du personnel qualifié sel...

Страница 8: ...LOI JB SYSTEMS 12 36 SOLAR WHITE RGB MAINTENANCE Assurez vous que la zone au dessous du lieu d installation ne comporte pas de personnes non concernées lors de la maintenance Mettez l appareil hors tension débranchez le cordon d alimentation et attendez que l appareil ait refroidi Pendant l inspection les points suivants doivent être vérifiés Toutes les vis utilisées pour l installation de l appar...

Страница 9: ...et toestel soms verhinderen perfect te functioneren Het kan soms zelfs schade aan het apparaat toebrengen Gebruik dit apparaat uitsluitend binnenshuis Plaats geen stukken metaal en mors geen vocht binnen in het toestel om elektrische schokken of storing te vermijden Indien een vreemd voorwerp in het apparaat geraakt moet U het direct van het lichtnet afkoppelen Plaats de installatie op een plaats ...

Страница 10: ...chanische veiligheid in uw land DMX INSTALLATIE Het DMX protocol is een veel gebruikt hogesnelheidssignaal om lichtuitrustingen te bedienen U moet uw DMX bediening en alle units met een gebalanceerde kabel van goede kwaliteit doorverbinden Zowel de 3pins XLR als de 5pins XLR connector worden gebruikt de 3pins XLR is echter meer populair want deze kabels zijn compatibel met symmetrische microfoonka...

Страница 11: ...een optische lens klaarblijkelijk beschadigd is door barsten of diepe krassen dan moet deze vervangen worden De stroomkabels moeten steeds in perfecte verkeren en dienen vervangen te worden wanneer er zelfs maar een klein probleem ontdekt word Om het toestel te beschermen tegen oververhitting behoren de ventilatoren als die er zijn en de ventilatieopeningen elke maand gereinigd te worden De binnen...

Страница 12: ...g einige Zeit zum Temperaturausgleich ausgeschaltet stehen lassen Kondensation kann zu Leistungsverlust des Geräts oder gar Beschädigung führen Gerät nicht im Freien und in feuchten Räumen und Umgebungen verwenden Keine Metallgegenstände oder Flüssigkeiten ins Innere des Geräts gelangen lassen Kurzschluss oder Fehlfunktion können die Folge sein Falls es doch einmal vorkommen sollte bitte sofort Ne...

Страница 13: ...en daisy chain Es werden sowohl XLR 3pin als auch XLR 5pin Stecker benutzt allerdings ist der XLR 3pin gängiger da diese Kabel mit symmetrischen Audiokabel kompatibel sind Stiftanordnung XLR 3pin Pin1 GND Pin2 Negatives Signal Pin3 Positives Signal Stiftanordnung XLR 5pin Pin1 GND Pin2 Negatives Signal Pin3 Positives Signal Pins4 5 werden nicht verwendet T Um durch Interferenzen verursachte Fehlfu...

Страница 14: ...en abgehängte Decken dürfen keine Anzeichen von Verformung aufweisen Ist die Optik sichtbar beschädigt Sprünge oder tiefe Kratzer dann müssen die entsprechenden Teile ausgewechselt werden Netzkabel muss stets in einwandfreiem Zustand sein und selbst bei kleinsten Beschädigungen erneuert werden Zur Vermeidung von Überhitzung müssen die Ventilatoren sofern vorhanden und Lüftungsschlitze monatlich ge...

Страница 15: ...o y puede incluso provocar daños Esta unidad sólo se puede usar en el interior No coloque objetos metálicos ni derrame líquidos dentro del reproductor de la unidad Se pueden producir descargas eléctricas o fallos de funcionamiento Si algún objeto extraño entra en la unidad desconecte inmediatamente el suministro eléctrico Coloque el aparato en un lugar bien ventilado lejos de materiales y o líquid...

Страница 16: ...conectores XLR de 3 pines y conectores XLR de 5 pines no obstante el conector XLR de 3 pines es más popular porque estos cables son compatibles con los cables de audio equilibrados Disposición de pines en el conector XLR de 3 pines Pin1 GND Pin2 Señal negativa Pin3 Señal positiva Disposición de pines en el conector XLR de 5 pines Pin1 GND Pin2 Señal negativa Pin3 Señal positiva Pines4 5 no se util...

Страница 17: ... óptica esté visiblemente dañada por grietas o rasguños profundos deberá ser reemplazada Los cables de red deberán estar en perfecto estado y deberán reemplazarse inmediatamente incluso si el problema detectado es pequeño Para proteger al aparato del sobrecalentamiento las aletas de refrigeración si las hubiera y las aberturas de ventilación deberán limpiarse mensualmente El interior del dispositi...

Страница 18: ...ção em espaços fechados Não introduza objectos de metal nem verta líquidos no interior do produto correrá risco de choque eléctrico ou poderá danificar o produto Caso algum objecto estranho entre em contacto com o interior da unidade desligue a de imediato da corrente Coloque esta unidade num local arejado afastado de materiais inflamáveis e ou líquidos Esta unidade deverá ser instalada a pelos me...

Страница 19: ...om cabos de áudio balanceados Configuração XLR 3 pinos Pino 1 Terra Pino 2 Sinal negativo Pino 3 Sinal positivo Configuração XLR 5 pinos Pino 1 Terra Pino 2 Sinal negativo Pino 3 Sinal positivo Pinos 4 5 não são usados Para prevenir comportamento estranho dos efeitos de luz devido a interferências deverá usar uma resistência de 90Ω a 120Ω no final da série Nunca utilize divisor de cabo Y isto simp...

Страница 20: ...a vez por ano De forma a optimizar a projecção de luz limpe as lentes ópticas internas e externas e ou espelhos periodicamente A regularidade das limpezas depende do ambiente em que está instalada a unidade um ambiente húmido com fumo ou poeirento dará origem a uma maior acumulação de impurezas nas ópticas da unidade Stand by Coloca a SOLAR RGB em Blackout Function Pressione para função 1 Strobe 2...

Отзывы: