

ENGLISH
USER MANUAL
JB SYSTEM
®
3/10
SIRIUS
OVERHEAD RIGGING
Important: The installation must be carried out by qualified service personal only. Improper
installation can result in serious injuries and/or damage to property. Overhead rigging requires
extensive experience! Working load limits should be respected, certified installation materials
should be used, the installed device should be inspected regularly for safety.
Make sure the area below the installation place is free from
unwanted persons during rigging, de-rigging and servicing.
Locate the fixture in a well ventilated spot, far away from
any flammable materials and/or liquids. The fixture must
be fixed
at least 50cm
from surrounding walls.
The device should be installed out of reach of people and
outside areas where persons may walk by or be seated.
Before rigging make sure that the installation area can hold
a minimum point load of 10times the device’s weight.
Always use a certified safety cable (number 3 on the
picture) that can hold 12 times the weight of the device
when installing the unit. This secondary safety attachment
should be installed in a way that no part of the installation
can drop more than 20cm if the main attachment fails.
The device should be well fixed; a free-swinging mounting
is dangerous and may not be considered!
Don’t cover any ventilation openings as this may result in overheating.
The operator has to make sure that the safety-relating and machine-technical
installations are approved by an expert before using them for the first time. The
installations should be inspected every year by a skilled person to be sure that
safety is still optimal.
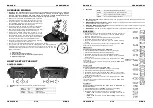
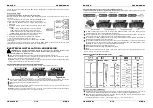
1. Optional Clamp
2. Special omega clamp (included)
3. Threaded hole, used to install the supplied eyebolt
4. Optional safety cable
HOW TO SET UP THE UNIT
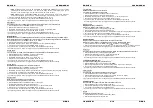
CONTROL PANEL:
1. DISPLAY
shows the various menus and the selected functions.
2. LEDS
DMX
On
DMX input present
MASTER
On
Master mode
SLAVE
On
Slave mode
SOUND
Flashing
Sound activation
ENGLISH
USER MANUAL
JB SYSTEM
®
4/10
SIRIUS
3. BUTTONS
MENU
To select the programming functions
DOWN
To go backward in the selected functions
UP
To go forward in the selected functions
ENTER
To confirm the selected functions
4. DMX INPUT/OUTPUT:
used for DMX512 linking. Use good quality 3pin XLR M/F balanced cable to link
the units together.
5. WIRED REMOTE CONTROL INPUT:
Used to connect a simple CA-8 hand controller while the unit is
used in standalone or master/slave mode.
6. WIRELESS REMOTE CONTROL INPUT:
Used to connect RF-8 wireless controller while the unit is used
in standalone or master/slave mode.
7. MAINS INPUT:
with IEC socket and integrated fuse holder, connect the supplied mains cable here.
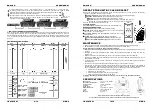
MAIN MENU:
To select any of the functions, press the MENU button up to when the
required one is shown on the display or use the DOWN and UP
buttons to browse the menu.
Select the function with the ENTER button (the display blinks).
Use DOWN and UP buttons to change the mode.
Once the required mode is selected, press the ENTER button to
confirm.
To go back to the main menu without any change press the MENU
button shortly. The main menu is shown in the chart.
DMX Address
Used to set the starting address in a DMX setup.
Press the MENU button until “
Addr
” is shown on the display.
Press the ENTER button, the display starts blinking.
Use DOWN and UP buttons to change the DMX512 address.
Once the correct address shows on the display, press the ENTER
button to save it.
To go back to the main menu without any change press the MENU
button shortly.
If you want to go back to normal running mode: press the MENU button
for about 2 seconds.
Channel mode
Used to set the desired channel setup mode.
Press the MENU button until “
ChMd
” is shown on the display.
Press the ENTER button, the display starts blinking.
Use DOWN and UP buttons to choose 1MSL, 4MSL or 11Chan mode.
Once the desired channel setup mode shows on the display, press
the ENTER button to save it.
To go back to the main menu without any change press the MENU
button shortly.
If you want to go back to normal running mode: press the MENU button
for about 2 seconds.
Show Mode
Used to choose the Show mode when used in standalone or
master/slave mode.
Press the MENU button until “
ShMd
” is showing on the display.
Press the ENTER button, the display starts blinking.
Use DOWN and UP buttons to select one of the available shows:
Show 1 (Sh 1):
Fixture is placed
on the floor
. Tilt movement
angle 210°.
Show 2 (Sh 2):
Fixture is fixed
under ceiling
. Tilt movement
angle 90°.
Содержание Sirius
Страница 1: ......


