


- 4 -
mains
SP12
2 conductor, 1 phase
L
N
L
N
PE
3 conductor, 1 phase
L
N
L
L
PE
N
4 conductor, 3 phases
L
1
L
2
L
3
N
L
N
PE
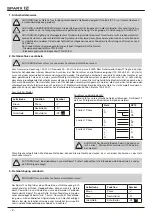
Connection non EU-model:
The Sparx12 may only be connected to mains supply systems according to this drawing:
WARNING! Sparx12 only can be used in
Canadian mains supply system with 2 con-
ductor, 1 phase with max. 120V!
ATTENTION! Le Sparx12 peut être utilisé
au Canada avec 2 conducteurs, 1 phase et
une tension maximal de 120V!
!
!
WARNING! Sparx12 might light up immediately if standalone mode is active or DMX signal is connected!
ATTENTION! Le projecteur Sparx12 peut s’illumine directement, lorsque le mode standalone et activé ou si un signal DMX
est programmé!
Connect fixture only after assuring that the electrical installation fits your demands. If any doubts occur consult a qualified tech-
nician!
4. Rigging the fixture
WARNING! Keep fixtures at least 3,0 meter away from inflammable articles!
Always use a safety cable attached to the base!
ATTENTION! Respecter une distance minimale de 3,0 m entre le projecteur
est d‘éventuelles objets inflammables! Sécuriser toujours le Sparx18/Sparx30
avec une élingue de sécurité appropriée!
Power can be relayed to another device via the PowerCon throughput socket that accepts a PowerCon NAC3FCB cable connec-
tor. Note that input and throughput connectors have different design: one type cannot be connected to the other.
The value of Sparx12 in chain depends on the local power network. Never use more than four in one line. Power throughput cable
must be rated 20A min., have three conductors 1,5mm² min. conductor size and a outer cable diameter of 5-15mm. Use only
original PowerCon plug from Neutrik. See installation manual from manufacturer (www.neutrik.com).
3. Relaying power to other fixtures
WARNING! To ensure proper installation of the plug consult a qualified technician!
ATTENTION! Installation de la connexion au réseau doit être effectuée par un professionnel!
!
!
Color
Funktion
Symbol
brown
live
„L“
blue
neutral
„N“
green/yellow
ground
„PE“
!
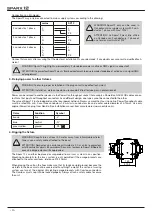
The Sparx 12 can either be placed or suspended from a truss system in any position.
Mounting horizontally to the truss system is only permitted if the omega brackets are
attached to the outer camlocks. (distance 213.20mm).
When placing the unit on the floor make sure that it stands on rigid ground, because the
air inlets in the base must not be covered with anything! To mount the unit on a trussing
system use two of the original JB-Lighting omega brackets with Camloc-connectors.
The Camlocs must snap in to be locked properly. Always attach a safety cable to secure
the unit.
Name
Erstellt
Art.-Nr.:
Datum
Prisma
Fax.: 07304 / 9617-99
Tel.: 07304 / 9617-0
Sparx 12
utobuschat
Allgemeintoleranzen
ISO 2768-m
Blechdicke:
Material:
Farbe:
Oberfläche:
Abmessung:
Lichtanlagentechnik GmbH
Sallersteig 15, 89134 Blaustein
12
37
6,
8
49
0,
9
248,7
220
140
213,2
14
0


