


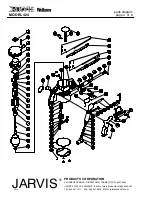
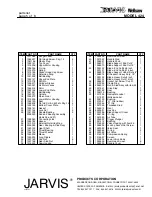


page 6 of 8
MODEL 424
PRODUCTS CORPORATION
33 ANDERSON ROAD, MIDDLETOWN, CONNECTICUT 06457-4926
UNITED STATES OF AMERICA E--MAIL.
TEL. 860-347-7271 FAX. 860-347-6978 WWW.
jarvisproducts.com
JARVIS
®
6205001
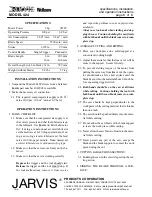
SPECIFICATIONS
Motor Power
1 hp
745 W
Operating Pressure
100 psi
6.9 bar
Air Consumption
28 ft
3
/ min
0.8 m
3
/ min
Blade Speed
7500 cuts / min
Stroke
1.125 in
29 mm
Control Handle
Single Trigger
Pneumatic
Blade Length
8 in
203 mm
16 in
406 mm
Overall Length (w/16 in blade) 31 in
787 mm
Weight (without blade)
8.2 lbs
3.7 kg
INSTALLATION INSTRUCTIONS
1 Suspend the Model 424 Wellsaw from a balancer.
Jarvis
part number 4042028 is available.
2 Make the necessary air connection.
2.1 The required compressed air supply is 28 ft
3
/
min at 100 psi. (0.8 m
3
/ min at 6.9 bars).
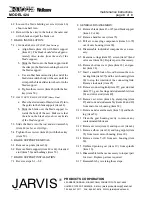
OPERATION INSTRUCTIONS
1 DAILY CHECKLIST:
1.1 Make sure that the compressed air supply is at
the correct pressure and that the lubricator is up
to the full mark. Use
Jarvis
Air Mist Lubricator
Oil
; if using a conventional air mist lubricator
set the feed rate at 8--10 drops per minute; if us-
ing a
micro fog
air mist lubricator set the feed
rate at 100 drops per minute.
Note:
Almost all
air mist lubricators are of the micro fog type
.
1.2 Make sure that the saw moves freely on the ba-
lancer.
1.3 Make sure that the saw is working correctly.
Depress
the trigger and the tool should start.
Release
the trigger and the tool should stop.
If
the tool malfunctions, remove it from service
and report the problem to your supervisor im-
mediately.
Always use two hands when starting and stop-
ping the saw. Continue holding the saw firmly
with both hands until the blade comes to a com-
plete stop
.
2 AVERAGE CUTTING AND RIPPING:
2.1 Place your work piece on a solid support at a
convenient working height.
2.2 Adjust the material so that the line of cut will be
close to the support. Secure it firmly.
2.3 To prevent starting torque of the motor from
pulling the saw away from line of cut, the opera-
tor should make a few short strokes until the
blade has cut into the material about 1/4 inch be-
fore squeezing trigger switch.
2.4
Both hands should be on the saw at all times
while cutting. Continue holding the tool with
both hands until the saw blade comes to a com-
plete stop.
2.5 The saw should be kept perpendicular to the
work piece while cutting material that is thicker
than one inch.
2.6 The saw should be pushed firmly into the mate-
rial while cutting.
2.7 Do not allow the saw blade or the blade support
to leave the work piece while cutting.
2.8 Never allow the saw blade to float into the mate-
rial while cutting.
2.9 Never permit any part of the saw, except the
blade and the blade support, to contact the work
piece during the cut.
3 CUTTING LARGE CROSS SECTIONS:
3.1 Rocking the saw in the cut will speed up the cut-
ting action.
4 SINKING THE BLADE THROUGH A SUR-
FACE:
specifications, installation
and operation instructions


