JAPANNEXT JN-T2822UHD Скачать руководство пользователя страница 15

GUIDE DE DEMARRAGE RAPIDE 

Sortez l’écran de sa boîte, placez le vers le bas en le posant sur une surface douce de manière à protéger le panneau à 
cristaux liquides. Choisissez une surface stable avec assez de place autour pour assurer un montage en sécurité.   

INSTALLATION DU MONITEUR 

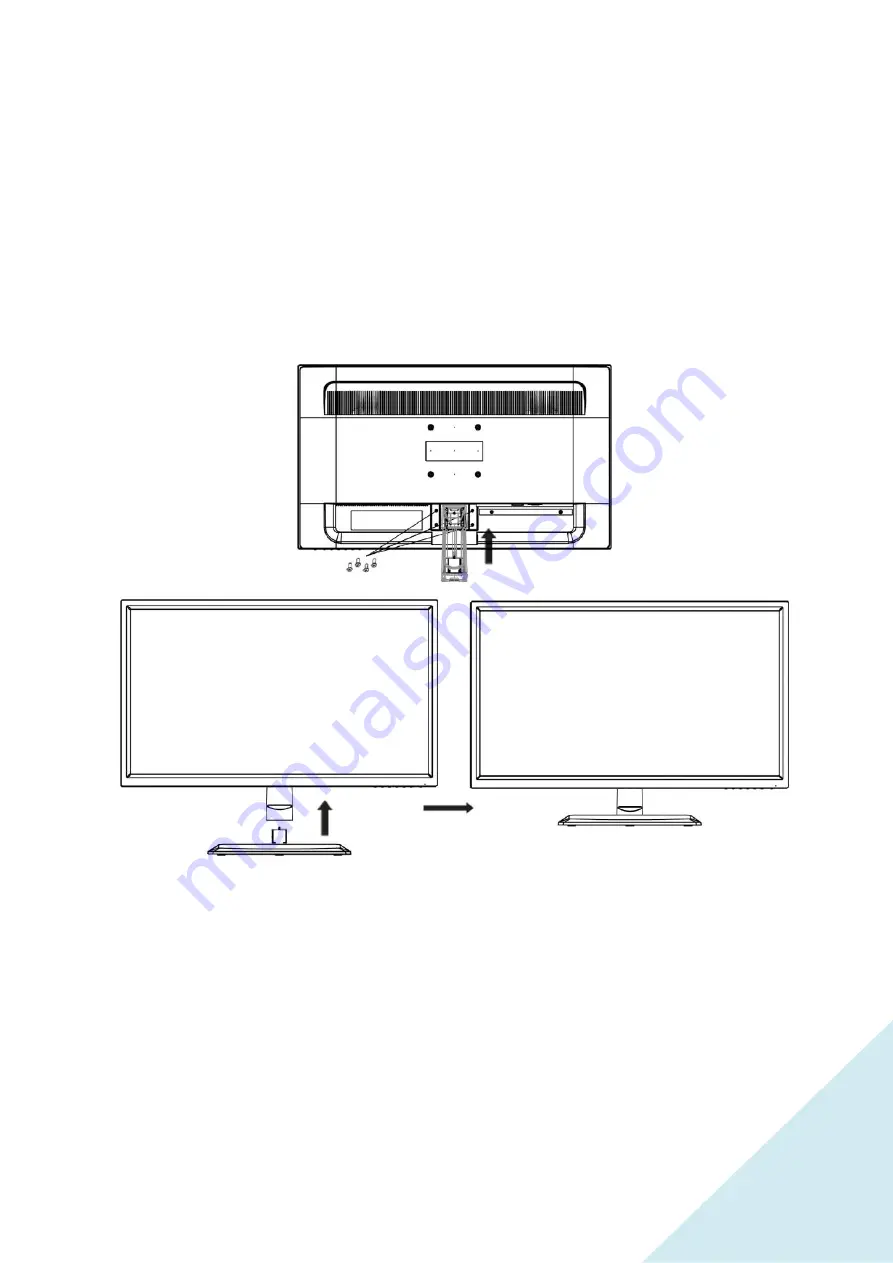
1- Poser le moniteur à plat sur une surface douce et stable, en faisant attention à ne pas rayer l'écran.
2- Positionner le cou du pied à l'arrière du moniteur, en le plaçant comme sur la photo ci-dessous et utiliser les 4 vis
fournies pour le fixer. Visser sans forcer.
3- Clipser le socle du pied, partie arrondie coté écran, sur le dessous du cou du pied.
4- Vérifier que les pieds soient fermement attachés.

5- Assurez-vous que ni le moniteur ni l’ordinateur ne soient sous tension (débrancher les câbles).
6-Branchez les câbles de signal du moniteur (HDMI, DP etc..) sur votre PC et votre moniteur.
7-Insérez les câbles d’alimentation de votre moniteur et ordinateur.
8-Mettez votre moniteur et ordinateur sous tension.

ATTENTION AUTRES REMARQUES 

Après avoir allumé l’ordinateur et le moniteur si rien ne s’affiche, vérifier que le bon câble source soit sélectionné. 
Veuillez utiliser une prise de secteur avec une prise de terre.   

15

Содержание JN-T2822UHD

Страница 1: ...lace for future reference FR Manuel d utilisation Ce manuel de l utilisateur contient les informations n cessaires l utilisation de votre moniteur prenez le temps de le lire avant d utiliser votre mon...

Страница 2: ...l EMBALLAGE CONNECTEURS P17 BOUTONS DE REGLAGES P18 MENUS DE RELAGE OSD P19 A PROPOS DE FREESYNC P20 DEPANNAGE FAQ INTERNATIONAL P21 TECHNICAL SPECIFICATION P22 DIMENSIONS P23 COMPLIANT TIMING ENG Fo...

Страница 3: ...n these specified may result in exposure to electrical and mechanicals hazards electrical shocks and may damage your monitor and or put yourself in danger If any sign of spark smoke noise or vibration...

Страница 4: ...monitor is not designed for a 24 7 use Always use power cord provided with the monitor If the power cord is missing or damage please contact JAPANNEXT customer service or a technician Unplug the monit...

Страница 5: ...ecommend positioning the screen below eye level at a distance of about 40 to 60 cm With prolonged use it is recommended to take a 10 minute break per hour of use Customer service assistance maintenanc...

Страница 6: ...lacing it as shown in the picture below and use the 4 screws provided to fix it Screw without force 3 Clip the stand rounded side on the screen side on the underside of the neck 4 Make sure the stand...

Страница 7: ...ptor Power Plug Shape CONNECTORS 1 DC Power Plug Please use only the power DC adaptor and power cord included in Package 2 and 3 HDMI 2 0 Connectors 60Hz Can be use with both monitor and a large varie...

Страница 8: ...to select the OSD setting Shortcut key Decrease the volume Press this button move right to select the OSD setting Shortcut key Increase the volume Press this button move up to select the OSD setting...

Страница 9: ...0 Adjust horizontal position V POSITION 0 100 Adjust vertical position CLOCK 0 60 Adjust the pixel clock PHASE 0 100 It allows to reduce video distortion and instability components ASPECT WIDE It allo...

Страница 10: ...MER 0 60 Set the display time of the menu TRANSPARENCY 0 100 Adjust the transparency of the menu RESET IMAGE AUTO ADJUST It allows to auto adjust the image COLOR AUTO ADJUST It allows to auto adjust t...

Страница 11: ...specification seems to be adequate unplug monitor immediately and contact JAPANNEXT customer service ASAP Image is blurring vibrating flickering is indistinct etc Make sure the computer signal timing...

Страница 12: ...rt seulement par un technicien qualifi L ouverture du moniteur peut vous exposer des risques d incendie des chocs lectriques une mise en danger Il contient des l ments haute tension Ne jamais introdui...

Страница 13: ...XT Maintenance Pour prot ger votre moniteur contre de possibles dommages n appuyez pas sur l cran LED Lorsque vous le d placez saisissez le par le cadre ne mettez pas vos mains ni vos doigts sur l cra...

Страница 14: ...de positionner l cran au dessous du niveau des yeux une distance d environ 40 60 cm En cas d utilisation prolong e il est recommand de prendre une pause de 10 minutes par heure d utilisation Service S...

Страница 15: ...is fournies pour le fixer Visser sans forcer 3 Clipser le socle du pied partie arrondie cot cran sur le dessous du cou du pied 4 V rifier que les pieds soient fermement attach s 5 Assurez vous que ni...

Страница 16: ...URS 1 Connecteur d alimentation DC Veuillez utiliser uniquement le c ble et adaptateur DC fourni avec le moniteur Pri re d utiliser une prise secteur avec prise de terre 2 et 3 Port HDMI 2 0 60Hz Peut...

Страница 17: ...Naviguer dans le menu vers la gauche Raccourci diminuer le volume Naviguer dans le menu vers la gauche Raccourci diminuer le volume Naviguer dans le menu vers le haut Naviguer dans le menu vers le ba...

Страница 18: ...tion horizontale POSITION V 0 100 Ajustez la position verticale HORLOGE 0 60 Ajustez le pixel clock PHASE 0 100 Il permet de r duire les composants de distorsion vid o et d instabilit ASPECT WIDE Perm...

Страница 19: ...ent POS V OSD 0 100 D placer l OSD verticalement TIMER OSD 0 60 S lectionnez le temps d affichage de l OSD TRANSPARENCE 0 100 S lectionnez la transparence de l OSD RESET AJUST AUTO IMAGE Ajuste automa...

Страница 20: ...r glez la r solution de l image param tres de votre PC sur 3840x2160 L cran tremble ou met un bruit La tension d alimentation est elle compatible avec le moniteur et son adaptateur DC Si les sp cific...

Страница 21: ...1 2 3840x2160 60Hz DP2 DP 1 2 3840x2160 60Hz Output Terminal Earphone YES Speaker Typical 2 x 5W Power Consumption Typical Max 39W Typ 29W Standby 0 3W AC Power Range AC 100 240V 50 60Hz Power Mode In...

Страница 22: ...DIMENSIONS 22...

Страница 23: ...COMPLIANT TIMING e mail europe cs japannext net Europe 24 Rue de la Plaine 75020 Paris Japannext SA Japan 1 3 1 JAPANNEXT 23...

Отзывы: