background image

PC Application User Manual


JTY-4S0-0E10-0-V1.1, 2013-02-14 

Page 30 of 41 

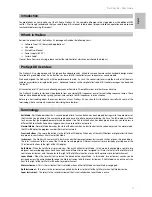
I chose to give mine an all red look, and it ended up looking like this: 


Now, this profile, when the button on the MiD is pressed, will run the following voltages over the 
first second, in 1/10th of a second intervals: 

6,9 

– 2 – 1.5 – 1.3 – 2.4 – 7.3 – 4 – 2.4 – 2 – 2.75 – 5.85 

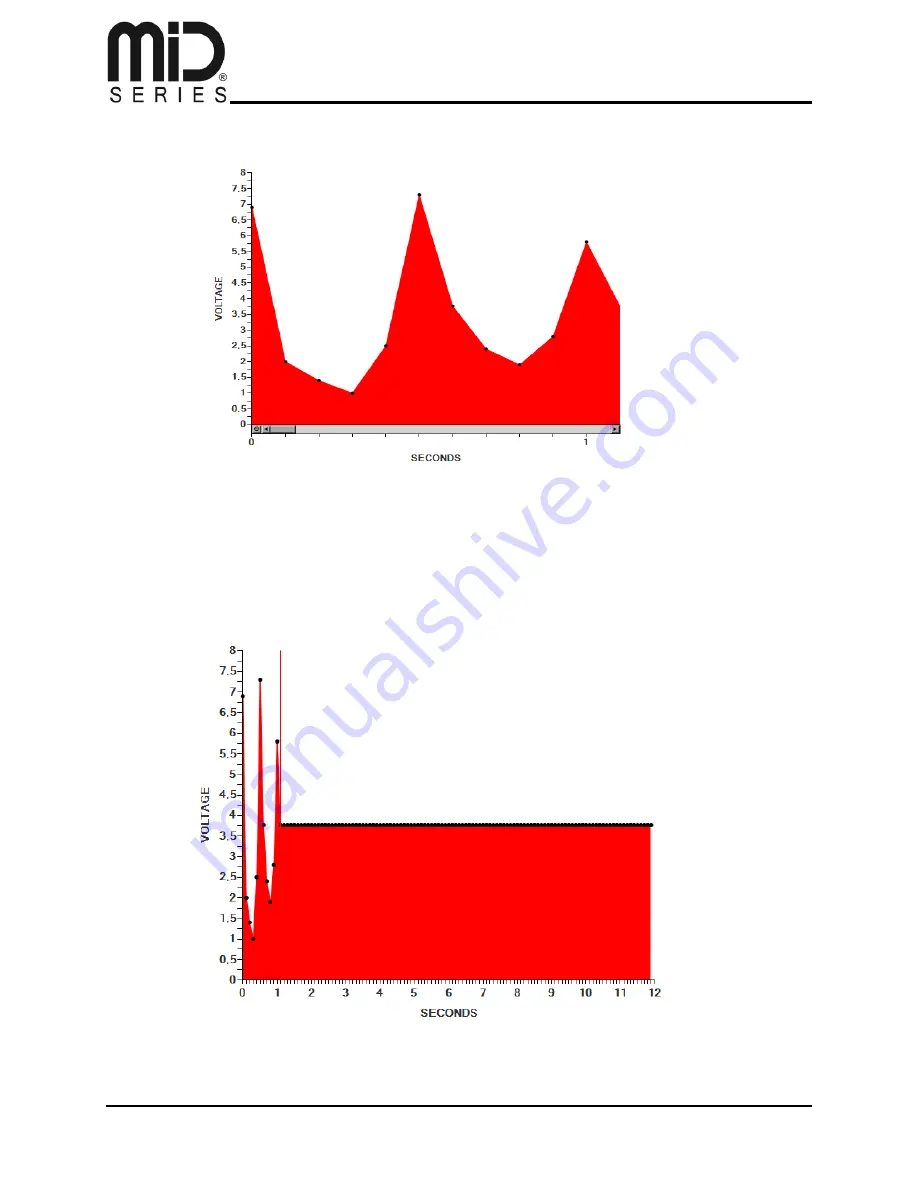
Now, this is all fine 

– for the first second – but if we zoom out, we see that the rest of our profile 

is still quite flat after the first second has passed. 


Содержание MiD One

Страница 1: ...PC APPLICATION USER MANUAL PULL DATA WRITE DATA EXECUTE DATA SHARE DATA CONTROL DATA ...

Страница 2: ......

Страница 3: ... 7 3 PC Application 8 3 1 Logging in and Creating a User 8 3 2 HOME 8 3 3 COMMUNITY 8 3 4 DEVICE 9 3 4 1 Vaping Style 12 3 4 2 Update 13 3 4 3 License Manager 13 3 4 4 State Color 14 3 4 5 Threshold Range 15 3 4 6 Statistics 16 3 5 PROFILE 17 3 5 1 MiD BASE 17 3 5 2 MiD PRO 22 3 6 MONITORING 39 ...

Страница 4: ... 4 PC with windows XP or higher running The next thing you have to do is go to this link www midseries com download And download the newest MiD software for your platform You will be required to register before being able to download this registration also creates a user for you so you can share and download other users vaping profiles on midseries com This user is required since you also have to ...

Страница 5: ... First remove the battery lid on the MiD One by screwing the end cap counter clockwise Next insert the batteries with the pointing towards the joystick on the MiD And screw the end cap back on You are now ready to connect your MiD to the PC software In order to do so insert the USB cable into the MiD take note it only fits one way and you should not have to use force to insert the cable ...

Страница 6: ...l info from your MiD vendor B Community This button leads to the midseries com community in which you will be able to share and download vaping profiles for use on your MiD device as well as partake in the forum in order to exchange ideas and tips for the MiD series C Device You can set the global settings of your MiD device in this section D Profile This is where the magic happens This is where y...

Страница 7: ... the option to activate will of course be usable and you can then go ahead and use the module The reasoning behind this modular method is simple 1 We don t believe all our users will want the same modules 2 We don t believe in making all our users pay for modules they dont need 3 Being modular means our device is future proof we can always invent new modules new ways of using the MiD and offer the...

Страница 8: ... tips about your MiD device and other devices You can scroll through the pages by clicking the left and right arrow 3 3 COMMUNITY The MiD community button will open up the midseries com website this is where you can share the vaping profiles you make as well as download other users vaping profiles for use on your own MiD device You will also be able to partake in our forums and discuss the MiD sug...

Страница 9: ...lso where you activate it Once you open up the page you see the following This screen is divided into left and right On the left side you have information about your MiD serial number owner etc on the right side you have the global settings However on the left side you see a tab called Device If your MiD is not connected via the USB cable then that is all you see ...

Страница 10: ...e following A small tab saying Janty MiD Series shows up Note Depending on what model you buy and if the software has been changed this could read something else but it is still the identifer for your particular device In order to activate your MiD and let the software know you want to program it you have to click this tab ...

Страница 11: ...D you can input your own name here Product Nickname If you have a nickname you use online or if you want to use your initials you can input this yourself Device registered This portion says if your device has been registered or not with midseries com If it has it will say yes if it has not it will say NO and it will then be possible for you to register your MiD device by clicking the Register butt...

Страница 12: ...e that you purchase a module from midseries com in order to use it 3 4 1 Vaping Style This module defines how fast your joystick can be used to boost a profiles settings Low values slow high values fast Lowest value is 0 01 highest value is 1 00 Enter the desired value and press Set Pressing Get will collect the current values from the MiD and display these Enable Disable You can choose to enable ...

Страница 13: ...r update button will then change to a Update firmware button You can click this button to download and install the new firmware Do not disconnect your device or turn off your computer during this process 3 4 3 License Manager The license manager is where you can see which modules you have activated The modules listed will have a checkbox and be either checked or unchecked Unchecked modules are not...

Страница 14: ...he color you want the MiD to display whenever you activate profile programming mode Vaping Style Switching Click the box to set the color you want the MiD to display whenever you activate vaping style switching mode Shut Down Click the box to set the color you want the MiD to display whenever it is shutting down Monitoring Click the box to set the color you want the MiD to display whenever you act...

Страница 15: ...nd a certain limit Or if you know you don t want your MiD to ever go below a certain range Vaping Profile Voltage Range volts Simply drag the slider to select the minimum and maximum values you want the MiD to be able to perform within Vaping Profile Power Range watts Simply drag the slider to select the minimum and maximum values you want the MiD to be able to perform within Click Set to save the...

Страница 16: ...2 14 Page 16 of 41 3 4 6 Statistics The statistics page shows the amount of puffs you have taken on the MiD since you inserted new batteries If you take out your batteries this statistic will be reset One puff everything past a 1 second push on the button ...

Страница 17: ... is where you edit store and shares your profiles In the profile section we will be covering two different ways of using the MiD software MiD BASE and MiD PRO Please read the next section carefully and step by step to benefit the most from this manual 3 5 1 MiD BASE When you first enter the profile page it will look something like this ...

Страница 18: ...en The speed dial monitors your MiD One in real time showing you the value you selected in the bottom right of the screen So if you click voltage you will see the dial show the actual voltage the MiD One is outputting the second you press on the joystick button Below the speed dial we have the Color Selected icon this icon is adjustable by the use of the Adjust Color bar at the bottom of the scree...

Страница 19: ...set this variable by dragging the slider below So if you drag this slider to 4 2 the Atomizer Voltage will show that same value and your MiD One will be working at 4 2 volts when you press the button on the joystick Now all of these values are inactive when you first enter this screen this is due to the software not yet having any data if you are using it for the first time In order to give the so...

Страница 20: ...3 and 4 and the highlighted profile in this case profile 1 also displays its first data on the right side in this case a green LED color and a starting atomizer voltage of 5 58 volts In order to change this profile you can click the Adjust Color bar and set a new LED color as well as drag the Adjust Voltage slider to your preferred setting and once done put a checkmark in the box to the left of th...

Страница 21: ... active profile in use If you wish to activate or change another profile simply highlight that profile and that profile will be the one you are now editing In order to actually switch to using that profile you will have to put a mark in the checkbox and click save In MiD BASE mode you can change and store up to 4 profiles on your MiD One each with a freely chosen LED color and a freely chosen stat...

Страница 22: ...all if you have bought the MiD PRO module you will be able to switch into PRO mode by clicking in the bottom left corner By clicking MiD PRO suddenly portions of the screen changes quite drastically But fear not let s do a breakdown of all the individual elements The grey profile management area stays the same so let s begin with the bottom bar The bottom bar now contains several sections let s qu...

Страница 23: ...ou select what kind of power voltage you want your profile to be edited in 3 5 2 2 Cut Copy Paste Select This is your toolbox for selecting cutting copying and pasting your profile data these work just like you know from text editors 3 5 2 3 Zoom Tools These are your tools for zooming the profile editing area ...

Страница 24: ...ase and decrease are functions to do just that to any selection you make in your profile edit area 3 5 2 5 Figures These are custom figures you can insert into your profile edit area by selecting an area and clicking one of these you will then insert that shape into the profile 3 5 2 6 Colors This is where you pick the color the LED should be for the selection you have made in the profile edit are...

Страница 25: ...a To the right side of the screen you have the gauge area These gauges show the atomizer voltage atomizer power and atomizer current in real time from the second you press the button on the joystick until you let go this is a mini real time monitor which comes in handy when making a profile ...

Страница 26: ...o your currently selected profile Going from bottom to top in the left side you can see voltage from 0 to 8 volts Going from left to right at the bottom you can see your profiles timeline from 0 to 12 seconds When you press the button on your MiD the profile begins reading from left to right Every 1 10th of a second there is a piece of information that the MiD then processes ...

Страница 27: ...l about the MiD PRO editor We do zoom in using the zoom tool in order to explain this a bit clearer And all of a sudden you can see the entire second split up in 10 small black dots Each of these dots represent a value to the MiD As you can see the first dot on the left is in between 3 5 and 4 volt so its value is 3 75 volt ...

Страница 28: ...can see is red This red color represents the LED light Let s start by changing the color of the first second of this profile Since we already have highlighted the first full second all we have to do to change the LED is to click on another color in the color section So let s pick purple What happens now is that the selected portion of the profile immediately changed color to purple while the un se...

Страница 29: ...change to a small round icon indicating it s busy and after a few seconds return to normal Your profile is now saved and active If you push your MiD button now the LED will light up in the colors you selected at the specified locations you put them in You would still be vaping at 3 75 volts though so let s try to change that Now zoomed in at the first full second again let s try to pull some of th...

Страница 30: ...e this Now this profile when the button on the MiD is pressed will run the following voltages over the first second in 1 10th of a second intervals 6 9 2 1 5 1 3 2 4 7 3 4 2 4 2 2 75 5 85 Now this is all fine for the first second but if we zoom out we see that the rest of our profile is still quite flat after the first second has passed ...

Страница 31: ...you want to copy hold down the left mouse button and drag to cover the portion you want to copy And then you could select where you wanted to paste from but by leaving the selection alone the paste function will simply insert at the end of your selection reading from left to right So now just click paste ten times and you will have filled out the entire 12 second timeline with a loop of your origi...

Страница 32: ...uch into detail and you need some inspiration this is where the figures come into the picture Let s try to do some radical and easy changes start by choosing select all This will highlight the entire 12 second timeline Now press the flat line symbol in the figures section And your end result should look like this ...

Страница 33: ...cted try pressing some of the other figures your results should look something like this Underneath these figures you also have a More Options button pressing this button will give you just that more options These new options are simply new figures you can use as you please By clicking one of them you will then be given the option to select how many of these you wish to create For instance clickin...

Страница 34: ...telling the software to create 4 sines in the selected area which will look like this You can also see four choices named sample 1 to sample 4 These boxes are samples we made simply for giving you a starting point in creating profiles If you click on Sample 4 your result ends up looking like this ...

Страница 35: ...ighlighted click and hold the decrease button this is what happens Your entire profile begins sinking This is a very efficient tool for lowering or increasing your profiles as you edit Only the highlighted portion of your profile will be affected It is also possible to insert a figure into another figure Let s say you want a pyramid shape in the middle of this profile you simply highlight the area...

Страница 36: ...s the pyramid shape and as you can see the pyramid is now inserted into the profile Another very cool feature is that you can copy and paste from other profiles as you wish Right now we are in profile 3 still editing with the pyramid area still highlighted as a selection let s try to switch to another profile by simply highlighting it in the profile management area ...

Страница 37: ...ile mark the checkbox and click Delete and that profile will be deleted 3 5 2 10 Share and Explore Other Vaping Profiles Once you find that perfect profile for your favourite atomizer it s time to share it with your friends at midseries com In order to do so you simply mark the checkbox to the left of the profile you want to share and click Export This will bring up a new window asking you to sele...

Страница 38: ...o indicate which profile you are currently on Clicking to the right with the joystick will cycle this choice between R1 and R2 profile and clicking left will cycle this choice between L3 and L4 R1 one blink R2 two blinks L3 three blinks L4 four blinks The idea behind this is actually to not have to remember the amount of blinks but rather which side you put your profile in Instead of having to rem...

Страница 39: ...ou will These dials show from left to right Atomizer Current The current of your atomizer Atomizer Power The watt your atomizer is using Atomizer Voltage The voltage your atomizer is using Underneath the dials are two bars Atomizer Resistance This shows the resistance of your atomizer when being used Battery Voltage This shows the current voltage of your battery At the bottom you have two bars one...

Страница 40: ...grey represents the LED and the color of it Once the MiD is activated the black cross will have a small blue square on it indicating where you are pressing on the joystick at the same time the U shape will light up in the color you have programmed the LED to show when the profile is running So by pressing center on the joystick i am the profile i have made This is being shown visually by the blue ...

Страница 41: ...S0 0E10 0 V1 1 2013 02 14 Page 41 of 41 If I press up or down the blue square will also reflect this and as you can see different LED colors due to my profile having multiple LED colors in it are being shown Pressing Up Pressing Down ...

Отзывы: