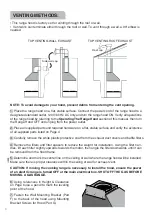
• This range hood is factory set for venting through the roof or wall.
• Vent work can terminate either through the roof or wall. To vent through a wall, a 90° elbow is
needed.
NOTE: To avoid damage to your hood, prevent debris from entering the vent opening.
1. Place the range hood on a flat, stable surface. Connect the power cord of the range hood to a
designated standard outlet, 120V/60Hz, AC only and turn the range hood ON. Verify all operations
of the range hood by referring to the
Operating The Range Hood
section of this manual, then turn
the Range Hood OFF and unplug from the power outlet.
2. Place all supplied parts and required hardware on a flat, stable surface and verify the existence
of all supplied parts listed on Page 4.
3. Carefully remove the white plastic protective coat from the exhaust duct covers and baffle filters.
4. Remove the filters and filter spacers to reduce the weight for installation. Using the filter han-
dles, lift each filter slightly upwards towards the motor, then angle the filter downwards until it can
be removed from the hood frame.
5. Determine and mark the center line on the ceiling or wall where the range hood will be installed.
Make sure there is proper clearance within the ceiling or wall for exhaust vent.
CAUTION: If moving the cooking range is necessary to install the hood, ensure the power
of an electric range is turned OFF at the main electrical box. SHUT OFF THE GAS BEFORE
MOVING A GAS RANGE.
6. Using references in Height & Clearance
on Page 6 use a pencil to mark the leveling
point of the hood.
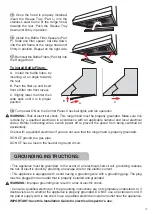
7. Fasten the Wall Mounting Bracket (Part
F) to the back of the hood using Mounting
Bracket Screws for Hood (Part G).
VENTING METHODS:
TOP VENTING ROOF EXHAUST
TOP VENTING WALL EXHAUST
Side wall cap
Roof cap
9

