


28
⇒
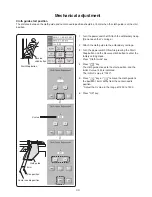
Embroidery foot detecting sensor adjustment
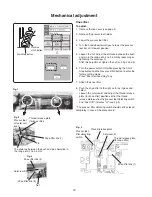
Mechanical adjustment
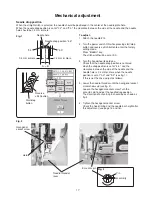
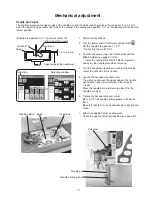
Start/Stop button
Reverse
stitch button
To adjust:
Adjust the presser foot height and embroidery foot height
before this adjustment (see page 26 and 27).
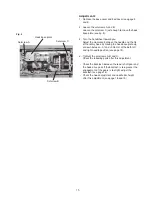
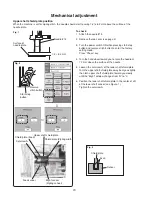
1. Remove the top cover (see page 2).
Remove the setscrews (see fig. 1).
Remove the carrying handle with the carrying handle
base plate.
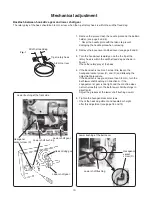
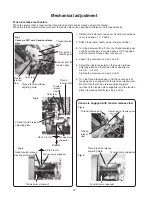
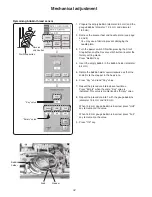
2. Attach the embroidery foot P.
Turn the presser foot pressure dial to "1".
3. Turn the drop feed lever to lower the feed dogs.
Place the 4.2 mm spacer (block) between the presser
foot and the needle plate.
4. Turn the power switch ON while pressing the Start/
Stop button and the Reverse stitch button to enter the
factory setting mode.
Press "Foot Sen/Feed Dog" key.
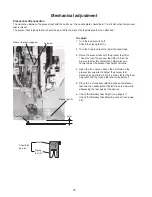
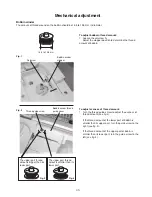
5. Loosen the setscrew C.
Move the printed circuit board G1 slowly left or right
until the P Foot changes from "H" to "L" or "L" to "H".
Tighten the setscrews (see fig.3).
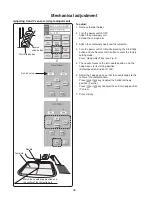
To check:
1. Lower the drop feed dogs.
2. Attach the embroidery foot P.
Turn the presser foot pressure dial to "1".
3. Lower the presser foot lifter.
Turn the handwheel toward you to raise the
embroidery foot P to its highest position (near the
highest needle position).
4. Raise the presser foot lifter, and lower it slowly.
Be sure that "P Foot" changes from "L" to "H".
5. Attach the presser foot A.
Turn the presser foot pressure dial to "7".
6. Raise the presser foot lifter.
Lower the presser foot lifter rapidly.
Be sure that "P Foot" indicates "L".
Embroidery foot
Surface of
needle plate
4.2 mm
Setscrew A
Carrying handle
base plate
Printed circuit board G1
(Embroidery foot detecting sensor)
Setscrew B
Setscrew C
Fig. 1
Fig. 2
Fig. 3
Содержание MC9900
Страница 1: ...SERVICE MANUAL PARTS LIST MC9900...


