background image

11

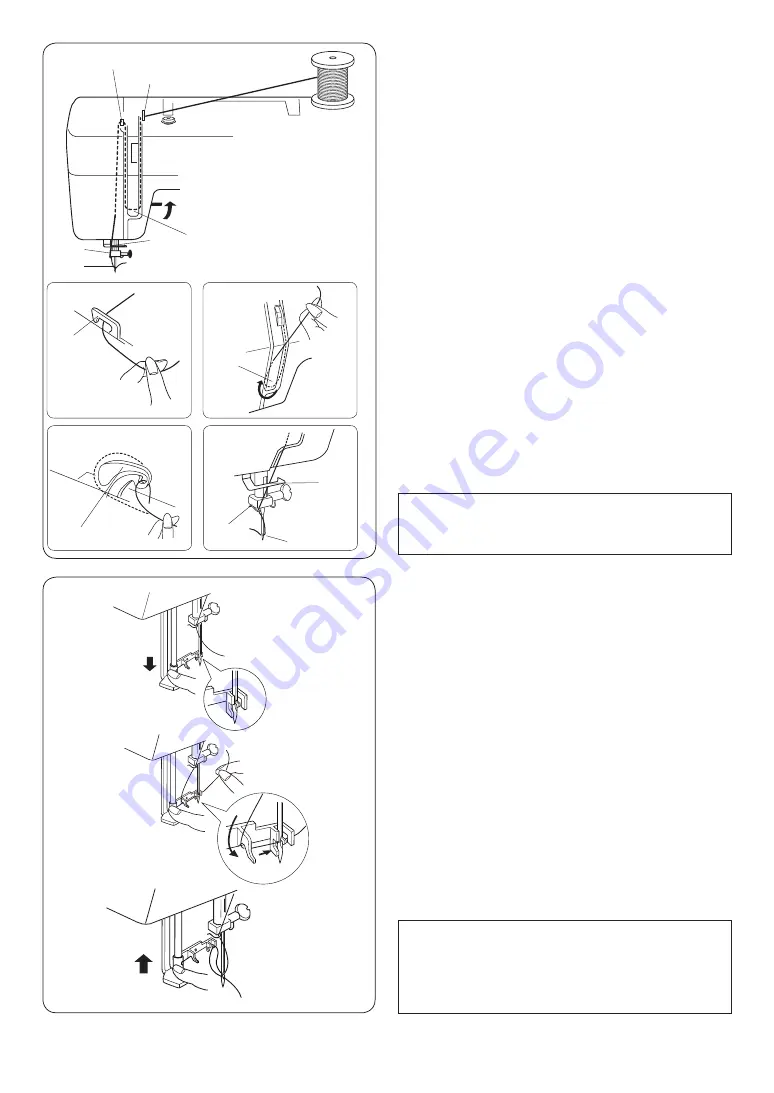
Needle Threader

z

 Raise the needle to its highest position.

    Press down the needle threader knob as far as 

it will go.

    The hook comes out through the needle eye 

from behind.

x

 Pull the thread down around the thread guide 

then pass it from the left and under the hook.

c

 Release the knob slowly while holding the 

thread end with your hand.

    A loop of the thread is pulled up through the 

needle eye.

v

 Remove the loop from the threader and pull 

out the thread end from the needle eye.

NOTE:

The needle threader can be used with a #11/75 

to #16/100 needle or Janome Blue Tipped 

needle.

Thread size 50 to 100 would work well.

z

c

x

z

x

c

b

n

b
n

Threading the Machine

Raise the take-up lever to its highest position by 

turning the handwheel toward you.

Raise the presser foot.

Place a spool on the spool pin as shown, with 

thread coming from back of the spool.

z

 Draw the thread into thread guide using both 

hands.

x

 While holding the thread near spool, draw    

thread down into the tension area and then    

around the check spring holder.

c

 Firmly draw the thread up and through the 

take–up lever from right to left.

v

 Then draw the thread down along the left 

channel.

b

 Slide the thread into needle bar thread guide 

on the left.

n

 Thread the needle eye from front to back.

NOTE:

You may want to cut the thread end with sharp 

scissors for easier needle threading.

v

v

z

x

c v

Содержание HD523

Страница 1: ...INSTRUCTION MANUAL...

Страница 2: ......

Страница 3: ...grasp the plug not the cord 10 Keep fingers away from all moving parts Special care is required around the sewing machine needle and or cutting blade 11 Always use the proper needle plate The wrong pl...

Страница 4: ...ector Dial 13 Stitch Length Dial 13 Stitch Width Dial 14 Reverse Stitch Button 14 Dropping or Raising the Feed Dog 14 BASIC SEWING Straight Stitch Sewing 15 To Change Sewing Direction 15 Seam Guide Li...

Страница 5: ...ace plate Thread cutter Needle threader Needle plate Extension table Lever Presser foot holder Needle clamp screw Needle Presser foot zigzag foot Setscrew Carrying handle Handwheel Ventilation opening...

Страница 6: ...er Buttonhole foot Hemmer foot Zipper foot Satin stitch foot Hemming guide Oil Screwdriver large Screwdriver small Foot control Dust cover q w e t r u y i o 0 1 q w e r t y u i o 0 1 2 3 2 3 The power...

Страница 7: ...the foot control The harder you press on the foot control the faster the machine runs CAUTION Before connecting the power cord make sure the voltage and frequency shown on the machine conform to your...

Страница 8: ...r the groove of the foot holder Lower the foot holder to lock the foot in place w Groove e Pin CAUTION Turn off the power switch when changing the presser foot To Attach and Remove the Foot Holder q S...

Страница 9: ...help you to place heavy fabric under the foot q Lowest position w Normal up position e Highest position e w q Pressure Regulator The Presser foot pressure adjusting dial should be set at 3 for regular...

Страница 10: ...80 100 Synthetic 80 100 9 65 11 75 Blue tip needle Medium Sheeting Jersey Broadcloth Fleece Silk 50 Cotton 50 80 Synthetic 50 80 11 75 14 90 Heavy weight Denim Tweed Coating Quilting Silk 30 50 Cotton...

Страница 11: ...w q e Setting Spool Pins The spool pins are used for holding the spool of thread in order to feed thread to the machine To use pull up the spool pin Push down for storage q Spool w Hole e Tangle Set...

Страница 12: ...nd cut the thread close to the hole in the bobbin b Depress the foot control again When the bobbin is fully wound stop the machine Return the bobbin winder spindle to its original position by moving t...

Страница 13: ...e Thread size 50 to 100 would work well z c x z x c b n b n Threading the Machine Raise the take up lever to its highest position by turning the handwheel toward you Raise the presser foot Place a spo...

Страница 14: ...ppears on the right side top side of the fabric loosen the needle thread tension by moving the dial to a lower number c Needle thread tension is too loose When the needle thread top thread appears on...

Страница 15: ...le selecting a stitch Turn the stitch length dial to set the setting mark with the desired stitch length The higher the number the longer the stitch length q Setting mark Adjust the dial in the 0 5 4...

Страница 16: ...h the lever in the direction of the arrow q x To raise the feed dog push the lever in the direction of the arrow w as illustrated and turn the handwheel e toward you The feed dog must be up for normal...

Страница 17: ...he fabric along the guide line letting the fabric feed by itself x For fastening the end of seams press the reverse stitch lever and sew several reverse stitches Raise the presser foot and remove the...

Страница 18: ...d lower the needle by turning the handwheel counterclockwise Raise the presser foot and turn the fabric to line the edge with the 5 8 1 6 cm seam guide Lower the presser foot and begin stitching in th...

Страница 19: ...ttern selector C w Presser foot Zigzag foot e Thread tension 2 5 r Stitch length 0 5 4 t Stitch width 5 Zigzag Stitching Simple zigzag stitching is widely used for overcasting sewing on buttons etc w...

Страница 20: ...ce after sewing Be careful not to cut the stitches w e q Knit Stitch q Pattern selector F w Presser foot Zigzag foot e Thread tension 1 4 r Stitch length S S t Stitch width 5 This knit stitch is ideal...

Страница 21: ...en constructing items requiring extra strength such as backpacks Straight Stretch q Pattern selector A B w Presser foot Zigzag foot e Thread tension 2 6 r Stitch length S S t Stitch width 0 or 5 w e q...

Страница 22: ...t Stitch width 3 5 Make a test buttonhole on a sample duplicating the fabric interfacing and seams of the actual garment Place the button on the fabric sample and mark the top and bottom to determine...

Страница 23: ...e of the buttonhole Stop the machine when you are directly opposite the fine stitch on the left hand side and raise the needle n Remove the fabric from the machine and cut the sewing threads Insert a...

Страница 24: ...stance of the holes in the button Lower the foot to hold the button in place Check to see if the needle enters into the holes in the button by turning the handwheel by hand Sew about ten 10 stitches T...

Страница 25: ...te zipper tape to fabric and place it under the foot Smooth the threads toward the back and lower the foot To sew the left side of the zipper guide the zipper teeth along the edge of the foot and stit...

Страница 26: ...em guide between the screw and the shank of foot holder Tighten the screw making sure the wall of hem guide is placed in the middle of the toes of the presser foot e Screw r Hem guide c Raise the pres...

Страница 27: ...and 6 cm 2 3 8 long q Wrong side of the fabric w 0 5 cm e 0 8 cm r Curl of the foot x Place the fabric aligning the hem edge with the guide on the foot Lower the foot and sew several stitches while pu...

Страница 28: ...e to just clear the folded edge of the fabric After stitching open the fabric and iron press the tucks flat to one side NOTE Increase the needle thread tension to form prominent tucks DECORATIVE STITC...

Страница 29: ...ded edge on each side q w e q Smocking q Pattern selector D w Presser foot Zigzag foot e Thread tension 1 4 r Stitch length S S t Stitch width 5 With the stitch length at 4 sew straight stitching line...

Страница 30: ...falls along the outer edge of the applique When sewing corners lower the needle down into the fabric Raise the presser foot and pivot the fabric to the right or left Applique q Pattern selector C w P...

Страница 31: ...er with a tear away backing if necessary Stretch Stitch Patterns q Pattern selector A L w Presser foot Zigzag foot e Thread tension 1 4 r Stitch length S S t Stitch width 5 If forward and reverse feed...

Страница 32: ...e by the center pin and fit it carefully back into the shuttle race forming a perfect circle with the shuttle driver Attach the shuttle race ring making sure the bottom pin fits into the notch Lock th...

Страница 33: ...sewn Page 8 Page 8 Page 8 Page 12 Page 15 Page 8 Skipped stitches 1 The needle is incorrectly inserted 2 The needle is bent or blunt 3 The needle and or threads are not suitable for the work being se...

Страница 34: ...32 This page is left intentionally blank...

Страница 35: ......

Страница 36: ...312 XXX XXX PL...

Отзывы: