12
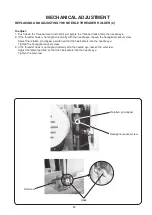
Before proceeding with this adjustment, check the hook timing (see page 11).
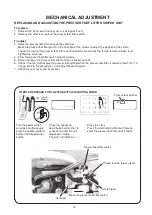
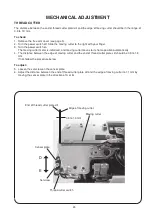
The distance between the upper edge of the needle eye and the tip of the hook should be in the range of 1.6 to 2.0
mm when the tip of the hook timing meets right side of the needle in the left needle position ( ) as the needle
ascends from its lowest position.
1. Remove the setscrews (2 pcs.) on the needle plate, the needle plate and the bobbin holder.
2. Turn the power switch on.
3. Select the pattern (left position). Set the zigzag width at 0.
4. Turn the handwheel toward you until the tip of hook meets the right side of the
needle.
5. Open the face cover.
6. Loosen the hexagonal socket screw.
7. Move the needle bar to adjust the needle bar height, and tighten the hexagonal socket screw.
Be careful not to turn the needle bar.
8. Attach the bobbin holder, needle plate and face cover.
MECHANICAL ADJUSTMENT
ADJUSTMENT OF NEEDLE BAR HEIGHT
Hexagonal socket screw
Needle setting
groove
Hook race (unit)
1.6 to 2.0 mm
Upper edge of the needle hole
Upper surface of hook race
Tip of hook meets the right side of the needle
Left position ( ) (#14)
Bobbin holder
Needle plate
Setscrew
Setscrew
Содержание 5270QDC
Страница 1: ...First Edition 06 March 2020 SERVICE MANUAL PARTS LIST MODEL 5270QDC For Europe only...
Страница 39: ...37 TOUCH PANEL KEY POSITION ADJUSTMENT GUIDE Print this illustration guide to its actual size...
Страница 52: ...50 MODEL 5270QDC PARTS LIST 1 2 3 4 6 5 7 8 9 10 11 12 13 14 17 15 18 19 20 9 21 21 22 23 16...


