Jandy LD Скачать руководство пользователя страница 14

Page 12

WATERPIK TECHNOLOGIES INC.

20. Connect the white wire labeled PS to the pressure

switch and the other white wire to its original

location on the Fireman's switch.

21. Reinstall the drain plugs and tighten securely.

Replace jacket/plug grommets.

22. Install the flue collector assembly. Be sure the

front and rear panels of the flue collector are

installed into the grooves on the front and rear

combustion chamber heat shield panels. Be sure

the sheet metal panels are not pinching any wires.

23. Attach the flue collector hold down clamps to the

clips located under the two center header bolts.

24. Replace the gap closures and tighten the screws

securely.

25. Double-check to make sure the wiring is not

pinched against sharp edges, or resting on the flue

collector assembly.

26. Reinstall rainshield assembly.
27. Replace the top assembly. Make sure the tabs are

outside the heater jacket. Fasten the top assembly

with the hex-head screws.

28. Install plastic tie wraps on wiring in the vestibule

(controls compartment).

29. Install heater door.
30. Reinstall the vent cap or drafthood, if one was

removed.

2G-3. Check Valve Installation

Install a check valve if there is any chance of back-

siphoning when the pump stops. Do not install any other

valve in the piping between the heater outlet and the

pool, unless it is being used as a diverter valve.

2G-4. Chlorinators, Ozone Generators,

and Sanitizing Chemicals

The Waterpik Laars Lite 2 heater is manufac-

tured with materials that are not compatible with high

concentrations of ozone, chlorine, bromine, or other

sanitizing chemicals. Heater damage caused by exces-

sive chemicals or improper ozonization is not covered

by the Waterpik Laars warranty. Be sure to adhere to

the following:
•

When ozone is injected upstream of the heater,

install an offgas mixing chamber, or an ozone

bypass system between the heater and the ozone

injector to prevent ozone and air from entering

the heater.

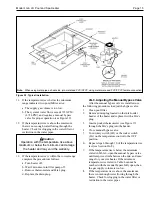
13. Lift the heat exchanger assembly out of the

heater. Reinstall heat exchanger 180 degrees

(inlet/outlet header left) from it's original posi-

tion.

14. After replacing the heat exchanger into the heater,

the end baffles must be replaced.  Each one is

held in place by two screws which mount to the

top of the combustion chamber wall. Reinstall the

baffles on the front and rear of the heat exchanger

before continuing with the "Reversible Water

Connections" procedure.

15. Remove pressure switch retainer (plastic cable

clamp) from the inner panel (allow pressure

switch to float).

16. On U.S. models reroute pressure switch tube and

thermostat bulb assembly through hole in left side

of vestibule cover in reverse order. Canadian

models have no cover on the left side of the

vestibule. Relocate the pressure switch tube and

temperature sensor through the open side of the

vestibule.

17. Reinstall the temperature sensing bulb in the

header, and fasten it with the retainer bracket and

screw.

18. Reinstall the compression fitting at end of pres-

sure switch tube into inlet/outlet header and

tighten the fitting.

19. Route the white wiring from the high limit

switches beside the heat exchanger and down to

the original location following the pressure switch

tubing. Secure white wires to the pressure switch

tube with plastic wire ties.

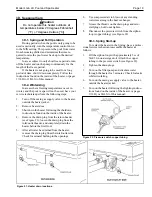
Figure 16.  Heat exchanger and end baffles.

Combustion

Chamber Wall

Heat Exchanger

End Baffles

Heat Exchanger

Содержание LD

Страница 1: ...y damage personal injury or death Do not store or use gasoline or other flammable vapors and liquids in the vicinity of this or any other appliance WHAT TO DO IF YOU SMELL GAS Do not try to light any...

Страница 2: ...9 2G 2 Reversible Water Connections 10 2G 3 Valve Installation 12 2G 4 Chlorinators Ozone Generators and Sanitizing Chemicals 12 2G4a Water Chemistry 13 2G 5 Pressure Relief Valve 13 2G 6 Adjusting t...

Страница 3: ...g with the latest edition of the Standard for Notes 1 In Canada derate BTU Hr input and output 10 percent for altitudes of 2 000 to 4 500 feet 609 to 1372 m above sea level No derating necessary up to...

Страница 4: ...the proper perfor mance and application of Waterpik Laars products For technical support call 415 382 8220 extension 260 SECTION 2 Installation Instructions 2A General Information Install the Laars L...

Страница 5: ...ate leakage If this is not possible provide a suitable drain pan to catch and divert any leakage The pan must not block natural flow of air around the heater Locate the heater so the clearances from c...

Страница 6: ...r at least 3 Figure 4 Non Combustible Platform Notes 1 Blocks must provide solid base and be braced so they cannot slip out of place 2 Air openings in blocks must be arranged to provide unrestricted o...

Страница 7: ...2 Check the rating plate to make sure the heater is fitted for the type of gas being used Waterpik Laars heaters as shipped from the factory are certified to operate at an altitude of 0 to 3000 feet 0...

Страница 8: ...ttention Au moment de l entretien des commandes tiquetez tous les fils avant de les d brancher Des erreurs de c blage peuvent entra ner un fonctionnement inad quat et dangereux 2F 1 General Informatio...

Страница 9: ...gram b Schematic Diagram WIRING SHOWN AS SHALL USE APPLIANCE WIRING MATERIAL RATED AT 200 C O HSI IGNITION WIRE FACTORY WIRED 120 V 240 V FIELD WIRED 120V 240V FACTORY WIRED 24 V IF ORIGINAL WIRE SUPP...

Страница 10: ...de power to the heater from the high voltage side of the time clock Doing so may cause damage to the heater or surrounding plumbing 0 92 7 7 5 5 1 5 0 Y Connection Diagram BK TH PP Y Y W PP TH Pilot G...

Страница 11: ...connected by removing the jumper wire on the terminal block located in the control compartment see Figure 6 and connecting the two wires from the remote to the two terminals on the terminal block This...

Страница 12: ...side It could be necessary or helpful to switch the connections to the left side to improve access for installation and service Perform this modification before installing the heater using the follow...

Страница 13: ...changer 10 Unscrew the brass compression fitting securing the pressure switch to the inlet outlet header Remove tube from header and gently bend it out of the way 11 Loosenthescrewsecuringthetemperatu...

Страница 14: ...ater damage caused by exces sive chemicals or improper ozonization is not covered by the Waterpik Laars warranty Be sure to adhere to thefollowing When ozone is injected upstream of the heater install...

Страница 15: ...The back pressure could be too low to trigger the pressure switch If this happens it may be necessary to install a directional fitting or elbows where the return line enters the pool This will increas...

Страница 16: ...ains off This allows water from the pool to reach the heater 7 Record the temperature indicated by the ther mometer cold water 8 Turn the heater ON following the lighting in structions found on the in...

Страница 17: ...ve thermometer and Pete s plug d Replace the drain plug 2G 9 Adjusting the Manual Bypass Valve After the manual bypass valve is installed use the following procedures to adjust the bypass valve 1 Clea...

Страница 18: ...ts off the top of the heater Blocking air flow could damage the heater and may void the warranty WARNING Vent pipes drafthoods and heater tops get hot These surfaces can cause serious burns Do not tou...

Страница 19: ...to the appliance if service is to be performed 3 Turn gas control knob clockwise to OFF 4 Replace control access panel A This appliance does not have a pilot light It is equipped with an ignition dev...

Страница 20: ...he knob will not push in or turn by hand don t try to repair it Call a qualified service techni cian Force or attempted repair may result in a fire or explosion D Do not use this appliance if any part...

Страница 21: ...only going to be used occasionally turn the temperature control down to the MIN setting This prevents the pool from water from becoming chilled and minimizes the time re quired to raise the pool wate...

Страница 22: ...temperature of 98 6 F 37 C Symptoms include dizziness fainting drowsiness lethargy and an increase in the internal body temperature The effects of hyperthermia include Lack of awareness of impending h...

Страница 23: ...ose or broken wires and terminal connections 2 Verify pressure switch operation by cycling the spa pump on and off a few times The heater should go off immediately after the pump stops 3 Inspect the e...

Страница 24: ...own All 10480000 VENT SYSTEM 59 Top Enclosure 125 400 R0343401 05 60 Top Filler Plate US Only 125 400 R0343701 05 61 Rainshield Kit US Only 125 400 R0318301 05 61 Rainshield Kit Canada Only 125 400 R0...

Страница 25: ...NER TRAY LDSHOWN SEE NEXT PAGE FOR DETAIL 50 51 52 53 54 66 60 59 61 62 65 UNITED STATES CANADA UNITED STATES CANADA UNITED STATES 82 82 85 85 101 102 103 104 105 106 107 108 HEAT EXCHANGER SEE NEXT P...

Страница 26: ...6 14 8 5 2 1 4 34 16 18 70 98 96 97 75 72 75 74 38 32 95 86 85 49 48 69 47 44 45 80 77 79 78 81 90 93 88 94 91 39 30 31 43 76 87 23 22 36 28 34 26 33 25 LD SHOWN 29 27 35 3 12 LG SHOWN 19 24 13 20 LG...

Страница 27: ...Model LG LD Pool and Spa Heater Page 25 NOTES...

Страница 28: ...thorized parts or accessories in conjunction with the product s 8 Chemical contamination of combustion air or improper use of sanitizing chemicals such as introducing sanitizing chemicals upstream of...

Отзывы: