IS295-21C J&D Manufacturing • 6200 Hwy 12 • Eau Claire, WI 54701 • 1-800-998-2398 • www.jdmfg.com
Page 2/13
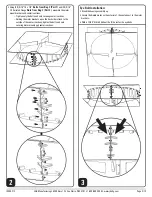
Venturi Assembly:
• Lay out the (4) venturi sections flat on the floor with the curve side of
the sections facing up.
• Assemble the motor mount brackets (flat side down) in-between each
venturi section.
1
Bag 1 (Tools)
- #3 Phillips Bit
- 1/16” Hex Wrench
Bag 2 (Housing)
Bag 2 (Part 1)
- (28) 5/16”-18 x 7/8” Bolts
Bag 2 (Part 2)
- (28) 5/16”-18 Serrated Flange Nuts
Bag 2 (Part 3)
- (24) #14-10 x 2” Screws (Use
#3 Phillips Bit from Bag 1
)
Bag 3 (Motor)
- (8) 3/8”-16 x 3/4“ Bolts
- (8) 3/8” Washers
Bag 9 (Misc. Hardware)
- (2) SS Eyebolts
- (4) SS Serrated Flange Nuts #10-24
- (1) 1/4” x 2” Machine Key
- (4) SS Damper Door Striker Plates
- (4) Damper Door Magnets
- (4) 1/2” OD 1/8” ID Nylon Spacers
- (2) SS Damper Door Springs
- (1) Front Guard Plate Hub w/Hardware
- (4) 11” Cable Ties
Bag 6 (Cone Guard)
- (8) 5/16”-18 x 1” Bolts
- (8) 5/16”-18 Serrated Flange Nuts
Bag 7 (Mounting Screws)
- (4) #12-11 x 3½” Screws (Use
#3 Phillips Bit from Bag 1
)
Bag 8 (Motor Guard)
- (10) #12-11 x 5/8” Screws (Use
#3 Phillips Bit from Bag 1
)
Bag 5 (Cone)
Bag 5 (Part 1)
- (50) #14-10 x 2” Screws (Use
#3 Phillips Bit from Bag 1
)
Bag 5 (Part 2)
- (50) 5/16”-18 x 7/8” Bolts
Bag 5 (Part 3)
- (50) 5/16”-18 Serrated Flange Nuts
Bag 4 (Damper Doors)
- (5) #4-40 x 3/4” Screw
- (5) #4-40 Lock Nuts
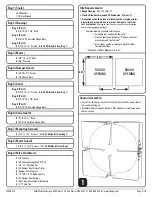
Site Requirements:
•
Rough Opening
- 65¼” W x 65¼”H
•
Side-By-Side Recommended OC Dimension
- Minimum 75”
• Precautions should be taken in locations that receive winter
precipitation accumulation to prevent damage to fans from
roof avalanches.
Damage to fans from ice, snow, or any other falling
debris is not covered by warranty.
Common industry standard solutions are
> Extending roof eve beyond fan cone
*
> Create a shelter a minimum of 6” above cone that
extends beyond the fan cone
*
> Install snow guards according to manufacturers
recommendations
*
The depth of J&D’s Magnum fan is 57”
65¼”
65¼”
ROUGH
OPENING
75”
ROUGH
OPENING


