


16
17
A more detailed review of setting trim controls
A simple analogy for trim and headroom
Let’s think of music as a person bouncing up and down on a trampoline. They can bounce a small amount or a large
amount. This is “dynamics.” Sometimes we bounce low, sometimes high. Most musicians are always changing the
“bounce” because most songs have both soft parts and loud parts.
Now let’s move that trampoline into a room with a ceiling. Ever heard of the term “headroom?” Well, headroom is the
distance between our head and the ceiling in our trampoline room. The ceiling isn’t moving, but we can raise and lower
the trampoline to give us more headroom, right? If our music is not very dynamic, that is our bounces are small, we
need less headroom. If some of our bounces are big, we’d better make sure the trampoline is far enough below the
ceiling that when we bounce hard we don’t hit our head and run out of headroom.
So how do we move the trampoline up or down? With the “trim” control. The trim control sets the trampoline higher or
lower. We can see how close we are getting to the ceiling by watching the LEDs: green = ok, yellow/orange = getting
close, red = bumping our heads.
Clipping
is the term engineers use to describe when the amp is out of room (when our heads are bumping on the
ceiling). It describes what’s happening to the electrical signal. Our ears perceive clipping when we hear a sound that
has been distorted or compressed. With a guitar, distortion can sound good, but with vocals it usually does not sound good.
Signal to noise
is the ratio of good stuff to bad stuff in your system. Signal is music. Noise is stuff you don’t want. If
we don’t get the trim set right, then the electronics noise that is in the atmosphere will start to be as loud as the music.
Think of the noise as the floor in our trampoline room. We want to be as far off the floor as possible, so we can really
bounce high. If the trampoline is too close to the floor, we’ll limit the power in our jumps because our feet will
hit the floor.
When setting up your trim levels,
there are a few things to keep in mind. First, leave plenty of headroom so that as
you get going you won’t get distortion from the system. Ideally, when you set the trim control, you should be playing at
the loudest volume. For example, a singer should not whisper in the mic to set the trim control, but sing as loud as
possible. If they whisper, they will set the trim (trampoline height) too high and run out of headroom the first time they
yell “HEY”. Conversely, if they yell too loudly in the mic, the trim control will be set too low. Then when our singer
whispers, we won’t hear her above the rest of the instruments.
If you’re setting the trim for an instrument, leave room for solos. Your solo volume should be solid green with a little
yellow in the LED. Then turn yourself down a bit with your device’s foot pedal or a volume control. That will leave room
for you to jump to the top of the mix when it’s time for a solo.
For a vocal mic, you can simply move away from the mic, or “back off” the mic, to lower the volume. You see the pros
do this all the time. It’s a great technique to know and is easy to learn, especially with a JamHub silent rehearsal studio.
We hope this section helped with the mystery of setting trim control. Over the years we’ve heard some crazy things about
trim controls like, “always set it to 9:00” or “keep it as low as possible” or “set all trims the same” and worse. The truth
is, there is no “magic setting.” Every mic, instrument and piece of gear is different and needs its own unique setting. And
even if your band has the exact same mic for two singers, their individual voices are different. So they’ll need their own
unique trim settings. Just follow the LED’s guidance, watch the trim levels throughout the jam and you will be fine.
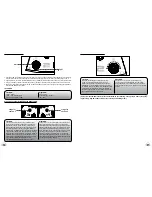
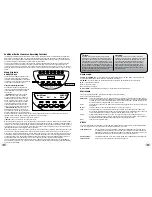
Additional GreenRoom and TourBus Features: Phantom Power
The GreenRoom and TourBus models both p48V phantom power for condenser mics. To turn it on, simply push
the button found on the back of the unit and the red +48V LED will illuminate red. You may hear a little static as it turns
on. This is normal and will go away after a second. What if only one person uses a condenser mic? No problem. Phan-
tom power is for condenser mics, yet won’t damage dynamic mics. Check out the Wikipedia article on how phantom
power works if you want to learn more: http://en.wikipedia.org/wiki/Phantom_power.
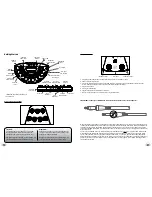
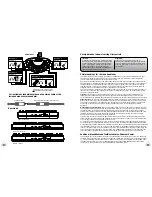
For instrument connections please use a stereo cable or the
included mono-to-stereo adapter.
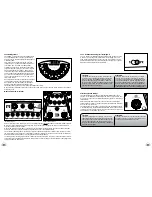
Left Brain:
As with other equipment (mixers, recording interfaces,
some old tube amps, etc.) getting the trim right matters.
So we’ve simplified things by using a familiar structure:
green = signal, yellow = warning, red = clipping. We
believe it’s important for you to understand gain
structure completely so read below. It’s applicable to
nearly every piece of music gear you’ll own.
Right Brain:
Read below, this is just good stuff to know for
recording, live sound and getting great sound into and
out of your JamHub silent rehearsal studio. When in
doubt, red means stop (or turn down in the case of
the JamHub
®
).
JamHub
®
BedRoom
JamHub
®
GreenRoom
JamHub
®
TourBus
Stereo Adapter
Mono Cable (acoustic guitar, mono bass, etc.)
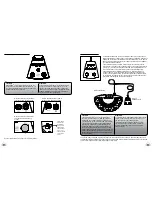
Musician
#
1
Section
#
1
Musician
#
2
Section
#
2
Musician
#
3
Sections
#
4 +
#
5
Musician
#
4
Section
#
6
4 musicians
Note: this musician is playing guitar
and keyboard and uses two sections
Rear views


