6
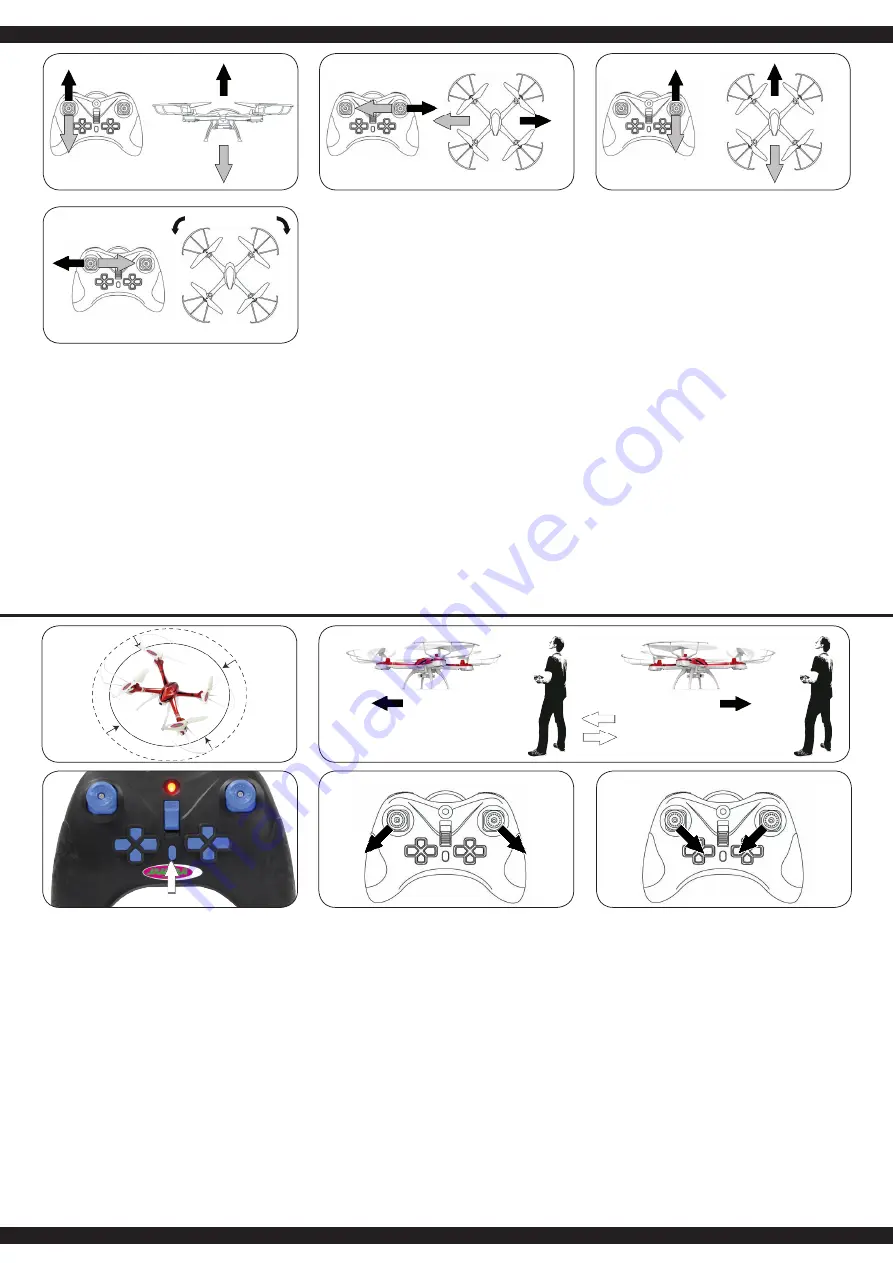
DE - Flugübungen
Bevor Sie mit dem Model fliegen informieren Sie sich zuerst über
seine Steuerfunktionen und führen einige Übungen durch.
Platzieren Sie das Model mit der Hinterseite zu Ihnen zeigend
(schwarz) auf einer ebenen Fläche. Üben Sie zuerst den Schwe-
beflug mit dem Gasknüppel zu kontrollieren. Anschließend ver
-
suchen Sie die Position des Models mit Hilfe des rechten Steu-
erknüppels zu verändern (vorwärts, rückwärts und seitwärts)
und gegebenenfalls abzufangen. Zuletzt sollten Sie das Drehen
des Models um die eigene Achse mit dem linken Steuerknüppel
üben. Wenn Sie die Grundfunktionen des Models beherrschen
können Sie sich an Ihren ersten kontrollierten Flug machen.
GB - Practice simulation flight
Before flying with the model check first about its control functions
and perform some exercises. Place the model with the back fa-
cing to you (black) on a flat surface. Practice only to hover with
the throttle control. Then, you try to change the position of the
model using the right stick (forward, backward, sideways) and
possibly correct the flight. At last, you should practice turning the
model around its own axis with the left stick. If you are into the
basic functions of the model you can perform your first controlled
flight.
FR - Voler dans la pratique
Avant de faire voler le modèle, informez vous de toutes ses fon-
ctions de contrôle et faîtes quelques essais. Placez le modèle
sur une surface platte, placez vous derrière le modèle (noir).
Essayez de le faire planer avec la manette des gaz. Ensuite
essayez de changer la position du modèle à l’aide de la manet-
te droite (marche avant, marche arrière, sur les cotés). Si vous
contrôlez toutes les fonctions de base du modèle vous pouvez
faire les premiers vols.
IT - La pratica
Prima di volare il modello, consigliamo fare conoscenza con tutte
le funzioni di controllo e di effettuare i primi voli di test. Posiziona-
re il modello su una superficie piatta, davanti al pilota. Le eliche
del modello devono essere in posizione posteriore. Per primo,
provare ad alzare il modello in volo, e tenerlo “fermo” in volo.
Poi provare a cambiare la posizione del modello utilizzando la
levetta destra (per farlo andare in avanti/indietro e destra/sinist-
ra). Appena imparato le funzioni di base, procedere ad effettuare
i primi voli.
ES - Volando en la práctica
Antes de volar con el modelo, se recomienda conocer todas la
funciones de control y hacer el primero vuelo de prueba. Posi-
cionar el modelo en una superficie plana, en frente del pilota
(negro). Las palas del modelo deben estar en la posición trasera.
En primo lugar, pruebe a despegar el modelo en vuelo, y tener
fijo en el vuelo. A continuación, intente a cambiar la posición del
modelo usando la palanca derecha (para que vas hacia ade-
lante/atrás y izquierda/derecha). Cuando se ha aprendido las
funciones básico, proceda con los primero vuelos.
DE
1. Kombination von Gas, Gieren, Roll und Nick
Nach dem Sie sich mit den verschiedenen Steuermethoden
des Models vertraut gemacht haben versuchen Sie nun die
verschiedenen Steuerungen zu kombinieren.
2.
Ändern der Flugperspektive
Nach dem Sie das Fliegen des Models von der Sicht von
hinten auf das Model beherrschen ist es an der Zeit den Flug
aus der seitlich vom Model stehenden Position und von der
vom Model zugewandten Seite aus zu üben. Denken Sie
daran, dass Sie zum Teil invertiert (umgekehrt) steuern
müssen.
3. Lande/Startassistent:
Wenn Sie die Taste im Stand drücken hebt das Modell
automatisch ab bzw. reduziert im Flug automatisch soweit die
Höhe bis es aufsetzt und zum Stillstand kommt. Während-
dessen muss das Modell weiterhin gesteuert werden. Der
Assistent übernimmt nur die Höhenkontrolle.
4. Notstop:
Wenn Sie während die Motoren laufen beide Steuerknüppel
nach unten außen oder nach unten innen richten stoppen die
Motoren ohne Verzögerung. Vermeiden Sie Flugmanöver die
diese Knüppelstellung enthalten da das Modell sonst
unweigerlich abstürzen wird!
GB
1. Combination of gas, rudder, roll and pitch
After you are into the different control methods of the model
now you can try to combine the various controls.
2. Change of flight perspective
After you master the flying of the model of the view from the
rear of the model it is time to practice the flight from the side of
the model and from facing towards to the model. Remember,
you need to invert the controls (vice versa).
3. Land/ Start Assistant
If you press the button while the model is standing it will
autmatically take off or automatically reduced the altitude
during flight until it touches down and will then come to a
standstill. You will have to continue stearing the model. The
assistant only takes control of the height.
4. Emergency stop
If you press both control sticks down and to the outside or
downwards and inside while the motors are running they will
stop without delay. Avoid maneuvers with the mentioned stick
positions during flight because the model will otherwise crash!
FR
1. Combinaison entre le gaz, le trim, le roulement et le nick
Si vous contrôlez toutes les différentes fonctions de contrôle,
vous pouvez combiner plusieurs fonctions entre-elles.
2. Changement de la perspective du vol
Après avoir fait des essais de vol en voyant le modèle de
l’arrière, il est maintenant temps de s’exercer en ayant le
modèle sur le coté. Pensez, qu’il faut commander le modèle à
l’inverse.
3. Atterrissage et décollage automatique
Si le modèle est au repos et que vous appuyez cette touche,
le drone décolle automatiquement. Si vous appuyez cette
touche en plein vol, l’altitude se réduira automatiquement
jusqu’à ce que le modèle atterrisse tout seul. Pendant ce
processus, vous pouvez toutefois contrôler la direction
4. Arrêt d’urgence
Si vous appuyez les deux leviers vers l’intérieur-bas ou vers
l’extérieur-bas pendant que les moteurs tournent, ces
derniers s’arrêtent systématiquement. Evitez tout manœuvre
pouvant amener les leviers dans cette position afin d’éviter
une chute libre du modèle.
forward
forward
1
2
3
4


