background image

88

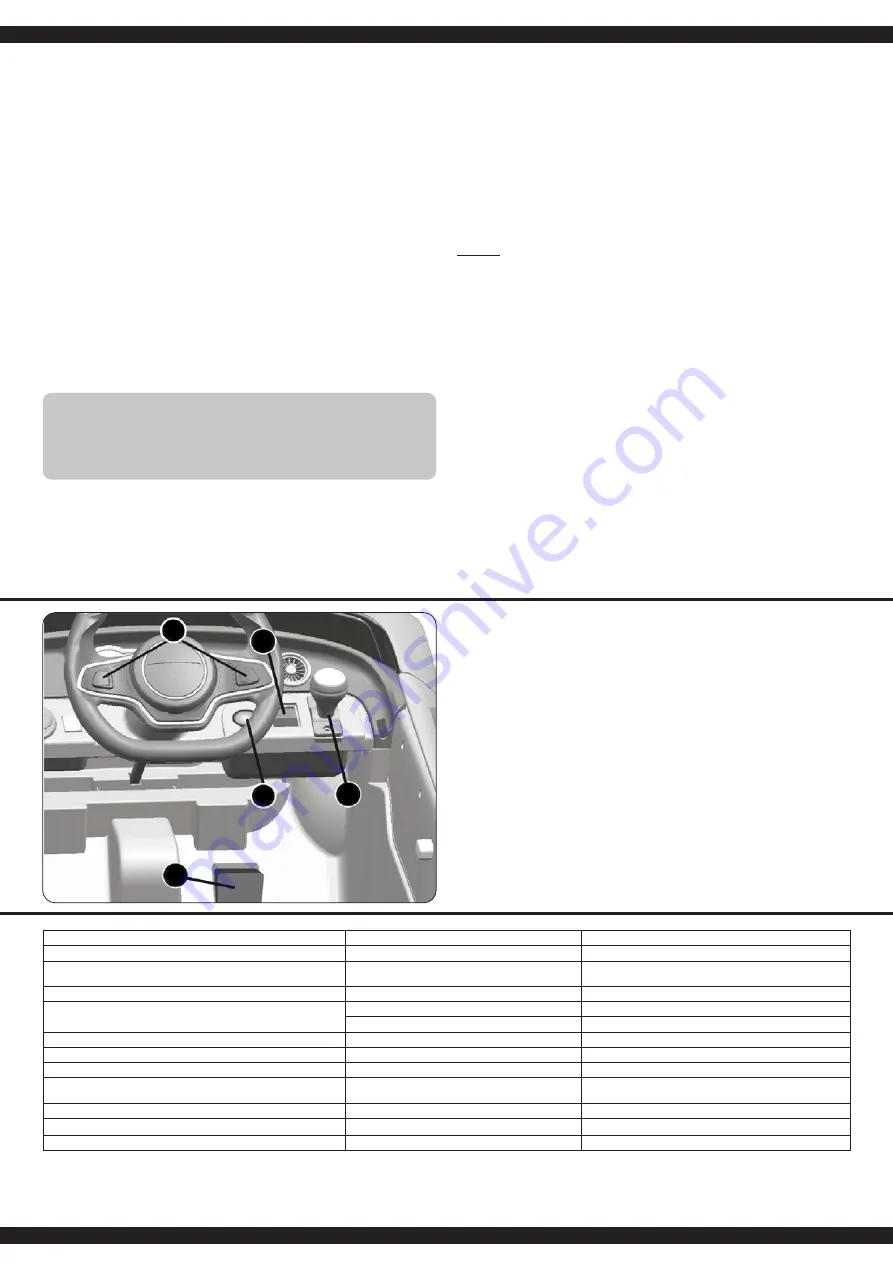
Functions

1   ON/Off switch


With the ON/OFF switch you start the vehicle.

2   Shift Lever


Forward: 

Press the “Forward-backward switch” on the “Forward” position.


Press the “Foot pedal”, the model drives forward.


Reverse:  

Press the “Forward-backward switch” on the “Backward” position.


Press the “Foot pedal”, the model drives backward.


IMPORTANT!   Always stop vehicle when changing the direction to avoid damage the


gears and motor.

3   Sounds buttons

4   Speed


High speed 

- Fast speed


Low speed  

- Slow speed

5   Foot pedal 


To move the car, press the pedal down.


To brake or slow down, release pressure from the pedal.

GB

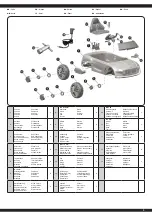
1.  Assembly of the rear wheels

  Place the body with the underside facing up. Place the gearbox (2) on the rear axle. Now attach 

  a drive wheel (3) to the gear unit. Slide a washer (6) onto the rear axle. Fix the whole thing with 

  a lock nut (9). Tighten the nut with a spanner. Finally, put a cover (10) on the wheel. Repeat this 

  on the other side.

2.  Assembly of the front wheels

  To mount the front wheels, slide a washer (6) onto the front axle. Attach a wheel (4) including 

  bearing bush (5) and slide a washer (6) onto the axle. Fix the whole thing with a lock nut (9). 

  Tighten the nut with a spanner. Finally, attach a cover (10). Repeat the steps to mount the other 

  wheel.

3.  Gearbox connection

  Pay attention to the installation direction when installing the gear units (L = left, R = right), 

  connect the gearbox connections to the connections in the model. The choice of connection 

  has no effect on the direction of rotation of the gear units. Only connect connectors that fit into 

  each other. 

  Battery connection

  Connect all connectors as shown. Only plug matching connectors into eachother and be sure 

  not to reverse the polarity. Make sure the red wire is well connected with the red terminal on the 

  battery, and same as the black one.

4.  Steering wheel assembly

  Open the battery cover. Put 2 AA batteries making sure that it is corectly put in. Then close the 

  cover. Install the steering wheel (14) in the Intended position and secure it with the Safety pin 

  (15) and nut (16)


  Battery warning:


Non-rechargeable batteries are not to be recharged!

  Do not open! Do not dispose of in fire! Do not mix old and new batteries!

  Do not mix alkaline batteries, standard (carbon-zinc) or rechargeable batteries!

  Rechargeable batteries are to be removed from the toy before being charged!

  Rechargeable batteries are only to be charged under adult supervision!

  The supply terminals are not to be short-circuited!

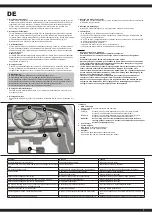
5.  Attach the Motor Hood

  Fit the Motor hood (7) on the motor. Tighten four screws (8) to secure it. Reapeat the abouve 

  for the other motor hood.

6.  Attach Seat

  Position the seat (12) over the vehicle body. Tighten two screws (11) with a screwdriver.

7.  Attach the Windshield

  Insert the tabs on the windshield (17) in the slots on the vehicle body, push until you hear it click 

  into place.

8.  Attach the view mirrors

  Install wing mirror (13) to the designated position, and fasten it.

9.  Charging Your Vehicle


  The power swich must be turned in OFF position when charging.


  Insert the charger (16) into the socket - the LED lights up green. Connect the charger to 

    the charging socket on the dashboard.


  The LED on your charger lights up red as long as the battery is being charged. If the LED 

    lights green again, the battery is fully charged.


  The charge time is 10 hours.  


  Do not charge the battery more than once within 24 hours.


  Charger and battery heat up during the charging process.

Attention!

•  The charger is not a toy. Only use the charger supplied.

•  The battery may only be charged by or under the supervision of an adult.

•  The terminals must not be short-circuited.

•  The charger must be checked regularly for damage to the cable, plug, housing and other 

  parts. If any damage is found, the charger must not be used until the damage has been 

 repaired.

•  Let the model cool ovv sufficiently after each use before putting it back into operation.

  When using an additional batteries let it cool off for minimum 15 minutes until the model 

  is operated again. Overheating can damage the electronics or may result in fire. 

•  Always disconnect the battery from the charger immediately after charging. Always 

  disconnect the charger from the power supply immediately after disconnecting the    

  battery. Inserting the rechargeable battery or charger after charging will result in 

  damage to the battery, charger or the power supply (fire hazard).

•  Use the charger only in dry rooms.

1

2

3

4

5

Problem

Source

Solution

The battery can no longer be charged

Carger or battery defective.

Check charger and battery

The battery can no longer be charged although the battery and charger 

are OK.

Charging socket defective

Check or replace the charging socket.

The journey time is very short.

The battery has been deep discharged or is worn out.

Use a new battery and avoid deep discharge.

No function

Battery is not or incorrectly connected.

Connect the battery (see instructions)

ON/OFF switch defective.

Check or replace switch.

Can be switched on but does not drive.

Motor cable incorrectly connected or not connected.

Check and connect motor cable (see instructions).

Can be switched on but does notmove, or only direction.

Gas or direction switch defective.

Check or replace switch.

Can be switched on but only travels in one direction

Directional switch defective.

Check or replace switch.

The active fuse blows and switches the unit off for a few seconds. You will 

hear a single click at the beginning

Oberload or electrical short circuit.

Do not overload or have the until checked.

No sound function on the steering wheel/andlebar

Battery is dead.

Replace battery.

Vehicle has very high wear on switches.

Dirt and moisture damage the switches.

Do not drive in moisture or dirt such as meadows, gavel, sand, etc.

The rubber tyres come loose on the wheels

Ridden on too hot a surface or in dirt.

Change tyres and avoid hot surfaces and dirt.

Содержание Bentley EXP12

Страница 1: ...a věku a vývoji může být vyžadován minimální věk 4 let Maximální hmotnost 30 kg Před montáží Montáž může provádět pouze dospělá osoba Během montáže není povoleno aby se děti pohybovaly poblíž hračky K montáži jsou vyžadovány následující nástroje nejsou součástí dodávky Křížový šroubovák a kleště DE Allgemeine Hinweise JAMARA e K übernimmt keine Haftung für Schäden die an dem Produkt selbst oder du...

Страница 2: ...digheden Afhankelijk van leeftijd en ontwikkeling is de minimale leeftijd voor het spelen met dit speelgoed 4 jaar Max gewicht 30 kg Vóór de installatie De installatie mag enkel door een volwassene worden uitgevoerd Tijdens de installatie mogen de kinderen niet in de buurt van het speelgoed verblijven Het bij de installatie vereiste gereedschap niet meegeleverd Kruiskopschroevendraaier SK Vhodné p...

Страница 3: ... Niemals ohne Schuhe fahren Niemals bei Dunkelheit fahren Mit Schutzausrüstung zu benutzen Hände Haare lose Kleidung und Gegenstände von drehenden Teile entfernt halten Das Modell nicht in Räumen oder Hallen mit hoher Luftfeuchtigkeit z B Garagen im Regen oder auf nassen Flächen betreiben es besteht die Gefahr von Fehlfunktionen oder Schäden an Elektronik und Gehäuse Das Modell ist nicht wasserdic...

Страница 4: ...und seiner Steuerung vertraut Das Modell hat ein hohes Eigengewicht Dadurch besteht ein erhöhtes Schadens und Verletzungsrisiko im Falle eines Kontrollverlustes Vermeiden Sie jegliche absichtliche oder unabsichtliche Art von Kollision oder Zusammenstößen mit Gegenständen oder die Gefährdung von Personen GB Only use in direct supervision of an adult To control the vehicle a minimum skill level and ...

Страница 5: ...edné sklo 1 4 Vorderrad Front wheel Roue avant Ruote anteriori Ruedas delanteras Přední kolo Koło przednie Voorwiel Predné koleso 2 11 M5 x 16 mm Zylinderschraube MMachine screw Vis à machine Macchina a vite Máquina tornillo Šroub válcovou hlavou Śruba z łbem cylindry cznym Machine schroef Skrutka valcovou hlavou 2 18 Schraubenschlüssel Spanner Clé plate Chiave inglese Llave inglesa Plochý klíč Kl...

Страница 6: ...izzare solo con caricatore 12V 500mAh Cod 413380 Usar solo con cargador 12V 500mAh Ref 413380 Používejte pouze s nabíječkou 12V 500mAh Číslo položky 413380 Tylko z ładowarką 12V 500mAh poz 413380 stosowanie Alleen met oplader 12V 500mAh artikelnr 413380 gebruiken Len s nabíjačkou 12V 500mAhh položka č 413380 použitie 7 9 8 2 3 6 6 6 9 9 10 4 5 10 14 14 15 16 8 12 11 7 17 13 ...

Страница 7: ...fest 7 Montage der Windschutzscheibe Bringen Sie die Windschutzscheibe 17 in die vorgesehene Position Drücken Sie die Zapfen in die Nuten bis sie einrastet 8 Montage der Rückspiegel Drücken Sie die Rückspiegel 13 in die vorgesehene Position bis sie einrasten 9 Ladevorgang Das Fahrzeug muss während dem Laden ausgeschaltet sein Stecken Sie das Ladegerät 4 in die Steckdose die LED leuchtet grün Schli...

Страница 8: ...ck into place 8 Attach the view mirrors Install wing mirror 13 to the designated position and fasten it 9 Charging Your Vehicle The power swich must be turned in OFF position when charging Insert the charger 16 into the socket the LED lights up green Connect the charger to the charging socket on the dashboard The LED on your charger lights up red as long as the battery is being charged If the LED ...

Страница 9: ...ixent 9 Charge de la voiture Il faut absolument que la voiture soit éteinte pour effectuer la charge Insérez le chargeur 16 dans la prise la LED s allume en vert Branchez le chargeur à la prise de charge située sur le tableau de bord La LED de votre chargeur s allume en rouge tant que la batterie est en charge Si la LED s allume à nouveau en vert la batterie est complètement chargée Le temps de ch...

Страница 10: ...ovisore Inserire il specchietto retrovisore 13 nella posizione prevista e fissano 9 Carica del veicolo Il veicolo deve essere spento mentre si carica Inserire il caricabatterie 16 nella presa il LED si illumina di verde Collegare il caricabatterie alla presa di ricarica sul cruscotto Il LED del caricabatterie si illumina di rosso finché la batteria è in carica Se il LED si illumina di nuovo verde ...

Страница 11: ...e el espejo retrovisor 13 en la posición deseada y lo arreglan 9 Carge del vehículo El vehículo debe estar apagado durante la carga Inserte el cargador 16 en el enchufe el LED se ilumina en verde Conecte el cargador a la toma de carga del salpicadero El LED de su cargador se ilumina en rojo mientras la batería se está cargando Si el LED se enciende de nuevo en verde la batería está completamente c...

Страница 12: ...cátka 13 do požadované polohy dokud nezaklapnou na místo 9 Nabíjení Vozidlo musí být během nabíjení vypnuto Vložte nabíječku do zásuvky 16 LED se rozsvítí zeleně Připojte nabíječku k nabíjecí zásuvka LED dioda na nabíječce se rozsvítí červeně dokud se nabíjí baterie Pokud LED svítí znovu zeleně baterie je plně nabitá Doba nabíjení je od 10 hodin Nenabíjejte akumulátor více než jednou za 24 hodin N...

Страница 13: ...steczn 13 na wymaganej pozycji Wcikać czopy do momentu aż zablokują się w rowkach 9 Nabíjení Vozidlo musí být během nabíjení vypnuto Vložte nabíječku do zásuvky LED se rozsvítí zeleně Připojte nabíječku k nabíjecí zásuvka LED dioda na nabíječce se rozsvítí červeně dokud se nabíjí baterie Pokud LED svítí znovu zeleně baterie je plně nabitá Doba nabíjení je od 10 hodin Nenabíjejte akumulátor více ne...

Страница 14: ...eruitkijkspiegels Schuif de achteruitkijkspiegels 13 in de gewenste stand totdat ze op hun plaats klikken 9 Laden Tijdens het laden moet het voertuig zijn uitgeschakeld Steek de lader in het stopcontact de LED brandt groen Sluit de lader aan op de laadaa insluiting De LED op uw lader brandt rood zolang de batterij wordt opgeladen Wanneer de LED is weer groen de batterij is volledig opgeladen De op...

Страница 15: ...do požadovanej polohy kým nezaklapnú v drážkach 9 Nabíjení Počas nabíjania vozidlo malo by byť vypnuté Vložte nabíjačku do zásuvky kontrolka sa rozsvieti na zeleno Pripojte nabíjačku k pripojte nabíjačku do nabíjacej zásuvky Indikátor LED na nabíjačke bude svietiť na červeno počas celého času nabíjania batérie Ak sa kontrolka LED opäť rozsvieti na zeleno batéria je je plne nabitá Čas nabíjania je ...

Страница 16: ...ostre FAQ all indirizzo ES Puede encontrar más soluciones a los problemas en Internet en nuestras preguntas frecuentes en CZ Další řešení problémů na internetu najdete v našich často kladených dotazech na adrese PL Więcej informacji na temat rozwiązywania problemów w Internecie można znaleźć w naszym dziale FAQ na stronie NL Meer oplossingen voor problemen op het internet vindt u in onze FAQ op SK...

Страница 17: ...voltios Después de su uso la batería intacta debe cargarse completamente inmediatamente después de una fase de enfriamiento de un mínimo de 10 minutos y un máximo de 12 horas para evitar una descarga profunda posterior debido a la autodescarga Si la batería no se utiliza o almacena durante un largo período de tiempo su tensión mín 6 2 voltios debe comprobarse o si están dañadas al menos cada 3 mes...

Страница 18: ...de vitesse Cambio di marcia Cambio de marchas Řadicí páka Dźwignia zmiany biegów Versnellingspook Radiaca páka No 412760 Schalter Gas Accelerator switch Interrupteur d accélérateur Interruttore dell acceleratore Interruptor de aceleración Akcelerátoru přepínač Przełącznik przyspieszacza Gaspedaalschakelaar Spínač akcelerátora DE Ersatzteile GB Spare parts FR Pièces de rechange IT Pezzi di ricambio...

Страница 19: ...i są wysoce reaktywne dlatego oddzielna ich zbiórka i ich wykorzystanie zgodnie z przepisami są ważne dla środowiska i Państwa zdrowia Jeżeli baterie poniżej przekreślonego kosza na odpady na kółkach oznaczone są znakiem chemicznym Hg Cd lub Pb oznacza to że zawierają one więcej niż 0 0005 rtęci Hg więcej niż 0 002 kadmu Cd lub więcej niż 0 004 ołowiu NL Informatie over de afvalverwerking Batterij...

Страница 20: ... for Czech Republic and Slovakia Veleslavínská 30 19 CZ 162 00 Praha 6 Tel 420 235 364 664 Mobil 420 739 075 380 Mail servis topdrony cz Web www topdrony cz Viva net d o o Distributor Jamara for Croatia Ante Topic Mimare 8 HR 10000 Zagreb Susedgrad Mail info viva net hr Web www viva net hr Nettrade Kft Distributor Jamara for Hungary 1033 Budapest Hévízi út 3 b Tel 36 30 664 3835 Mail ugyfelszolgal...

Отзывы: