9
GB
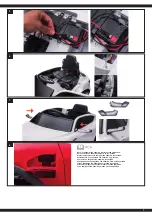
1. Assembly of the front wheels
Place the body with the underside facing up. Remove the nuts and the washer from the front
axle using the spanner. To mount the front wheels, slide a washer onto the front axle. Put a
wheel on the axle and slide another washer onto it. Fix the whole thing with a nut and finally put
on a wheel cover.
2. Assembly of the rear wheels
Remove the nuts and the washer from the rear axle using the spanner. Slide a drive wheel and
a washer onto the rear axle. Secure it with a nut. Now put the wheel cover on the wheel.
Repeat on the other side.
3. Mounting the Steering Wheel
Connect the cable from the steering wheel to the cable on the dashboard. Install the steering
wheel (3) in the intended position until they click into place.
4. Windshield assembly
Align the windshield with the corresponding openings on the car body, insert and push them
into place.
5. Battery connection
Connect all connectors as shown. Only connect plug connections that fit into each other and
take care not to reverse polarity. Make sure that the red cable and the black cable are
connected to the respective connectors of the same colour. Check the power supply by
pressing the ON/OFF switch on the model. If the power supply is working, you will hear a motor
noise.
6. Assembling the seat
First remove the two screws at the front of the seat position. Slide the two pins at the rear of the
seat into position in the body and secure the seat with two screws.
7. Assembling the mirrors
Push the rear view mirrors into the intended position until they click into place.
8. Charging your vehicle
• The power swich must be turned in OFF position when charging.
• The charging port is under the seat.
• Insert the charger into the socket - the LED lights up green. Connect the charger to the
charging socket.
• The LED on your charger lights up red as long as the battery is being charged. If the LED
lights green again, the battery is fully charged.
• The charge time is 6 hours.
• When the vehicle begins to run slowly, recharge the battery.
• Do not charge the battery more than once within 24 hours.
• Charger and battery heat up during the charging process.
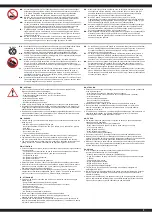
Warning!
•
The charger is not a toy. Only use the charger supplied.
•
The battery may only be charged by or under the supervision of an adult.
•
The terminals must not be short-circuited.
•
The charger must be checked regularly for damage to the cable, plug, housing and other
parts. If any damage is found, the charger must not be used until the damage has been
repaired.
•
Let the model cool off sufficiently after each use before putting it back into operation.
When using an additional batteries let it cool off for minimum 15 minutes until the
model is operated again. Overheating can damage the electronics or may result in fire.
•
Always disconnect the model from the charger immediately after charging. Always
disconnect the charger from the power supply immediately after disconnecting the
model. Inserting the rechargeable model or charger after charging will result in damage
tothe model, charger or the power supply (fire hazard).
•
Only use the charger in dry rooms.
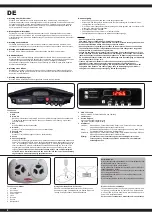
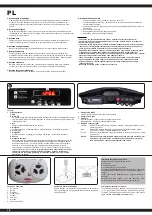
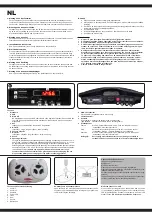
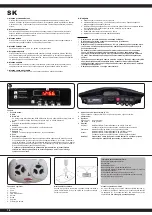
Functions
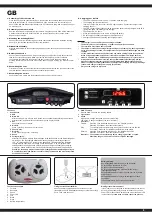
1 Soundboard
A USB
B Micro SD
After inserting a Micro SD card or USB stick, the soundboard starts playing the tracks one
after the other. Only files with the extension .mp3 can be played back.
C Aux
Connect MP3 device / mobile.
D Music/V-
Press = previous, long press = Volume down
E Pause & play
F Music/V+
Press = Next, long press = Volume up
G Sound
H Voltage display
Attention! Your vehicle displays the total voltage of the two batteries in volts immediately after
switching on. The fully charged batteries will usually display a total voltage of approx.
12.6 - 13 volts unloaded. The display is load dependent. This means that the displayed
voltage will drop under load. If a voltage of less than approx. 11.8V is displayed in the
unloaded state, you should switch off the Ride-on and charge the battery (see charging
procedure). Otherwise the battery may be deeply discharged and irretrievably damaged.
Otherwise, the battery may become deeply discharged and be irretrievably destroyed.
A completely discharged battery is not covered by the warranty and must be replaced
at the owner‘s expense.
2 ON/OFF switch
With the ON/OFF switch you start the vehicle.
3. Light button
4. Speed
High speed - Change the speed of the car more quickly.
Low speed - Change the speed of the car more slowly
5 Shift Lever:
Forward: Press the “Forward-backward switch” on the “Forward” position.
Press the “Foot pedal”, the model drives forward
Stop:
The model will brake automatically, when your child’s foot remove from the
“Foot pedal”. Press the “Forward-backward switch” in the middle.
Reverse: Press the “Forward-backward switch” on the “Backward” position.
Press the “Foot pedal”, the model drives backward.
Important! The vehicle must be stationary before changing direction or speed.
Otherwise the gear unit and/or the motor could be damaged.
A
B
G
H
C
D
E
F
8
1
3
5
6
4
7
2
Functions transmitter
1. Forward
2. Backward
3. Speed
4. Power LED
5. Left
6. Brake
7. Right
8. Battery compartment
Fitting the transmitter batteries
Open the battery compartment cover on the back of the
transmitter and put 2 AAA batteries making sure that it is corectly
put in. Then close the cover.
Binding transmitter and model
If the model does not respond to the transmitter, press the for
-
wards (1) and backwards (2) buttons for about 3 sec until the
Power LED (4) flashes. Now switch on the model, the Power LED
is lit continuously.
If this does not work, repeat the process.
2
1
3 4 5
Battery warning:
Non-rechargeable batteries are not to be recharged!
Do not open! Do not dispose of in fire!
Do not mix old and new batteries!
Do not mix alkaline batteries, standard (carbon-zinc) or
rechargeable batteries!
Rechargeable batteries are to be removed from the toy before
being charged!
Rechargeable batteries are only to be charged under adult
supervision!
The supply terminals are not to be short-circuited!
Содержание 461819
Страница 6: ...6 1 2 3 4...
Страница 23: ...23...


