


DCF-S-0126-2A (06.04)
Japan Aviation Electronics Industry, Ltd.
Connector Div. Production Engineering Dept.
日本航空電子工業株式会社コネクタ事業部生産技術部
Number
番号
T700460
Page
5
/
10
JAE Connector Div. Proprietary.
Copyright
©
2020, Japan Aviation Electronics Industry, Ltd.
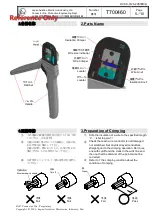
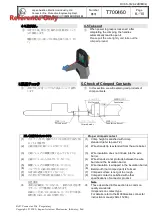
2.各部名称
2.Parts Name
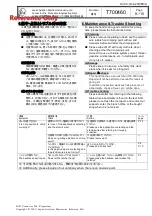
3.圧着準備
3.Preparation of Crimping
①
予め電線の被覆を指定剥き長さ(L寸法)で剥
いてください。(7項参照)
①
Strip the insulation of a wire to the specified length
“L”.
(
refer to para.7
)
②
芯線の切断、傷がないことを確認し、先端の乱
れは作業前に矯正して下さい。
芯線の切断、傷があったもの、先端の乱れが
矯正できないものは使用しないで下さい。
②
Check that each wire conductor is not damaged
nor scratched. Set any disarrayed conductors
straight prior to the crimping operation. Don't use
one with cutoff and the crack in the wick line and
the one that the disorder of the point cannot be
corrected.
※
圧着条件については、7 項圧着条件を参照し
てください。
※
Refer to 7 the crimping condition about the
condition of crimping.
○
×
×
×
不良
Fail
不良
Fail
不良
Fail
良品
Pass
芯線の乱れ
Disordered wire strand
切断
Cut off
傷
Crack
ヘッド
Head
ラチェット
Ratchet
ハンドル
Handle
芯線クリンパ
Wire Crimper
ロケータ
Locator
被覆アンビル
Insulation Anvil
芯線アンビル
Wire Anvil
電線サイズ表示
Wire size indication
被覆クリンパ
Insulation Crimper
電線ストッパ
Locator
5/10


