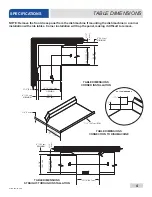


07610-003-61-42-U
18
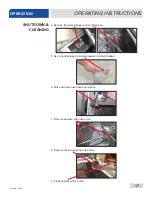
10. Use a small wire or toothpick to remove remaining debris or lime deposits from
the nozzles.
11. Flush the arms with water.
12. Replace end-caps and ensure they have been tightened.
13. Ensure the water level probe is clean.
14. Spray or wipe out interior of the machine.
15. Replace wash and rinse arms.
16. Ensure sump strainer and scrap screen are clean and securely in place.
17. Use stainless steel polish to clean/protect outside of dishmachine.
SHUTDOWN &
CLEANING
OPERATING INSTRUCTIONS
OPERATION
Содержание TEMPSTAR LT
Страница 33: ...07610 003 61 42 U 26 17 18 6 20 8 2 7 6 6 6 5 32 16 6 6 23 24 4 4 6 6 31 37 39 CONTROL BOX ASSEMBLY PARTS ...
Страница 34: ...27 07610 003 61 42 U CONTROL BOX ASSEMBLY PARTS 10 9 13 14 15 12 11 27 41 42 40 25 21 21 21 22 22 ...
Страница 35: ...07610 003 61 42 U 28 26 1 29 28 30 33 34 36 CONTROL BOX ASSEMBLY PARTS ...
Страница 67: ...07610 003 61 42 U 60 PARTS VENTLESS SYSTEM ASSEMBLY ...
Страница 75: ...07610 003 61 42 U 68 SCHEMATICS 208 230 V 50 60 HZ 1 PHASE ...
Страница 76: ...69 07610 003 61 42 U SCHEMATICS 460 V 50 60 HZ 3 PHASE ...
Страница 77: ...07610 003 61 42 U 70 SCHEMATICS LT NB 208 230 V 50 60 HZ 1 PHASE ...
Страница 78: ...71 07610 003 61 42 U SCHEMATICS LT NB 460 V 50 60 HZ 3 PHASE ...
Страница 79: ...07610 003 61 42 U 72 SCHEMATICS STEAM 208 230 V 50 60 HZ 1 3 PHASE ...
Страница 80: ...73 07610 003 61 42 U SCHEMATICS SDI OPTIONS ...
Страница 81: ...07610 003 61 42 U 74 SCHEMATICS DRAIN QUENCH OPTION ...