background image

5418 Elmwood Avenue, Indianapolis, IN 46203-6025
Toll Free: 888.652.9663 Fax: 317.227.1034
www.jacksonsystems.com

8

Although great care has been taken in preparation of this manual, Jackson Systems takes no responsibility
for errors or omissions contained herein. It is the responsibility of the installer to ensure that the Wireless
Zone One™ thermostat, control module and damper are installed and wired properly to provide safe and
efficient operation.

©

Due to ongoing product improvements, Jackson Systems reserves the right to change the specifications of the
Wireless Zone One™ system and its components without notice.

All rights reserved.

Jackson Systems, LLC 2010

Intellectual rights apply.

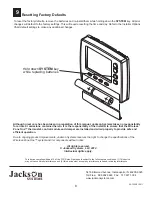
To reset the factory defaults, remove the batteries and re-install them while holding down the

key. All prior

changes will default to the factory settings. This will require resetting the time and day. Refer to the Installer Options
Chart default settings to make any additional changes.

SYSTEM

9

Resetting Factory Defaults

Hold down

key

while replacing batteries

SYSTEM

06-1059-012611

This device complies with part 15 of the FCC Rules. Operation is subject to the following two conditions: (1) This device
may not cause harmful interference and (2) this device must accept any interference received, including interference

Содержание WZ1

Страница 1: ...ensor determines there is warm air in the duct the damper will power open otherwise the damper will remain closed The relay control module has LED indication to confirm mode of operation and damper po...

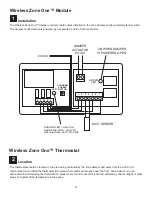
Страница 2: ...rmostat should be located in the area being controlled by the zone damper and away from the HVAC unit thermostat Do not install the thermostat in an area where drafts are present near the floor behind...

Страница 3: ...thermostat should be installed approximately 5 feet above the floor Level the subbase for appearance and use the wall anchors and screws provided Installing the Subbase 4 Slide the battery cover off...

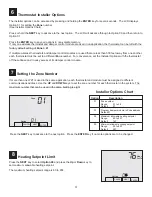
Страница 4: ...n seconds The LCD displays Option 01 for setting the number See Installer Options Chart Press or hold the key to advance to the next option The LCD will advance through to Option 09 and then return to...

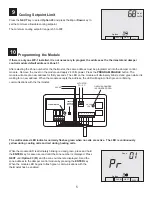
Страница 5: ...r normally flashes green when no calls are active The LED is continuously yellow during cooling calls and red during heating calls 9 Cooling Setpoint Limit Press the key to select and press the or key...

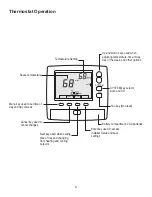
Страница 6: ...EM key selects Auto and Off Fan key Not used Temperature Setting Space temperature Menu key used to set time of day and day of week Cancel key used to cancel changes Next key used when setting time of...

Страница 7: ...the and keys to set the hour Make sure that the AM or PM is correct MENU Up Down Press the key to set the minute Use the and keys to set the minute Press the key to set the current day of the week Us...

Страница 8: ...f the Wireless Zone One system and its components without notice All rights reserved Jackson Systems LLC 2010 Intellectual rights apply To reset the factory defaults remove the batteries and re instal...

Отзывы: