background image

Communicating with the JTECH-ENCH4 H.264 Encoder - Windows 
 

You will need to utilize your computer's ethernet port in order to communicate with the encoder.  
 
You will start by changing the IP address of your computer to match the default IP address scheme 
of the encoder (192.168.1.168). This means we will need to change your PC's ethernet IP address 
to 

192.168.1.XXX

. To do so navigate to -  


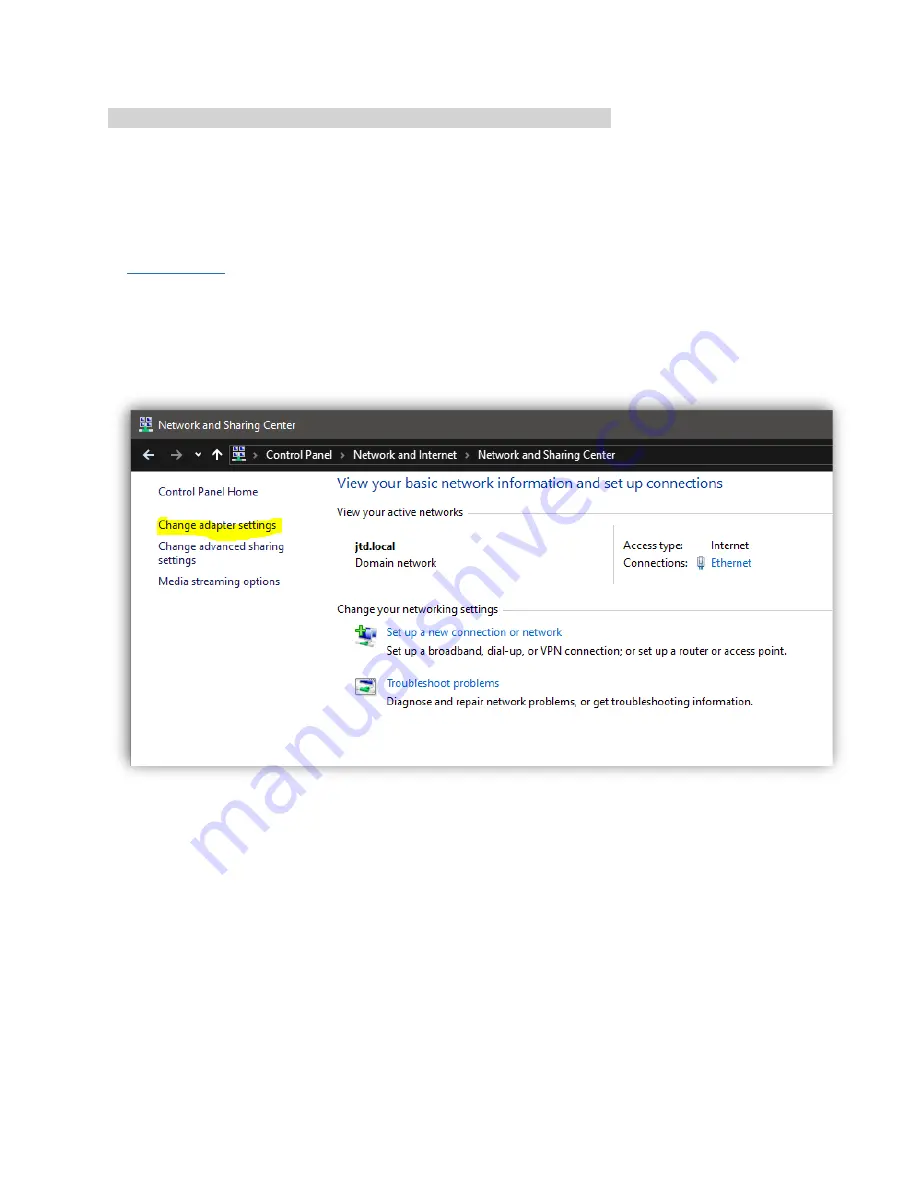
Control Panel > Network and Internet > Network and Sharing Center


Then, on the left-hand side select 

'Change Adapter Settings'


This will bring up a new window.  

Содержание JTD-220

Страница 1: ...Setup Guide J Tech Digital H 264 Encoder JTD 220 JTECH ENCH4 J Tech Digital Inc 12803 Park One Drive Sugar Land TX 77478 Tel 1 888 610 2818 E Mail support jtechdigital com...

Страница 2: ...tion is open type the command ipconfig and press enter Information about your computer and network will populate below Above you will see that the ipconfig command provides you with different pieces o...

Страница 3: ...Above you can see that the IP address of the computer is 192 168 1 71 and the Default Gateway is 192 168 1 1 This lets the user know that the scheme of your network is 192 168 1 XXX...

Страница 4: ...es and you do not know the IP address of the encoder then you cannot make any necessary changes to the encoder If you are on a Windows PC navigate back to or open the Command Prompt application Once t...

Страница 5: ...1 10 show that there is a device on the LAN at that IP address responding to our ping request If there is a device using the IP address 192 168 1 200 on your network try to ping another IP address lik...

Страница 6: ...by changing the IP address of your computer to match the default IP address scheme of the encoder 192 168 1 168 This means we will need to change your PC s ethernet IP address to 192 168 1 XXX To do...

Страница 7: ...Right Click on Ethernet and select Properties This will bring up a new window Highlight Internet Protocol Version 4 TCP IPv4 and select the Properties button...

Страница 8: ...sign your PC an IP address In this instance we want to set a static IP address for our PC that matches the default IP scheme of the encoder 192 168 1 168 In the above instance I set a static IP addres...

Страница 9: ...of the encoder s default IP address the two devices should be able to communicate with each other If you have not already please connect an ethernet cable directly from your PC s ethernet port to the...

Страница 10: ...ult IP address of the encoder 192 168 1 168 and hit enter If you are prompted to enter login information please enter the following credentials Username admin Password admin From here you should now h...

Страница 11: ...assign your encoder a new static IP address Before you assign the encoder a static IP address you will need to know the scheme of your current network and ensure that the IP address it not being used...

Страница 12: ...your settings hit the Apply button at the bottom of the screen A notification window will pop up saying that the changes were saved and that a reboot is required To reboot your encoder navigate to Sys...

Страница 13: ...This will bring up a new window Right Click on Ethernet and select Properties This will bring up a new window...

Страница 14: ...Highlight Internet Protocol Version 4 TCP IPv4 and select the Properties button This will bring up a new window...

Страница 15: ...r network s scheme and provide you access to the internet After these changes have been made you can confirm two things 1 Open a web browser to confirm you have regained internet access 2 Open a web b...

Страница 16: ...www jtechdigital com Published by J Tech Digital Inc 12803 Park One Drive Sugar Land TX 77478...

Отзывы: