


P o s i t i o n A d j u s t m e n t
Switch actuator from automatic to manual mode and approach to changing position of the manual
Turn the cam always from the direction in which the main shaft will rotate to the position of the switch
override.
General
Endposition
The adjustment tool may not be supported on actuator components when adjusting the end positions!
After calibration, the lid has to be replaced carefully. Be sure to route the cables around the shafts
and the engine as in the origin situation, so it can not cause malfunction by pinching. The lid must
now lie close to the base. If this is not the case, a cable is located between the motor and the cover,
or may be clamped between lower part and lid. When the lid rests tight, you can replace the screws
and tighten them crosswise. Then put on and fixed the handlever or the hand whee. Once the
electrical connections have been made and the actuator has been switched from AUTO to MAN by
rotating the hand wheel / lever, you can check the electrical function. If the function is incorrect, the
procedure must be repeated carefully.
Assembly
- 23 -
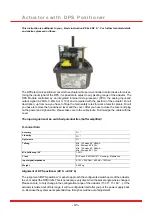
The adjustment of the end positions is accomplished in the same manner, with the help of a
resistance meter. The resistance meter is connected to pin 1 and 2 (closed position) or to pin 1 and 3
(open position) of the limit plugs (see wiring diagram). The signal switches must be set so that they
are triggered just before reaching the engine shut-down. Of course, they can also be adjusted to any
point in the pivot range of the actuator, such as intermediate positions to display.
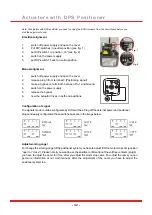
To avoid problems, you should adjust the cams 3 and 4 always about 3 degrees before the engine
shut-down.
Содержание J2 L/H 10
Страница 26: ...Jumper Configuration Heater active Optional Configuration Heater inactive 26 Basic configuration...
Страница 28: ...Special Models Series J3 J3C...
Страница 38: ...A p p e n d i x...
Страница 46: ...Dimensional Drawing 4xM6 4xM5 05 36 52 52 6 621 130 51 181 15 7 401 14 46 J2 H L 10...
Страница 47: ...Dimensional Drawing 181 130 51 55 55 42 14 11 9 6 3 5 0 110 110 1 1 3 1 5 1 4xM6 4xM5 4xM5 841 47 J3 S20...
Страница 48: ...14 11 9 130 51 42 55 55 169 110 15 13 11 4xM6 4xM5 4xM5 0 5 6 3 181 Dimensional Drawing 48 J3C S20 35...
Страница 49: ...B MAN A AUTO 110 181 130 51 16 19 55 55 4xM8 4xM6 14 17 5 0 7 0 691 Dimensional Drawing 49 J3C S55...
Страница 50: ...16 19 130 51 55 55 691 1 7 6 011 14 17 4xM8 4xM6 0 5 0 7 1 8 1 Dimensional Drawing 50 J3C S85...
Страница 52: ...Te l 4 9 5 1 8 1 6 0 1 7 i n f o j u j d e u t s c h l a n d d e w w w j u j d e u t s c h l a n d d e...


