J. A. Roby ULTIMATE TOR 2015 Скачать руководство пользователя страница 7

PR_I020/2023-08-11-EN

                                                   Revision: 5 


Installation 

If this room heater is not properly installed, a house fire may 
result.  To  reduce  the  risk  of  fire,  follow  the  installation 
instructions.  Contact  local  building  or  fire  officials  about 
restrictions  and  installation  inspection  requirements  in  your 
area. 
 
WARNING  ALWAYS  USE  J.A.  ROBY  PARTS  on  your 
appliance.  Using  other  differences  parts  can  damage  the 
appliance and cause injury. 


Use of smoke detectors and carbon 
monoxide monitors 

To provide reasonable fire prevention, the following should be 
given serious consideration: 

1.  At  least  one  smoke  detector on  each  floor of  your  home 

should be installed to ensure your safety. They should be 
located away from the heating appliance and close to the 
sleeping areas. Follow the smoke detector manufacturer’s 
placement  and  installation  instructions  and  be  sure  to 
maintain regularly. 

2.  A conveniently located Class A fire extinguisher to contend 

with small fires resulting from burning embers. 

3.  A  CO  detector  should  be  installed  in  the  room  with  the 

appliance. 

4.  A  practiced  evacuation  plan,  consisting  of  at  least  two 

escape routes. 

5.  A plan to deal with a chimney fire as follows:  

a. In the event of a chimney fire:  

b. Evacuate the house immediately 

c. Notify fire department. 


The average of the CO emission (carbon monoxide) is 68.5 
g/hr

. To maintain this rate, it’s recommended to operate the 

appliance in low or medium burn rate. 

The hazards with some fuels (e.g. Charcoal) and possibilities 
of generating carbon monoxide and the hazards from carbon 
monoxides. 

When the smoke detector is activated is mean that the 
smoke spill out of the appliance. Verify the door is close 
and the draft in chimney is good. 
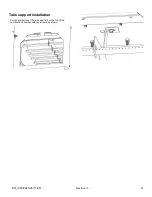
 

Floor protection 

Your  stove  must  be  installed  on  a  non-combustible  material 
plate to protect the floor and avoid fire which would be caused 
by:  


Projections  of  sparks  when  door  opening  or  loading 
logs; 


The heat radiation when stove runaway should have an 
ignition to the floor and the coating; 


Flow of creosote when there is a chimney fire. 

The  coating  used  must  be  non-combustible  and  approved 
according to standard or your local codes (Example: cement, 
brick, ceramic tiles…) 

Floor protection plate minimum 
dimensions 

The following dimensions are the minimums values and they 
can be greater. 

Canada: 
 

  44 ¾ (113.73 cm) 

  53 ¾ (136.53 cm) 


3/8 in thickness (1 cm)


Clearances chart on floor plate 

The following dimensions are the minimums values and they 
can be greater. 


Canada: 


8 inches (20.32 cm) rear 


8 inches (20.32 cm) side 


18 inches (45.72 cm) loading door 


Содержание ULTIMATE TOR 2015

Страница 1: ...LOCAL AUTORITY ABOUT RESTRICTION AND INSTALLATION INSPECTION IN YOUR AREA Instruction Manual 490 rue de l Argon Qu bec CANADA G2N 2C9 T l 418 849 8095 Fax 418 849 0077 www jaroby com Certified and tes...

Страница 2: ...stion air source 20 Air Inlet Obstruction 20 Part replacement 21 Steel deflector replacement 21 Front deflector replacement 21 Stainless steel tubes replacement 21 Stainless steel tube Installation 21...

Страница 3: ...th 24 inches Fuel Orientation front to rear Fuel Seasoned cord wood A range of BTU outputs based CSA B415 1 Default Efficiency and the burn rates from the low and high CSA B415 1 emission tests using...

Страница 4: ...PR_I020 2023 08 11 EN Revision 5 4 Rating plate...

Страница 5: ...PR_I020 2023 08 11 EN Revision 5 5 Appliance Dimension...

Страница 6: ...Door Opening 16 in x 9 5 in 40 6 cm x 25 4 cm Interior Height 14 1 2 in 36 8 cm Interior Width 19 3 4 in 50 1 cm Interior Depth 15 1 2 in 38 cm Recommended log length 20 in 50 8 cm Chamber combustion...

Страница 7: ...follows a In the event of a chimney fire b Evacuate the house immediately c Notify fire department The average of the CO emission carbon monoxide is 68 5 g hr To maintain this rate it s recommended t...

Страница 8: ...s at the back for a smoke simple pipe with a heat shield and 20 inches of lateral MINIMUM clearance In case of a single pipe without heat shield you must keep your single smoke pipe 18 inches away fro...

Страница 9: ...ove on its back carefully not to damage the paint 4 Loosen the nut 2 without removing it completely 5 Install the legs 1 as illustrated below Attention Make sure the legs are in place correctly positi...

Страница 10: ...t 2 brick A and 1 H 4 Insert brick A on the right and R on the left to finish the installation at the bottom Back firebricks installation 5 Put 4 bricks A and C against the back wall 6 Put the 3 brick...

Страница 11: ...ricks keep a maximum heat inside the combustion chamber to help the air supply from the pipes burn the entire gas coming out from wood The rockwool over the bricks can reduce a considerable leakage be...

Страница 12: ...the bricks and be sure then the smoke exit way is not obstructed 4 Put two half metal discs over the rockwool near the rear deflector already in place Be sure to put it under the rear deflector to max...

Страница 13: ...PR_I020 2023 08 11 EN Revision 5 13 Firebox configuration and part list...

Страница 14: ...tallation of this appliance by a certified installer Note This appliance has to be connected to 6 inches 15 24 cm factory build chimney HT UL 103 or CAN ULC S629 compliant or a 6 inches 15 24 cm mason...

Страница 15: ...rer indication ALL SECTION AND ELBOW MUST BE CLEAN AND IN GOOD CONDITION AND MUST BE APPROVED FOR WOOD BURNING 1 Chimney connector assembly installation Make a summary installation of all sections and...

Страница 16: ...e sealant to make the building airtight Note This is a general chimney installation method Be sure to refer to the manufacturer s manual for more details of installation of your chimney 1 Determine th...

Страница 17: ...method has to be safe to prevent fire Refer to your local authority to get the latest information To install the stove in an abandoned masonry the chimney must have a certified metallic sleeve cover...

Страница 18: ...installed in accordance with the applicable local laws or the CAN CSA B365 Follow the chimney manufacturer s instructions to install the chimney Always pass chimney between joists If you have to cut a...

Страница 19: ...arpenter or a certified installer Always frame around chimney Keep minimal clearances indicated in your chimney manual Do not fill the gap between the framing and the chimney Nothing must be in contac...

Страница 20: ...e recommend you to open slightly a window of the room where the stove is situated in order to avoid a negative air pressure when an appliance mentioned above is working WARNING DO NOT INSTALL THIS APP...

Страница 21: ...flector and take it out 2 Install the new deflector and screw it in place Pay attention to put all screw 3 Install previously disassembled tubes rockwool and half round steel plates Follow the instruc...

Страница 22: ...PR_I020 2023 08 11 EN Revision 5 22 Tube support installation Put the support over the tube and fix it at the top of the combustion chamber with the screws as shown...

Страница 23: ...tning fire After installing correctly the stove following the installation instruction of the manufacturer you are ready to light it 1 Turn the admission handle in horizontal position to set the prima...

Страница 24: ...process wood might shrink split twist or change shape In general wood must be dried before use Air drying i e seasoning is the most common method used for cordwood Season wood outdoors through the sum...

Страница 25: ...ey flue of a slow burning fire As a result creosote residue accumulates on the flue lining Creosote can take several forms such as tarry liquid black soot or crystals When it catches fire this creosot...

Страница 26: ...recommends using products for this purpose or an oven cleaner only for glass part Avoid cleaning hot glass and cleaning with abrasive Cleaning hot glass can cause a thermal shock and break the glass D...

Страница 27: ...ithout giving any tension Verify the length of rope 5 Cut it inches over the require length and repeat step 1 and 2 Glass fiber rope installation 1 Put a high temperature sealant in the clean groove t...

Страница 28: ...PR_I020 2023 08 11 EN Revision 5 28 Annex 1 Door assembly Square Door Arc Door...

Страница 29: ...PR_I020 2023 08 11 EN Revision 5 29 Annex 2 Circuit diagram of fan Snap Disc Box parts description...

Страница 30: ...can be replaced Bricks Stove ceramic glass Arc Stove ceramic glass Rectangular Spring Handle Stove Door with handle Fans Flat fiberglass rope around glass Round fiberglass rope Slotted Brick Washer T...

Страница 31: ...nd through the access opening Take care of putting the bolt s screwing part oriented downward Fastened the fan to the stove with the 4 lock washers D and the 4 nuts E provided with the fan kit as show...

Страница 32: ...location in the adjacent picture Put them inside the fan housing by passing the hand through the access opening Put the second blower in the opposite orientation compared to the first blower Screw the...

Страница 33: ...t after inspection and investigation of the defect The manufacturer may at its discretion fully discharge all obligations with respect to this warranty by refunding to the original warranted purchaser...

Отзывы: