background image


8

CHIMNEY 

Only  use  approved  chimneys  of  the  same  dimensions  as  the  appliance  exit.  Therefore, 
you should use 6 inches diameter chimneys for your GRIZZLY Furnace. Chimneys must 
be  tested  upon  the  ULC  S629  CSA,  UL103  norms.  The  GRIZZLY  Furnace  wood 
appliance can be installed onto a masonry chimney following the ULC S635, ULC S640 
and the UL 1777 norms. Do not forget to plan a place for the sweeping of the chimney.   
 
When possible, it is preferable to avoid an outside chimney or built on an exterior wall, 
and this is even more important for colder areas. Outside chimneys generally have a less 
efficient draught. They can even have an inverse draught because it is hard to heat them 
enough  so  that  they  can  reach  their  operating  temperature.  A  greater  accumulation  of 
creosote, a less efficient draught and a lesser performance are some characteristics of cold 
chimneys. Draught is proportional to the total chimney height as well as its temperature. 
It is therefore possible to get a better draught by increasing the chimney's height and by 
reducing  the  heat  loss  with  an  insulated  lining.  The  chimney  has  to  be  installed  with  a 
stainless  steel  lining.  Make  sure  that  all  smoke  pipe  joints  are  really  airtight.  A  leak 
reduces the efficiency of the appliance and could even make its utilization dangerous. 


INSTALLATION 

A good installation is extremely important for a safe and efficient use of your J.A. Roby 
Inc.  appliance.  If  you  doubt  on  the  way  to  install  the  appliance  correctly,  seek  for 
professional installation service. We suggest you to call masters fitters. 


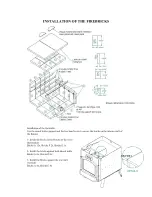
Withdraw firebricks placed inside the appliance in order to reduce the weight and to 

facilitate the installation. 


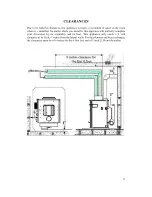
You  must  install  a  fireproof  plate  under  the  appliance,  which  must  exceed  of  18  

inches(46 cm) at the front and of 8 inches(20cm) at each side. 


The  free  space  shall  not  be  reduced  except  under  the  approval  of  the  authorities 

responsible for the application of the building code. 


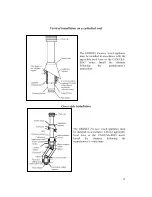
Install the chimney and an insulated wall firebreak for an installation passing through 

a wall according to the instructions from the chimney manufacturer. 


Install  the  firebricks  in  accordance  with  the  recommended  instructions  for  your 

model. 


The appliance should not be connected to an hot air conduct. 


Содержание GRIZZLY

Страница 1: ...ZLY FURNACE October 17 2014 Reviewed WOOD FURNACE 1 490 rue de l Argon Quebec Qc Canada G2N 2C9 Phone 418 849 8095 Fax 418 849 0077 www jaroby com Certified and tested according to CAN CSA B415 1 norm...

Страница 2: ...EDRAL ROOF 10 CROSS STYLE INSTALLATION 10 VERTICAL INSTALLATION 11 CLEARANCES 12 INSTALLATION OF THE FIREBRICKS 13 FANS AND THERMODISC 16 HOW TO PLUG THE THERMOSTAT DIRECTLY INTO THE TERMINAL BOARD 17...

Страница 3: ...IFIED TECHNICIAN AND IN CONFORMITY WITH THE OWNER S MANUAL GUIDE GIVEN WITH THIS APPLIANCE THE INSTALLATION MUST BE IN AGREEMENT WITH LOCAL AND NATIONAL REGULATIONS APPLICABLE FOR SOLID FUEL BURNING A...

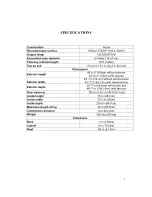
Страница 4: ...plenum 52 in 133cm with plenum Exterior width 29 1 8 in 74 cm without electrical box 33 5 8 in 85 7cm with electrical box Exterior depth 39 1 8 in 99 4cm without fan box 48 7 8 in 124 14cm with fan b...

Страница 5: ...room where the appliance must be installed must measure a minimum of 64 ft2 and must be very well ventilated Minimum clearances found in this manual must be observed Never use a non isolated exterior...

Страница 6: ...pliance You should contact your municipal or provincial fire department to have knowledge of the procedure to be followed in case of a chimney fire Think of an emergency plan In case of a chimney fire...

Страница 7: ...first hours of utilization It is normal that a light smoke is released from the paint during the first hours of use Even if this nuisance is temporary open the windows and the doors in order to ensur...

Страница 8: ...ight and by reducing the heat loss with an insulated lining The chimney has to be installed with a stainless steel lining Make sure that all smoke pipe joints are really airtight A leak reduces the ef...

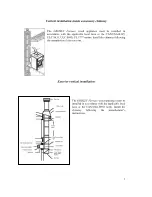
Страница 9: ...cal laws or the CAN CSA B365 ULC S635 ULC S640 UL 1777 norms Install the chimney following the manufacturer s instructions Exterior vertical installation The GRIZZLY Furnace wood appliance must be ins...

Страница 10: ...applicable local laws or the CAN CSA B365 norm Install the chimney following the manufacturer s instructions Cross style installation The GRIZZLY Furnace wood appliance must be installed in accordanc...

Страница 11: ...rtical installation The GRIZZLY Furnace wood appliance must be installed in accordance with the applicable local laws or the CAN CSA B365 norm Install the chimney following the manufacturer s instruct...

Страница 12: ...atter where you install it this appliance will perfectly complete your decoration by its originality and its heat This appliance only needs a 1 inch clearance at its back 6 inches from the lateral wal...

Страница 13: ...rew to secure the bricks on the interior wall of the furnace 1 Install the bricks in the bottom of the stove horizontal Bricks A 12x Bricks F 2x Bricks E 1x 2 Install the bricks against both lateral w...

Страница 14: ...the front of the stove See figure 1 above 6 Fix the pipes support in the stove using the hex head screw provided See figure 2 7 Insert the 2 other pipes in the stove passing them trough the hook of t...

Страница 15: ...15 Make sure that the rockwhool is properly installed In the bottom of the furnace and without prejuidice with the deflector FIGURE 3...

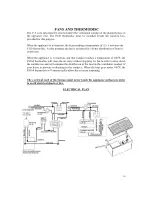
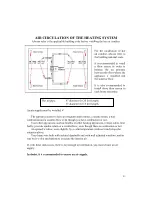
Страница 16: ...bution of heat in your home When the appliance is in function and that conduct reaches a temperature of 1600F the FS160 thermodisc will close the air entry without stopping the fan in order to slow do...

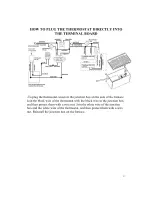
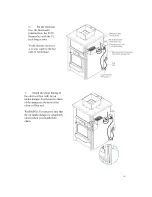
Страница 17: ...n box on the side of the furnace Join the black wire of the thermostat with the black wire in the junction box and then protect them with a wire nut Join the white wire of the junction box and the whi...

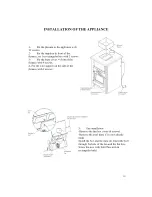
Страница 18: ...x the front cover in front of the furnace with 4 screws 4 Fix the wire support on the side of the furnace with 2 screws 5 Fan installation Remove the fan box cover 4 screws Remove the steel plate if i...

Страница 19: ...hat no electrical wire can touch to the hot side of the furnace 7 Install the chain linking to the electrical box with the air intake damper Just hook the chain of the damper to the hole of the electr...

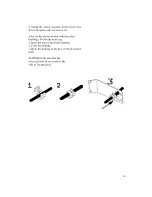
Страница 20: ...rews 2 After fix the electrical wire with the nylon bushings Follow the next step 1 Insert the wire in the nylon bushing 2 Close the bushing 3 Insert the bushing in the hole of the protection plate WA...

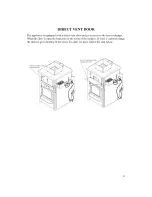
Страница 21: ...equipped with a direct vent door and give access to the heat exchanger When the door is open the heat goes in the room of the furnace If there is a power outage the furnace gives heating in the room T...

Страница 22: ...as ceramics marble or granite LIGHTING Now that you have completed the installation of the appliance according to the recommendations you are ready for the lighting 1 Place papers and small wood in t...

Страница 23: ...aft control a smoke return a bad combustion and a counter blow even though you have combustion or not Your other appliances such as hearths or other heating appliances release odors heat badly provoke...

Страница 24: ...appliance AIR SUPPLY A new air supply can be done by the following ways Indirect method In the case of an appliance not certified for a direct connection with a source of new air supply the new air i...

Страница 25: ...ot use a paper towel to clean gildings If they are not erased before the first fire fingerprints and other marks could stain these surfaces permanently 7 The Atmosphere is provided with an ashtray und...

Страница 26: ...ICK INTERIOR PIPE GLASS BRICK S SUPPORT DOOR HANDLE APPLIANCE S DOOR FANS SEALANT CORDS FAN CONTROL MODULE DAMPER MOTOR TRANSFORMATOR THERMOSTAT BUTTERFLY VALVE AIR ENTRY STALK TO ORDER PARTS PLEASE C...

Страница 27: ...ted to warranty repair are not covered The manufacturer may at its discretion decide to repair or replace any part or unit after inspection and investigation of the defect The manufacturer may at its...

Страница 28: ......
Отзывы: