Iwata Power Jet IS-900 Скачать руководство пользователя страница 9

9

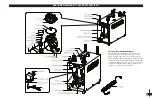
4.  On the Power Jet Lite, the airbrush should fit into the black airbrush holder by placing the front end of the airbrush into the holder. If using a   
         bottle feed airbrush with the bottle attached, put the back end of the airbrush into the holder. 


A. An airbrush holder can purchased separately for use with the Power Jet.

5.  Plug the compressor into a grounded wall outlet. (Avoid using an extension cord.)

6.  Turn the compressor ON by pressing down the on/off switch on top of the unit.  (You will see the button light up.)


A. The Power Jet will run until its storage tank fills up, then stop. As you run your airbrush, the stored air will deplete. At a certain point    


     the Power Jet will turn itself on to replenish the stored air.


B. The Power Jet Lite (which has no storage tank) will remain running as it is used with your airbrush.

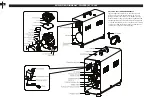
Using The Compressor
1.   Turn compressor on by pressing the power button.
 

* You will see the button light up. If there is no air in the air tank then the compressor engine will turn on and fill up the tank (Power Jet only).

2.   To adjust the air pressure, pull up on the black knob to unlock it.


A. Twist clockwise to raise the pressure.


B. Twist counter-clockwise to lower the pressure.


Note: There’s a + and - sign on top of the knob with arrows to remind you which direction raises and lowers pressure.

3.   After you’ve obtained the desired pressure, push down on the knob to lock it in place.
 

Note: The regulators come from the factory set at 100psi. (Keep twisting counter-clockwise until the gauge starts to move.)

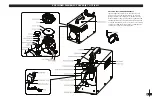
4.   While using the compressor, you’ll notice moisture start to condense in the clear plastic bowl of the moisture trap underneath the each  
 

of the black knobs on the front of the compressor.

5.   When droplets start to form, simply press up on the pressure release valve underneath the clear plastic bowl to release the built up moisture.  
 

Note: How often you need to do this will vary based on the weather and how much humidity is in the air.

6.   When the airbrush is not in use it may be placed in an airbrush holder.

HOW TO SET UP YOUR POWER JET (IS 900) & POWER JET LITE (IS 925) (CONT’D)

Содержание Power Jet IS-900

Страница 1: ... 925 and IS 975 POWER JET SERIES AIR COMPRESSORS Congratulations on your new purchase The Iwata Power Jet Series Air Compressors delivers quiet clean pulse free air along with superb moisture separation and precise air pressure adjustment IS 900 IS 925 and IS 975 ...

Страница 2: ......

Страница 3: ... completely ready to go If you re going to transfer the compressor to another country with a different voltage you ll need a plug adapter and the appropriate power converter These items typically are found at hardware stores or electronic stores Using compressors with the wrong voltage can damage the compressor or result in an electrical fire ...

Страница 4: ...ompletely ready to go If you re going to transfer the compressor to another country with a different voltage you ll need a plug adapter and the appropriate power converter These items typically are found at hardware stores or electronic stores Using compressors with the wrong voltage can damage the compressor or result in an electrical fire ...

Страница 5: ... completely ready to go If you re going to transfer the compressor to another country with a different voltage you ll need a plug adapter and the appropriate power converter These items typically are found at hardware stores or electronic stores Using compressors with the wrong voltage can damage the compressor or result in an electrical fire ...

Страница 6: ... Airbrush Adapter 1 Printed Compressor Diagram 1 Iwata Catalog Features 1 Airbrush Holders 2 Air Hoses 3 Air Tank 4 Moisture Traps 5 Pressure Gauges 6 Pressure Regulators 7 Quick Disconnect QD Adapters 8 Quick Disconnect QD Ports 9 Air Hose Adapters See also www iwata medea com and search for How to set up your Power Jet Pro Set Up 1 Plug it in 2 The coiled air hoses and male QD adapters come pre ...

Страница 7: ...clockwise to raise the pressure B Twist counter clockwise to lower the pressure Note There s a and sign on top of the knob with arrows to remind you which direction raises and lowers pressure 3 After you ve obtained the desired pressure push down on the knob to lock it in place Note The regulators come from the factory set at 100psi Keep twisting counter clockwise until the gauge starts to move 4 ...

Страница 8: ...m 1 Iwata Catalog Features 1 Airbrush Holder 2 Air Hose 3 Air Tank No tank on Power Jet Lite 4 Moisture Trap 5 Pressure Gauge 6 Pressure Regulator 9 Hose Adapters Set Up 1 Plug it in 2 Screw the large end of the air hose onto the air outlet on the moisture trap 3 Screw the other end of the air hose onto the airbrush Note If you re using a brand of airbrush other than Iwata use the appropriate adap...

Страница 9: ... in the air tank then the compressor engine will turn on and fill up the tank Power Jet only 2 To adjust the air pressure pull up on the black knob to unlock it A Twist clockwise to raise the pressure B Twist counter clockwise to lower the pressure Note There s a and sign on top of the knob with arrows to remind you which direction raises and lowers pressure 3 After you ve obtained the desired pre...

Страница 10: ...e compressor 2 Depressurize the tank Release remaining air in tank Air may be released through the airbrush or through the moisture trap pressure relief valve 3 Unscrew the nut on the drain valve at the lower back part of the air storage tank 4 Tip the compressor back 5 Let it drain 6 When its finished draining set compressor upright on all four rubber feet 7 Screw the nut back into the tank drain...

Страница 11: ...e Filter The filter only needs to be changed if it s significantly dirty or dirty enough to cut air flow into the compressor Use your finger to pull the black tab out Pull out the sponge like air filter Replace with new air filter Part IS 030 10 pack Please inspect your air filter once per week with heavy compressor use DO NOT use oil in on the compressor MAINTENANCE FOR ALL POWER JET SERIES AIR C...

Страница 12: ...ting bubbles indicate an air leak 2 Tighten connections 3 If bubbling doesn t stop try wrapping threads with Teflon Tape max 3 wraps only or applying beeswax to the threads Both methods provide an airtight seal 4 If the air leak is in the middle of a hose the hose will need to be replaced For all other problems or issues call or contact Iwata Medea at 503 253 7308 or email us at info iwata medea c...

Страница 13: ...ly Allows quick removal of the air hose from the compressor Air Hose Adapters Almost any airbrush can be retro fitted to your compressor with included air hose adapters Power Switch Yes it s a feature You don t have to unplug the compressor when you want it to stop just flip the switch Auto Shut off This is the Smart part of the Power Jet series Thermal Overload Switch If the compressor ever decid...

Страница 14: ...e centers You must pay all charges for shipping transporting your Iwata Studio Series Compressor to from these service facilities Iwata Medea Inc will not be responsible for damage to persons or property commercial loss or any other incidental or consequential damage caused by a defective compressor However some states do not allow the exclusion or limitation of incidental or consequential damages...

Страница 15: ......

Страница 16: ... w w w I W A T A M E D E A c o m Iwata Medea Inc 1336 N Mason St Portland Oregon 97217 tel 503 253 7308 fax 503 253 0721 info iwata medea com ...

Отзывы: