PLEASE NOTE:
The screws provided with Iver products are made from
solid brass. This allows fi nishes to be matched as closely
as possible and prevents the possibility of screws rusting in
coastal areas. Please note that screws require
pre-drilling
.
Please take extra care when fi tting.
Included
Not Included
5.1.
Place the split spindles into the lock body from
either side of the door*.
5.2.
Place privacy spindle through privacy bolt follower.
5.3.
Align the halves with the lever and privacy spindles
on either side of the door. Push until fl ush with
the door, ensuring the levers function in the
correct direction.
5.4.
Insert male tie bolts through top and bottom
of back plate,
OR
5.5.
Affi
x wood screws at all fi xing points.
5.6.
Place the female sections in the opposite holes,
lining them up with the male thread. (Figure 7)
5.7.
Secure loosely by hand, then use a screwdriver
to hold the female section while tightening the
male section with a second screwdriver.
—
* Regular spindle also provided
5. Install Levers
Figure 7.
(8)
(6)
Wood Screws
(7)
1.
6.
8.
9. (or 7.)
4.
2.
5.
3.
1. Backplate
Privacy Lever Set
2. Privacy Snub
4. Springs
6. Split Spindle
9. Tie Bolts
8. Privacy Spindle
10. Standard Spindle
7. Wood Screws
5. Circlip
3. Emergency Release
Backplate Privacy
Lever Set
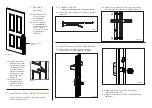
IMPORTANT:
Please install this door
hardware in the following
order to ensure its warranty
is not voided.
1.
Install the door hardware
on raw / unfi nished door
using the instructions
provided.
2.
Remove door hardware
and store safely. Do not
place painters tape or
masking tape over the
product. The tape will
damage the fi nish.
3.
Paint / fi nish door.
4.
Reinstall hardware.
Please recycle
me after use


