ITS Telecom CGW-D Скачать руководство пользователя страница 56

CGW-D  


5-1


5.  

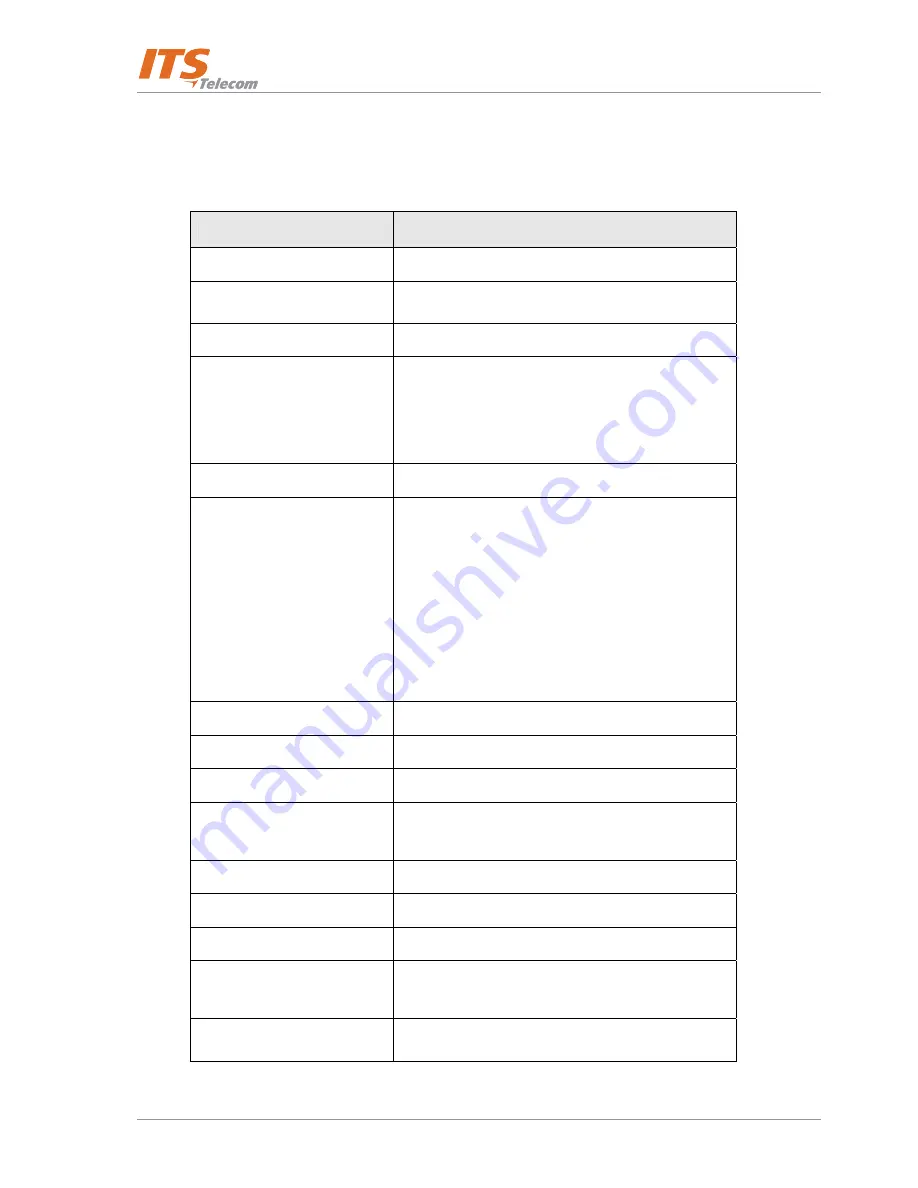
5.1  CGW-D for GSM Network 

Model 

CGW-D GSM Gateway 

GSM Network Type 

GSM Phase II 

GSM Module 

Integrated dual-band (900/1800, 850/1900 MHz) 

SIM card 

Plug-in, 3V, small 

Transmission Power 

Max. 2W / 900MHz 

Max. 2W / 850MHz 

Max. 1W / 1800MHz 

Max. 1W / 1900MHz 

Receiver sensitivity 

-104 dBm 

Connectors 

RJ-11 (Trunk) – to analog trunk interface to PBX or 

home phone 

RJ-11 (PSTN) – to analog trunk interface of PSTN 

or to PSTN subscriber line – home phone 

configuration only (CGW-D only)  

Power Supply 

SMA female - Antenna 

Off-hook AC impedance 

600


On-hook line voltage 

48VDC 

Off-hook line current 

Maximum 25mA 

Off-hook loop resistance 

threshold 

800


Dial tone frequency 

400Hz 

Ringing voltage 

48Vrms, 25Hz 

Supported dialing type 

DTMF 

Antenna 50

 Impedance, connected via SMA connector 

frequency 800 - 2000MHz 

Antenna cable length 

3m 

Chapter 5:  Technical Specification  

Содержание CGW-D

Страница 1: ...CGW D June2008 Installation and Operation Guide Version 2 Release 4...

Страница 2: ...shall ITS be liable for consequential or special damages loss of revenue or user dealer expenses arising out of or in connection with the use or performance of the product whether based on contract t...

Страница 3: ......

Страница 4: ...1 2 Communication Menu 3 2 3 2 1 3 Tools Menu 3 4 3 2 1 4 Help Menu 3 5 3 2 2 Window Tabs 3 6 3 2 2 1 Dialing Parameters Tab 3 6 3 2 2 2 System Parameters Tab 3 9 3 2 2 3 Tones Parameters Tab 3 11 3 2...

Страница 5: ...dware Wizard Window 1 2 5 2 9 Found New Hardware Wizard Window 2 2 5 2 10 Found New Hardware Wizard Window 3 2 6 2 11 Browser Window 2 6 2 12 Found New Hardware Wizard Window 4 2 7 2 13 Found New Hard...

Страница 6: ...7 Tones Parameters Tab 3 11 3 18 Create User Window 3 13 3 19 Edit User Window 3 13 3 20 Prefix Restriction Numbers Window 3 14 3 21 Call Manipulation Window 3 14 4 1 Start Up Mode 4 1 4 2 Idle Mode 4...

Страница 7: ...Installation and Operation Guide iv...

Страница 8: ...gn Exchange Office and home phone and PBX trunk service FXS Foreign Exchange Station 1 3 What s in the Box When opening the supplied package please check its content If the content does not match the...

Страница 9: ...ors of the CGW D device are displayed in Figure 1 1 The SIM insertion port on the bottom panel is displayed in Figure 1 2 AntennaConnector L CD Display US BConnector F XO P S T NConnector F X S P hone...

Страница 10: ...apter 2 for instructions Connect the device to PC via the USB interface Program the device as required Device installation Connect the antenna to the antenna connector Insert a SIM card into the port...

Страница 11: ...ded by the CGW D to the cellular network Otherwise the call is forwarded to the PSTN Incoming calls from a cellular network are forwarded to an analog telephone Figure 1 4 Office Trunk Configuration T...

Страница 12: ...ular users A Callback remote cellular user can call the PBX and if authorized the call is disconnected and reversed The CGW D calls back the remote user and sends a dial tone The remote user becomes n...

Страница 13: ...Installation and Operation Guide 1 6 This page is intentionally left blank...

Страница 14: ...the software perform the step as follows a Insert the supplied CD into the drive b Open the folder from the drive Figure 2 1 and double click the Setup icon The installation window opens Figure 2 2 T...

Страница 15: ...to continue The next installation window opens Figure 2 3 The recommended name for the program folder appears in the Program Folders field If required type another name in this field The program file...

Страница 16: ...Install Shield Wizard Window Installtion Complete e Click Finish The installation window closes An icon appears on your desktop Figure 2 5 Figure 2 5 CGW D Icon f Activate the CGW D application by ei...

Страница 17: ...stages of USB driver installation 2 3 1 USB Serial Driver Installation To install a serial driver perform the steps as follows a Power the device using the 9V DC external power supply b Plug a USB ca...

Страница 18: ...CGW D 2 5 Figure 2 8 Found New Hardware Wizard Window 1 d Click Next The next wizard window appears Figure 2 9 Figure 2 9 Found New Hardware Wizard Window 2...

Страница 19: ...er for my device recommended radio button and click Next The next wizard window appears Figure 2 10 Figure 2 10 Found New Hardware Wizard Window 3 f Select the Specify a location check box and click N...

Страница 20: ...d CD and the operation system installed on the PC and click Open The next wizard window appears Figure 2 12 Figure 2 12 Found New Hardware Wizard Window 4 h Click Next An installation procedure is per...

Страница 21: ...Found New Hardware Wizard Window 6 j Click Finish to finish USB COM port converter installation and start the USB port installation Found New Hardware window appears Figure 2 15 and after a few second...

Страница 22: ...ears Figure 2 17 Figure 2 17 Found New Hardware Wizard Window 8 l Click the Search for a suitable driver for my device recommended radio button and click Next The next wizard window appears Figure 2 1...

Страница 23: ...Next A standard Windows browser opens Figure 2 19 Figure 2 19 Browser Window n Select the USB driver s files location on the supplied CD and the operation system installed on the PC and click Open Th...

Страница 24: ...re from the supplied CD b From the main menu select Communication Read Configuration and click OK VMS starts reading the configuration from the Device system through the USB interface If the VMS appli...

Страница 25: ...nd the corresponding PC COM port On the VMS application main menu select Communication Com Port USB To COM Port Selection window appears Figure 2 23 Figure 2 23 USB to COM Port Selection Window Set th...

Страница 26: ...Paragraph 3 2 1 and four tabs see Paragraph 3 2 2 3 2 1 Application Menus The CGW D application has the following menus File menu see Paragraph 3 2 1 1 Communication menu see Paragraph 3 2 1 2 Tools m...

Страница 27: ...elect parameters for printing by group Print Opens a standard Windows print dialog Print Preview Displays a preview of the printed parameters Figure 3 2 Print Setup Opens a standard Windows print setu...

Страница 28: ...ndow Figure 3 4 Send Configuration Opens the Send Parameters window Figure 3 5 USB ComPort Selection Opens the Communication Setting window Figure 3 6 Password Opens the Change Password window Figure...

Страница 29: ...Window Figure 3 7 Change Password Window 3 2 1 3 Tools Menu The Tools menu Figure 3 1 serves for performing operations related to CDR viewing and deletion device reset and software upgrade Figure 3 8...

Страница 30: ...ersion restricted for administrators Figure 3 9 Read CDR Window Figure 3 10 Clear CDR Warning The CDR list is based on FIFO functionality thus the first call registered is the first call to be overwri...

Страница 31: ...Installation and Operation Guide 3 6 Figure 3 11 Help Menu Item Function Help topics Opens an online help file About CGW D Displays the software version Figure 3 12 Figure 3 12 About Window...

Страница 32: ...d 3 2 2 1 Dialing Parameters Tab The Dialing Parameters tab Figure 3 13 contains the options for dialing parameters configuration Figure 3 13 Dialing Parameters Tab Item Function Default Range Op tion...

Страница 33: ...0 Inter digit timeout Specifies the timeout value in seconds for dialing the all number digits except the first digit 3 Hook flash time Specifies the required time in milliseconds to put a call on hol...

Страница 34: ...O side is forwarded 20 disabled Free Call Forward Enables to forward calls from the FXO side to a cellular extension corresponds to the Maximum Number of Digits to be Dialed parameter Deselected Local...

Страница 35: ...set Roaming Enables to activate the roaming service Selected CLIR Calling Line Identification Restriction Prevents transmission of calling SIM card s number for outgoing calls Selected Network Lock En...

Страница 36: ...automatically any radio frequency from the list of supported frequencies during registration process Selected 850 MHz Sets the gateway to use only 850 MHz frequency during registration process Desele...

Страница 37: ...from the cellular network during all calls Selected All Calls Disconnection Pulse Drop Enabled Activates pulse drop loop current disconnection service and enables the Loop Disconnect Time field Select...

Страница 38: ...ar call a new cellular call will be indicated by the call waiting tone whereas a new PSTN call will be rejected Selected Gateway Dial Tone Enables the gateway to generate a dial tone for outgoing gate...

Страница 39: ...ll Back Call Through tab contains the options for call back and call through configuration Item Function Users List NEW This button opens the Create User window Figure 3 18 EDIT This button opens the...

Страница 40: ...CGW D 3 15 Figure 3 19 Edit User Window Figure 3 20 Prefix Restriction Numbers Window...

Страница 41: ...hanged according to the rule from the Call Manipulation window Item Function Default Range Option Public Call Through Allow Public Call Through Enables to provide a dial tone to any incoming cellular...

Страница 42: ...d disables this feature Empty APPLY Applies all changes 3 2 3 DTMF Programming The CGW D device can be programmed using DTMF commands To program the unit perform the steps as follows 1 If the unit is...

Страница 43: ...Reverse polarity only on outgoing calls 2 Reverse polarity for incoming and outgoing calls 2 Output volume control 330 X where X 1 9 9 is highest 5 End dialing digit definition 334 X where X DTMF dig...

Страница 44: ...swer from PBX Home In addition to Gateway provides dial tone for the free dialing via Cellular network follow by the Cellular prefixes White list settings 420 X where X 0 disabled X 1 enabled to speci...

Страница 45: ...sy 2 ON time X 5 DTMF OFF time sent X 6 DTMF ON time sent YYYY 4 digit cadence in steps of 20msec For X 1 4 YYYY 0100 3000 For X 5 6 YYYY 0020 0980 DTMF sensitivity 480 Y where Y sensitivity level 1 9...

Страница 46: ...ted digits 0 9 Clear restriction list 562 1 for for None Maximum number of digits for Public Call Through calls 564 X where X 0 9 0 Public Call Through mode disabled Call Back Call Through first digit...

Страница 47: ...Installation and Operation Guide 3 22...

Страница 48: ...guration connection diagram in Chapter 1 c Insert SIM card to the SIM card port on the bottom panel d Connect the external power supply to the power connector The LCD display lights up and displays th...

Страница 49: ...e To define permitted cellular prefixes in home use configuration perform the steps as follows a Connect the PSTN line cable to the To PSTN socket on the device b Connect a home phone to the To Phone...

Страница 50: ...re 4 6 and the device notifies by two short beeps that the call is routed to a cellular network P lease dial 9167798654 Figure 4 6 Dialed Cellular Number j When the person at the destination answers a...

Страница 51: ...ward area of the Dialing Parameters tab Figure 4 9 d Set a value in No Answer Forwarding Time field default value is 20 Figure 4 9 Call Forward to Cellular Number e Click APPLY m To test the function...

Страница 52: ...as detailed in Paragraph 4 4 d Define the required call forwarding settings It is recommended to select the Call Forward Disabled radio button in the Dialing Parameters tab so that the incoming calls...

Страница 53: ...Y The user s subscriber account was created in the database k Make a call to the CGW D from the registered cellular phone The device receives the call disconnects and calls the caller back A message a...

Страница 54: ...the To PSTN socket c Launch the PC software d Select Free Call Forward in Dialing Parameters tab e Click APPLY f To test the function make a call to the CGW D extension to receive a dial tone g Dial...

Страница 55: ...Installation and Operation Guide 4 8 This page is left intentionally blank...

Страница 56: ...k interface to PBX or home phone RJ 11 PSTN to analog trunk interface of PSTN or to PSTN subscriber line home phone configuration only CGW D only Power Supply SMA female Antenna Off hook AC impedance...

Страница 57: ...5 2 Model CGW D GSM Gateway 9 8ft Power supply Input 110VAC 60Hz 220VAC 50Hz Output 9VDC 800mA Temperature range 0 C 45 C 32 F 113 F Maximum relative humidity 95 Dimensions HxWxD 212x44x121 mm 8 3x1...

Страница 58: ...multiple antenna holder that can hold up to six antennas and wall mount brackets for three or six units Figure 6 1 Multiple Antenna Holder Three Unit Bracket Six Unit Bracket Figure 6 1 CGW D Mountin...

Страница 59: ...Installation and Operation Guide 6 2 This page is intentionally left blank...

Отзывы: