background image


26

The hour display can be selected to show hours in 12-hour or 24-hour settings. (Default 24-
Hour) 
1. 

Use the OUT/+ key to toggle between “12H” or “24H”. 

2. 

Confirm with the SET key and enter the Manual time setting. 


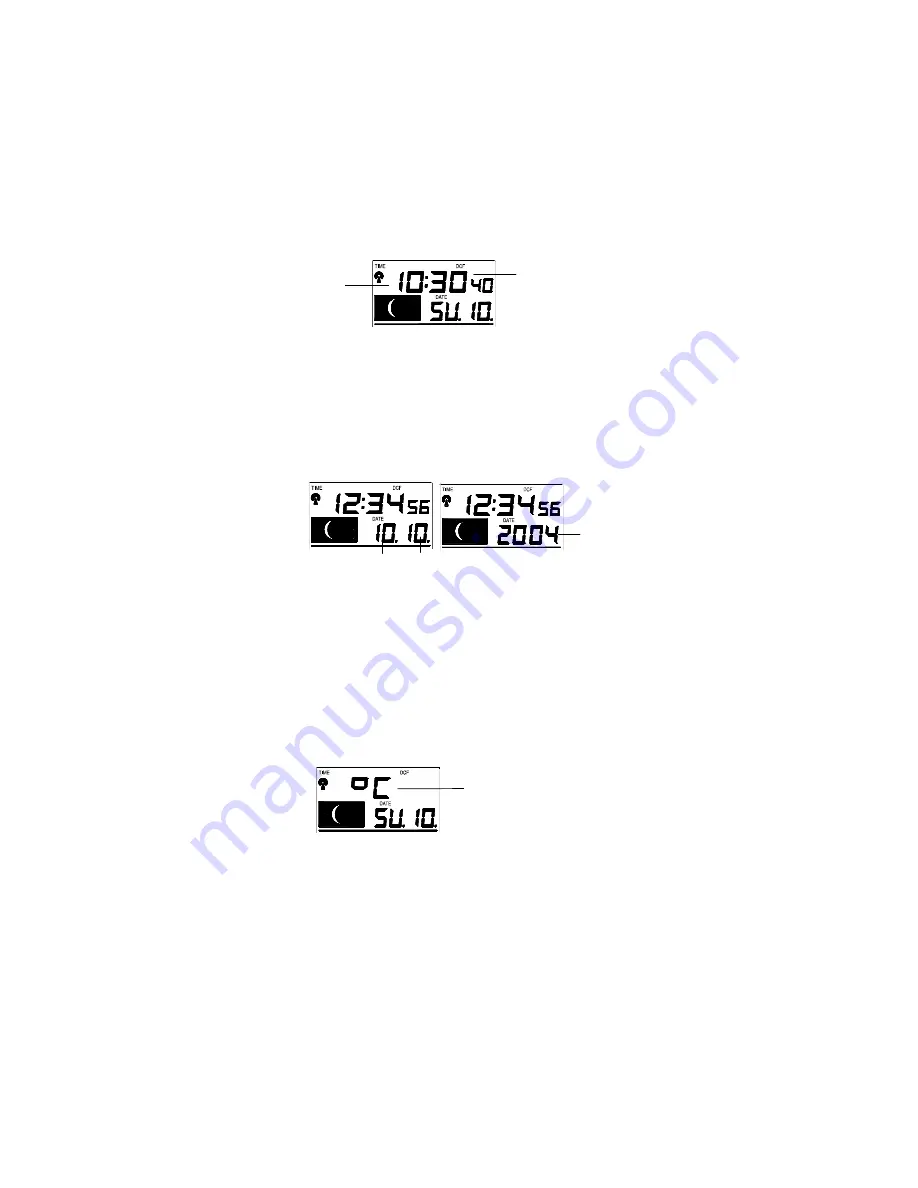
MANUAL TIME SETTING: 

In case the Weather Station cannot detect the DCF-signal (for example due to disturbances, 
transmitting distance, etc.), the time can be manually set. The clock will then work as a 
normal Quartz clock. 


1. 

The hour digit will start flashing. 

2. 

Use the OUT/+ key to set the hour. 

3. 

Press again the SET key to set the minutes. The minute digits start flashing. 

4. 

Use the OUT/+ key to set the minutes. 

5. 

Confirm with the SET key and enter the 

Calendar setting

.  


Note: 

The unit will still try and receive the signal despite it being manually set. When it does 
receive the signal, it will change the manually set time into the received time. During 
reception attempts the DCF tower icon will flash. If reception has been unsuccessful, then 
the DCF tower icon will not appear but reception will still be attempted the following day. 


CALENDAR SETTING: 


The date default of the Weather station is 1. 1. 2006. Once the radio-controlled time signals 
are received, the date is automatically updated. However, if the signals are not received, the 
date can also be set manually.  
1. 

The year starts flashing. 

2. 

Use the OUT/+ key to set the year (between year 2003-2029).  

3. 

Press the SET key again to confirm and to enter the month setting. The month starts 
flashing. 

4. 

Use the OUT/+ key to set the month.  

5. 

Press the SET key again to confirm and to enter the date setting mode. The date starts 
flashing. 

6. 

Use the OUT/+ key to set the date. 

7. 

Confirm all calendar settings with the SET key and enter the 

Temperature unit 

setting

.


°C/°F TEMPERATURE SETTING: 


Hour flashing 


Minutes flashing 

Year  

Date and month (24hr time format) 
Month and date (12hr time format) 

Flashing 

Содержание WEATHER STATION

Страница 1: ...oduct is simple and straightforward By reading this operating manual the user will receive a better understanding of the Weather Station together with the optimum benefit of all its features FEATURES The Weather Station DCF Radio controlled time with manual setting option Time reception ON OFF user selectable 12 24 hour time display Time zone option 12 hours Battery compartment Hanging hole Instan...

Страница 2: ...Signal reception intervals at 4 seconds Can receive up to 3 outdoor transmitters LED back light Low battery indicator Table standing or wall mounting Thermo Hygro Transmitter Remote transmission of outdoor temperature and humidity to weather station by 868 MHz signals Wall mounting case TO INSTALL AND REPLACE BATTERIES IN THE WEATHER STATION The Weather Station uses 3 x AA IEC LR6 1 5V batteries T...

Страница 3: ... them Once the indoor data is displayed user may proceed to the next step 3 After the batteries are inserted the Weather station will start receiving data signal from the transmitter The outdoor temperature and humidity data should then be displayed on the Weather station If this does not happen after 2 minutes the batteries will need to be removed from both units and reset from step 1 4 In order ...

Страница 4: ...onal sensors is not followed as described above Should transmission problems occur it is necessary to remove the batteries from all units and start again the set up from step 1 RESETTING The Weather Station and the Thermo hygro transmitter need to be reset when one of the following conditions occur Unsuccessful 868MHz signal reception Malfunction on the units Batteries replacement For resetting re...

Страница 5: ...asy to use function keys SET key Press and hold the key to enter manual setting modes LCD contrast time zone time reception ON OFF 12 24 hour display manual time setting calendar temperature C F pressure hPa inHg relative pressure value and weather icon sensitivity setting Reset all MIN MAX records Stop the alarm during alarm ringing Stop snooze mode Back light on ALM DATE key Press and hold key f...

Страница 6: ...ot be shown on LCD The user can then easily see whether the last reception was successful icon on or not icon off On the other hand the short blinking of the icon shows that a reception is currently taking place MANUAL SETTINGS The following manual settings can be changed when pressing the SET key for LCD contrast setting Time zone setting Time reception ON OFF setting 12 24 hour format setting Ma...

Страница 7: ...ge runs from 0 to 12 and then runs from 12 back to 0 in consecutive 1 hour intervals 3 Confirm with the SET key and enter the Time reception ON OFF setting TIME RECEPTION ON OFF SETTING In area where reception of the DCF time is not possible the DCF time reception function can be turn OFF The clock will then work as a normal Quartz clock Default setting is ON 1 The digit ON will start flashing on ...

Страница 8: ... time into the received time During reception attempts the DCF tower icon will flash If reception has been unsuccessful then the DCF tower icon will not appear but reception will still be attempted the following day CALENDAR SETTING The date default of the Weather station is 1 1 2006 Once the radio controlled time signals are received the date is automatically updated However if the signals are no...

Страница 9: ... 35 30 72 inHg for a better reference 1 The current relative pressure value will start flashing 2 Use the OUT key to increment and IN key to decrement the value Keep holding the key allows the value to advance faster 3 Confirm with the SET key and enter the Weather forecast icon sensitivity setting WEATHER FORECASTING ICON SENSITIVITY SETTING For locations with rapid changes of weather conditions ...

Страница 10: ... is 2 minutes SNOOZE SETTING AND STOPPING THE ALARM 10 minutes snooze function can be set when the alarm is ringing by pressing the SNOOZE CH key When the alarm is snoozing the alarm icon will remain flashing indicating that the alarm is active but is in Snooze mode To stop the snooze function when it is in snooze period press any key except the SNOOZE CH key To stop the alarm press any key during...

Страница 11: ...of LCD can be displayed in any of the following combinations Sunny Cloudy with sunny intervals Rainy For every sudden or significant change in the air pressure the weather icons will update accordingly to represent the change in weather If the icons do not change then it means either the air pressure has not changed or the change has been too slow for the Weather station to register However if the...

Страница 12: ...xample if the indicator is pointing downwards together with cloud and sun icons then the last noticeable change in the weather was when it was sunny the sun icon only Therefore the next change in the weather will be cloud with rain icons since the indicator is pointing downwards Note Once the weather tendency indicator has registered a change in air pressure it will remain permanently visualized o...

Страница 13: ...nsmitter 3 Three times to return to transmitter 1 2 Use OUT key to view the MIN MAX temperature and humidity data for the selected transmitter 3 To reset the minimum and maximum temperature and humidity data and the times at which they were recorded press the SET key continuously for about 3 seconds This will reset the MIN MAX data recorded to the current time date temperature and humidity The cur...

Страница 14: ...n space However this depends on the surrounding environment and interference levels If no reception is possible despite the observation of these factors all system units have to be reset see Setting up above POSITIONING THE WEATHER STATION The Weather station provides the option of table standing or wall mounting the unit Before wall mounting please check that the outdoor data can be received from...

Страница 15: ...atteries of the recommended type Do not make any repair attempts to the units Return it to their original point of purchase for repair by a qualified engineer Opening and tampering with the units may invalidate their guarantee Do not expose the units to extreme and sudden temperature changes this may lead to rapid changes in forecasts and readings and thereby reduce their accuracy SPECIFICATIONS T...

Страница 16: ...he User manual is highly recommended for the benefit of the user The manufacturer and supplier cannot accept any responsibility for any incorrect readings and any consequences that occur should an inaccurate reading take place This product is not to be used for medical purposes or for public information This product is only designed to be used in the home as indication of the future weather and is...

Отзывы: