33
34
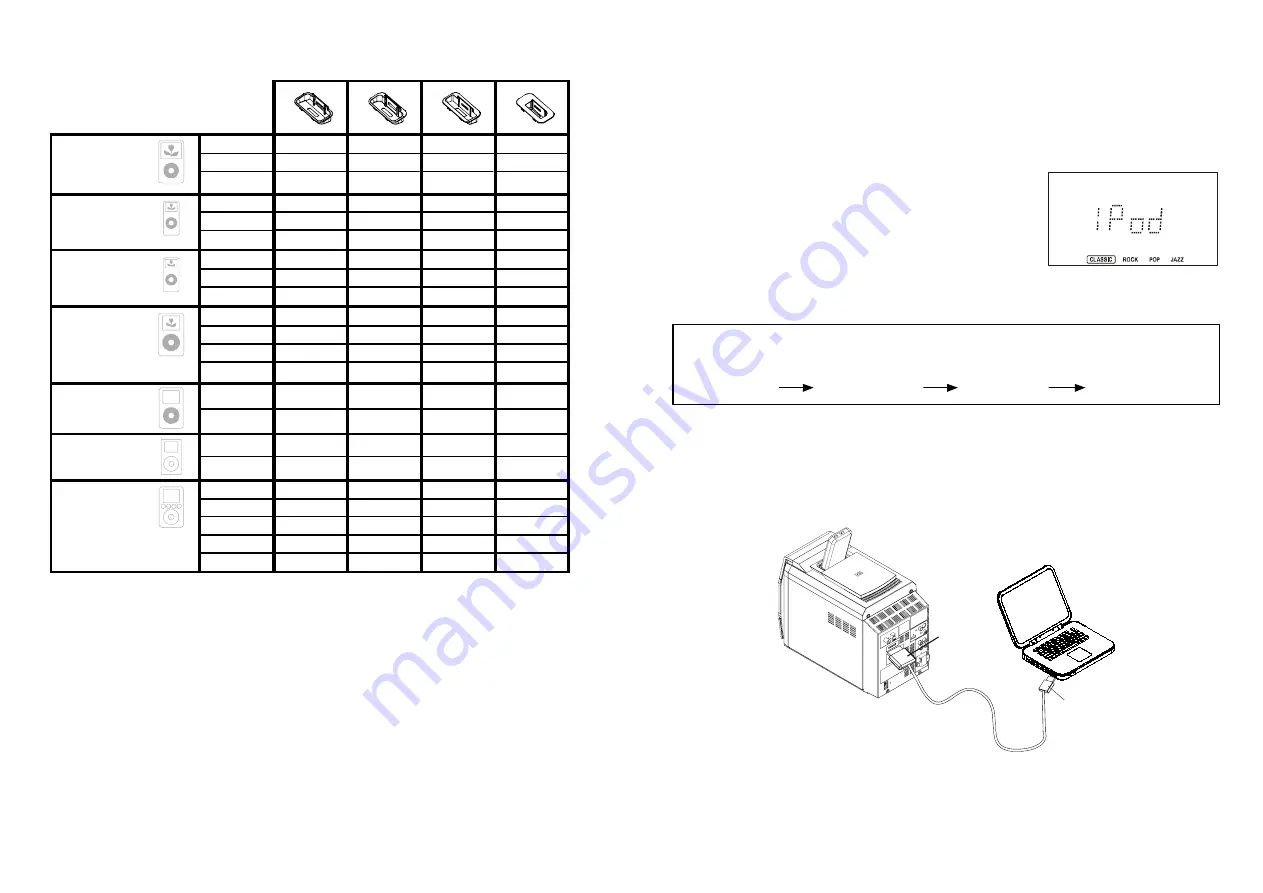
Dock Adapter Compatibility
A
B
C
D
5G with Video
1GB
2GB
4GB
photo
20GB
30GB
40GB
60GB
4G
20GB
40GB
mini
4GB
6GB
3G
10GB
15GB
20GB
30GB
40GB
X
X
X
X
X
X
X
X
X
X
X
X
X
X
X
X
X
X
80GB
X
30GB
60GB
(1st generation)
(2nd generation)
nano
2GB
4GB
8GB
X
X
X
nano
Note: Please make sure you are using the correct insert for your iPod and that it is properly docked
into this unit.
FAILURE TO DO SO MAY DAMAGE THE iPod .
Charging your iPod
When an iPod is inserted into the dock, it will go to standby mode then turn off. Whilst the iPod is
docked in the system, it will recharge (until fully charged).
Listening to your iPod
Insert the iPod as described above.
With the unit turned on, press the function button repeatedly
until "iPod " is shown in the display.
Press the
PLAY/PAUSE
, Stop button on the Micro System to
commence, control playback and stop.
1.
2.
3.
NOTE: The volume control on the iPod only adjusts the
volume of any headphones connected. To increase volume
when connected, use the volume controls on the front panel or
remote control.
PC Connection
A docked iPod can be connected to a PC using the “
iPod USB Sync”
socket on the rear of the
system. To set up the connection, insert the iPod connector end of the iPod PC cable (supplied with
iPod) to the socket on the rear of the system and connect to the PC USB port. Files can then be
uploaded to the iPod using iTunes.
30 PIN
CONNECTOR
USB CONNECTOR
Main Menu
IMPORTANT:
To prevent distortion during iPod playback you should go to the Main Menu of your
iPod, select the Settings Menu page, select the EQ Setting, and make sure that the EQ function is
set to “Off”.
Settings Menu
EQ Setting
Select “Off”


