ISOFIX UNIT fix 012 Скачать руководство пользователя страница 23

23

the child’s back or level with the ears (fig. 4.1).
1.  Loosen the harness straps 

(e) 

by pulling them gently while 

pressing the harness adjustment button 

(J) 

(fig. 5.1).

2. Adjust the headrest according to the child´s height by pulling the 

headrest height regulator 

(a) 

adjusting the harness to the height 

of the child´s shoulder or slightly above (fig. 5.2).

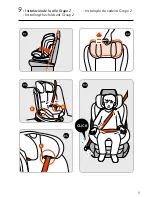
6. INsTallING THe car seaT. GroUP 1

GROUP 1 only. From 9 months to 4 years 

approx. (9-18 kg)

notice

1.  Ensure the seat is not in a reclined position (the indicator 

should be in position 1) and is ready to install in forward 

position (Group 1) as shown fig. 6.1. Pull the lever 

(H)

 forward 

and adjust the angle of recline to position 4 without releasing 

the lever. Release the lever when the seat is in the desired 

position (fig. 6.1)

2. Pull the iSoFiX adjuster 

(I)

 to extract both arms 

(M)

. Move the 

locking arms from side to side until you hear the click indicating 

that they are fully locked (fig. 6.2).

3. Take the top tether and pass it over the seat.
4. Place the child safety seat in the back seat of the vehicle 

facing in the direction of travel.

5. Hold the safety seat with both hands and insert the two locking 

arms 

(M)

 into the verhicle´s isofix connectors until they fasten 

with a click on both sides. The red button will change to green 

on both sides (fig. 6.3). 

6. Shake the seat to check that it is correctly anchored to the 

vehicle’s iSoFiX points.

IMPORTANT! The locking arms are only correctly fixed if both 

safety buttons are green. 

7.  Pull the iSoFiX adjuster and push the safety seat towards the 

back using a firm, constant pressure on both sides until it rests 

Содержание UNIT fix 012

Страница 1: ...1 UNIT fix 012 Manual de uso Instructions MANUAL Instru es de utiliza o Apto para Suitable for Adequado para 0 25 kg Grupo Group Grupo 1 2 0...

Страница 2: ...IMPORTANTE Conservar para futuras consultas Procure que las instrucciones puedan conservarse en el sistema de retenci n infantil durante su ciclo vital WARNING Keep for future reference Please kindly...

Страница 3: ...0 1 2 De 0 a 25 kg de 0 a 6 a os aprox English Instruction manual Child safety seat Group 0 1 2 From 0 kg to 25 kg from 0 to 6 years approx Portugues Instru es de utiliza o Dispositivo de reten o para...

Страница 4: ...s de instalaci n en el veh culo Installation positions whitin the vehicle Postos de instala o no ve culo 1 2 A B C D F G J I K L Cintur n diagonal Cintur n abdominal Cinto diagonal Cinto abdominal Dia...

Страница 5: ...5 3 4 K 3 5 3 2 Instalaci n de la silla Grupo 0 Installing the child seat Group 0 Instala o da cadeira Grupo 0 3 click Q 3 6 3 2 4 1 3 1 1 2 3 K 3 3...

Страница 6: ...1 4 5 Instalaci n del ni o Grupo 0 Fastening the child to the seat Group 0 Ajuste en altura del reposacabezas Regulating the headrest height Instala o da crian a Grupo 0 Ajuste da altura do apoio da c...

Страница 7: ...7 1 2 4 3 6 1 6 2 6 6 3 6 5 6 4 Instalaci n de la silla Grupo 1 Installing the child seat Group 1 Instala o da cadeira Grupo 1 click Top tether P 1 Top tether P 2 Top tether P 3...

Страница 8: ...8 8 Retirar el arn s y la hebilla del cintur n Removing the harness and the buckle Retirar o arn s peitoral e a fivela do cinto 8 4 6 6 8 1 8 3 8 2 6 7 N P 6 8...

Страница 9: ...9 9 Instalaci n de la silla Grupo 2 Installing the child seat Group 2 Instala o da cadeira Grupo 2 9 2 9 1 9 3 9 4 9 5 click K C K...

Страница 10: ...categor a del asiento infantil y del aparato 6 El grupo de peso y la clase de tama o ISOFIX para los que est destinado el dispositivo son Grupo 1 para ni os de 9 a 18 kg Sistema de retenci n ISOFIX c...

Страница 11: ...17 Los art culos r gidos y las piezas de pl stico de la silla de seguridad deben colocarse e instalarse de forma que no puedan durante el uso diario del veh culo quedar atrapados en un asiento m vil o...

Страница 12: ...elanteros salvo en estos casos concretos 1 Cuando el veh culo no disponga de asientos traseros 2 Cuando todos los asientos traseros est n ya ocupados por menores de edad de estatura igual o inferior a...

Страница 13: ...a presionando hasta oir un click fig 3 4 5 Pase la parte del cintur n diagonal por las gu a de cintur n superior correspondiente Q segun el puesto de instalaci n en el coche tal y como indica la figur...

Страница 14: ...cabezas y correas de hombro se ajustan del modo siguiente 1 Afloje las correas de los hombros de la silla de seguridad lo m ximo posible Para ello 2 Destense las cintas del arn s E tirando de la parte...

Страница 15: ...mprobar que est correctamente anclada a los puntos ISOFIX del veh culo PRECAUCI N Los brazos de bloqueo s lo estar n correctamente acoplados si en ambos botones de seguridad aparece el color verde 7 P...

Страница 16: ...p tulo 4 8 Retirar el arn s y la hebilla del cintur n 1 Retirar el arn s de 5 puntos y la hebilla del cintur n 1 Destense las cintas del arn s tirando de la parte pectoral de ste a la vez que presiona...

Страница 17: ...la silla este en la posici n desea 2 Coloque la silla del ni o en la bancada trasera del veh culo en direcci n a la marcha fig 9 1 10 INSTALACI N DEL NI O EN LA SILLA GRUPO 2 1 Seg n la altura del ni...

Страница 18: ...caci n de este producto o necesita cualquier pieza de repuesto por favor p ngase en contacto con nuestro servicio de atenci n al cliente 12 Garant a 1 Quedan excluidos los defectos o aver as producida...

Страница 19: ...ween 9 and 18 kg ISOFIX class B1 restraint system 7 Under no circumstances should the safety seat be installed in the front seat of the car opposite the direction of travel if the car is equipped with...

Страница 20: ...e straps are not twisted or knotted 19 The seat should be replaced after undergoing the violent stresses associated with an accident 20 Do not use anchor points that are not listed in the instruction...

Страница 21: ...forward seats except for the following cases 1 Whenever the vehicle does not count with rear seats 2 When all rear seats are already occupied by children exceeding 135 cm height 3 When it is not possi...

Страница 22: ...d to the height of the child s shoulder or slightly above never behind the child s back or level with the ears fig 4 1 1 Loosen the harness straps E by pulling them gently while pressing the harness a...

Страница 23: ...Release the lever when the seat is in the desired position fig 6 1 2 Pull the ISOFIX adjuster I to extract both arms M Move the locking arms from side to side until you hear the click indicating that...

Страница 24: ...ctly tightened when the green tension indicator extends 1 mm fig 6 7 Uninstalling the Isofix arms 1 To release the IsoFix arms pull the button on the anchors to unlock them until the indicator turns f...

Страница 25: ...recline to position without releasing the lever Release the lever when the seat is in the desired position 2 Place the child safety seat in the back seat of the vehicle facing in the direction of trav...

Страница 26: ...s or queries regarding the use or placement of this product or you need any replacement elements please contact our Customer Services Department 12 GUARANTEE 1 The guarantee will not apply to defects...

Страница 27: ...is o dispositivo se destina s o Grupo 1 para crian as dos 9 aos 18 kg Sistema de reten o ISOFIX classe B1 6 N o se deve instalar a cadeira de seguran a em circunst ncia alguma no assento dianteiro do...

Страница 28: ...ras e aos dispositivos de ajuste 17 Os itens r gidos e as pe as de pl stico da cadeira de seguran a devem ser colocados e instalados de modo a n o ficarem presos num banco amov vel ou numa porta do au...

Страница 29: ...lar no sentido inverso da marcha GRUPO 1 Instalar no sentido da marcha GRUPO 2 Instalar no sentido da marcha Em assentos com Ganchos ISOFIX entre o assento e o encosto e pontos de fixa o Top Tether po...

Страница 30: ...ivela pressionando at ouvir um clique fig 3 4 5 Passe a parte do cinto diagonal pela guia do cinto superior Q tal como indica a figura 3 6 6 Retire a folga que fica detr s da instala o do cinto de 3 p...

Страница 31: ...s fig 4 1 1 Liberte as cintas do arn s ao tirar a parte peitoral do mesmo enquanto prime o bot o de ajuste do arn s J fig 5 1 2 Tire do regulador do cabeceiro A e escojha o altura correta do arn s Sue...

Страница 32: ...lo 6 4 Se necess rio ajuste a reclina o do encosto do banco do ve culo para garantir que o assento para crian a esteja correctamente encostado 8 Pegue no Top Tether e pressione o regulador do Top Teth...

Страница 33: ...assento fig 8 3 2 Retirar a capa 1 Coloque o apoio de cabe a na posi o mais alta 2 Retire a capa do cabeceiro fig 8 5 3 Levante a capa do assento desabotoando os botoes que fixam a capa o assento Pux...

Страница 34: ...agonal da correia atrav s da guia diagonal da correia C no apoio para a cabe a e certifique se que mant m dentro da guia fig 9 5 CUIDADO N o tor a o cinto 6 Comprove que os cintos n o est o torcidos e...

Страница 35: ...oinadequadaou do incumprimento das normas de seguran a de instala o e de manuten o descritas nas fichas de instru es que acompanham os produtos 2 assegurada a repara o totalmente gratuita de defeitos...

Страница 36: ...GROUP Parque Empresarial Zuatzu Edificio Donosti 2 planta Oficina 3 20018 San Sebasti n Gipuzkoa Spain t 34 943 833 013 f 34 943 833 004 e info babyauto com babyauto com 80 0201 GR 0 I II 0 25 kg ECE...

Отзывы: