background image


38 

[email protected] | +49 921 150845-0


5


Assembly informationen 

5.1


Basic information for assembly 

The bed should only be assembled by authorised personnel. The fuse on the installation side must not 
exceed 16A. 

Before  connecting  the  device,  please  ensure  that  the  voltage  and  frequency  of  your  mains  supply 
correspond to the specifications on the type plate.  

Ensure that the bed is placed on a level surface when selecting its location. Ensure  a suitable floor 
covering if the bed has to be moved frequently. Carpets, rugs and loosely laid floor coverings can be 
damaged or make it difficult to push the bed.  

Connect the mains plug firmly to the mains socket. When doing so, lay the mains connection cable on 
the floor. When doing so, ensure that the bed (especially when moving) is not standing with its castors 
on the cable. The cable must not be fed through the mechanics of the bed base! (danger of crushing) 

Damage  to  the  electrical  mains  cable  by  running  over  it  or  clamping  it  can  have  fatal 
consequences. 

Before moving the bed or dismantling it for transport, the mains connection cable must be 
wound up and secured to the intended device on the chassis. 

5.2


Setting up the Multidorm Mobil 

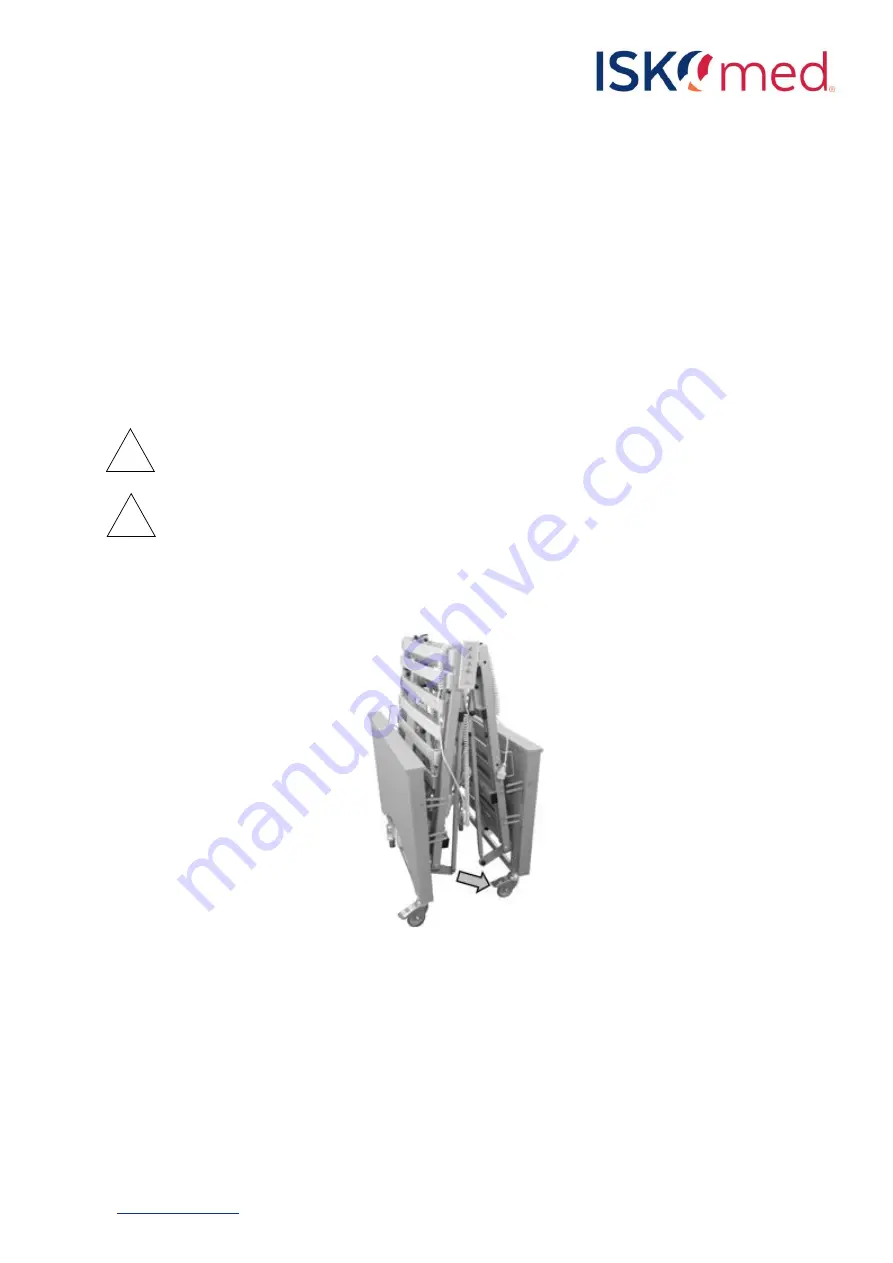
After unpacking the delivered nursing home bed, the completely assembled bed stands with you in the 
folded state as shown in Figure 2. 


Figure 2: Multidorm mobile in the folded state 

The set-up works as follows: 

1.


Brake either at the head end or at the foot end both castors of one side of the bed (arrow 
Figure 2) with the castor lock.  
One  side  of  the  bed  must  be  fixed  so  that  the  bed  does  not  move  back  and  forth  in  an 
uncontrolled manner and so that the lying surface can unfold in one direction 


2.


Connect the power supply cable to the power supply (socket). 

Содержание ISKOmed Multidorm Mobil

Страница 1: ...Multidorm Mobil Gebrauchsanleitung Instruction for use Stand 04 2022 Rev 2 0...

Страница 2: ...me 16 5 4 Demontage des Pflegebettes 17 6 Bedienung 18 6 1 Bedienung der Seitengitter und Halteb gel 18 6 2 Absperrfunktion 19 6 3 Bedienung der Funktionen 19 6 4 Bedienung der Bremsrollen 20 6 5 Pati...

Страница 3: ...s verification 34 3 Safety instructions 36 4 General product description 36 4 1 Intended purpose 36 4 2 Indication 36 4 3 Contraindication 37 4 4 Equipment features 37 5 Assembly informationen 38 5 1...

Страница 4: ...e 51 17 2 Disposal of the electrical components 51 17 3 Disposal of the packaging 51 18 Declaration of Conformity 52 Abbildungsverzeichnis Abbildung 1 Exemplarisches Typenschild 9 Abbildung 2 Multidor...

Страница 5: ...Folding out 40 Figure 5 Assembly lower and upper side rail 41 Figure 6 Sequence assembly extendable side rail 41 Figure 7 Side rail operation 42 Figure 8 Locking option via the hand control 43 Figure...

Страница 6: ...en Sie die Gebrauchsanleitung vor dem ersten Gebrauch sorgf ltig durch und bewahren Sie sie stets in greifbarer N he auf In dieser Gebrauchsanweisung k nnen nicht alle denkbaren Einsatzm glichkeiten d...

Страница 7: ...barer N he des Symbols erscheinen Konformit tssymbol nach 2017 745 der Medizinprodukte Richtlinie Medizinprodukt Zeigt das durch den Hersteller zur Verf gung gestellte Medizinprodukt nach den EU Richt...

Страница 8: ...egrenzung zeigt den Feuchtigkeitsbereich an dem das Medizinprodukt sicher ausgesetzt werden kann Luftdruck Begrenzung zeigt den Bereich des Luftdrucks an dem das Medizinprodukt sicher ausgesetzt werde...

Страница 9: ...utig identifizieren Abbildung 1 Exemplarisches Typenschild Abbildung 1 zeigt ein exemplarisches Typenschild Die genauen Spezifikationen Ihres Produkts entnehmen Sie bitte dem angebrachten Typenschild...

Страница 10: ...e Vertr glichkeit 2015 DIN EN ISO 10993 Biologische Beurteilung von Medizinprodukten Teil 1 Beurteilung und Pr fung 2010 DIN EN 1041 Bereitstellung von Informationen durch den Hersteller eines Medizin...

Страница 11: ...ie Spannung und Frequenz Ihres Stromnetzes den Angaben auf dem Typenschild entsprechen Achten Sie auf eine ebene Standfl che bei der Auswahl des Standortes Sorgen Sie f r einen geeigneten Bodenbelag w...

Страница 12: ...n Kraft oder bereits vorliegender Erkrankung en des eigenen Bewegungsapparates die manuelle Verstellung nicht ausreichend bew ltigen kann 4 3 Kontraindikation Die pflegende Person muss sich vergewisse...

Страница 13: ...Sie den Netzstecker fest an die Netzsteckdose an Verlegen Sie dabei die Netzanschlussleitung am Boden Achten Sie hierbei darauf dass das Bett besonders beim Verschieben nicht mit den Rollen auf der Le...

Страница 14: ...tbeleuchtung Sperrung aller Funktionen Offen Ersten vier Tastenreihen Kopf Knie Comfort H he Unterbettbeleuchtung Stellung I Ersten f nf Tastenreihen Kopf Knie Comfort H he Trend Antitrend Unterbettbe...

Страница 15: ...Bettzeug Kissen Aufsteh Hilfen oder andere Zusatzger te von der Liegefl che abgebaut und aus dem Bett entfernt werden Auch die Seitengitter und alle unter dem Bett liegende Objekte m ssen abgebaut bz...

Страница 16: ...bbildung 5 Abbildung 5 Montage unterer und oberer Seitenholm Bitte achten Sie darauf dass bei der Montage der obere und der untere Seitenholm nicht vertauscht werden Vor der Montage des Seitenholmes m...

Страница 17: ...fu seitig ein Luftspalt zwischen Holzkoffer und Seitenholmen sichtbar ist Die Verriegelungskn pfe m ssen in den Bohrungen einrasten 5 4 Demontage des Pflegebettes Bei Bedarf z B Transport k nnen die...

Страница 18: ...Seitenteile ablassen Abbildung 7 Seitenholmbedienung Die Seitengitter erf llen die Schutzfunktion nur bei abgelassenem Kopfteil und Fu teil Wird ein Patient mit hochgezogen Seitengittern unbeaufsichti...

Страница 19: ...ktionen werden mit dem Handtaster bedient Jede Tastenreihe ist dabei entsprechend Ihrer Funktion beschriftet Abbildung 9 Bedienung der Funktionen Jede Auf oder Abw rtsbewegung des Kopfteiles der H hen...

Страница 20: ...ks und rechts an der Liegefl che je eine Aufnahme f r den Patientenaufrichter angebracht Bei der Montage des Aufrichters ist zu beachten dass das Aufrichterrohr mit dem Metallbolzen so weit in die Auf...

Страница 21: ...rend der Bet tigung der Verstellfunktionen d rfen um Verletzungsgefahren zu vermeiden weder K rperteile des Patienten ber die Liegefl che herausragen noch F e auf dem Bettenuntergestell ruhen Vor dem...

Страница 22: ...sehen Das Ma von Oberkante der Matratze unbelastet bis zur Oberkante des obersten Holzseitenholmes Seitengitter in oberer Position von 22cm muss aus Sicherheitsgr nden eingehalten werden Matratzen mit...

Страница 23: ...lten zu verbessern oder zu unterst tzen Anwendungsumgebung 4 ME Ger t zur Linderung oder zum Ausgleich einer Verletzung Behinderung oder Krankheit in der h uslichen Pflege Es kommt zu einer Ger uschen...

Страница 24: ...SKO Fachpersonal oder durch von ISKO autorisierte und geschulte Personen mit umfassender Produktkenntnis ausgef hrt werden Bei Nichteinhalten dieser Bestimmung wird jeglicher Garantie und Haftungsansp...

Страница 25: ...anwendbar siehe Herstellerangaben Es muss das von den Herstellern in der jeweiligen Gebrauchsanweisung empfohlene Verd nnungsverh ltnis angewendet werden L sungsmittel sind nicht zugelassen Schleifmit...

Страница 26: ...s die Motoren sich komplett eingefahren haben Nach der Initialisierung k nnen die Antriebe wieder verwendet werden Tabelle 6 Betriebsst rungen und deren Behebung nderungen Neueinstellungen und Reparat...

Страница 27: ...Funktion aller elektrisch betriebenen Bewegungen Alle Motoren am Pflegebett ohne Matratze ohne Patient ganz aus und einfahren bis sie von selbst abschalten Endschalter in den Motoren m ssen durch ein...

Страница 28: ...s unbedingt zu beachten 17 Entsorgung 17 1 Entsorgung des Ger tes Eine Entsorgung des Ger tes und der Zubeh rteile wenn vorhanden sollte Umweltgerecht und nach den gesetzlichen Bestimmungen erfolgen B...

Страница 29: ...erkl rung Wir erkl ren als Hersteller in alleiniger Verantwortung dass unsere Klappbetten die grundlegenden Anforderungen der EG Richtlinie f r Medizinprodukte 2017 745 Anhang II erf llen ISKO KOCH Gm...

Страница 30: ...30 info iskomed de 49 921 150845 0 English...

Страница 31: ...lease read the instructions for use carefully before using the product for the first time and always keep them close at hand Not all conceivable uses of the device can be covered in these instructions...

Страница 32: ...edical device on the market Conformity symbol according to 2017 745 of the Medical Devices Directive Medical Device Shows the medical device provided by the manufacturer in accordance with EU Directiv...

Страница 33: ...posed Humidity Limit indicates the humidity range to which the medical device can be safely exposed Air Pressure Limit indicates the range of air pressure to which the medical device can be safely exp...

Страница 34: ...plate is attached to the head of the trolley frame The nameplate allows the product to be clearly identified Figure 1 Exemplary type plate Figure 1 shows an exemplary type plate For the exact specifi...

Страница 35: ...Serviceability specification 2010 EN 60601 1 2 Electromagnetic compatibility 2015 DIN EN ISO 10993 Biological evaluation of medical devices Part 1 Assessment and testing 2010 DIN EN 1041 Provision of...

Страница 36: ...its rollers The cable must not be routed through the mechanics of the base danger of crushing Damaged power cables can lead to life threatening situations These must be replaced immediately Check the...

Страница 37: ...Equipment features The folding bed has the following electrical functions Type electr height adjustment electr head adjustment electr knee adjustment electr folding mechanism KP 011 0 IL Yes Yes Yes Y...

Страница 38: ...is not standing with its castors on the cable The cable must not be fed through the mechanics of the bed base danger of crushing Damage to the electrical mains cable by running over it or clamping it...

Страница 39: ...or this process and that the bed does not come up against any obstacles Now you can start the unfolding process with the help of the hand switch To do this please set the arrow on the back of the manu...

Страница 40: ...nbraked so that the castors can run freely Now you can start the folding process with the help of the manual switch To do this move the arrow on the back of the manual switch to position II Now simult...

Страница 41: ...l can be pushed onto the locating pins on one side Please pay attention to the correct drillings Figure 6 Sequence assembly extendable side rail Now by also pressing the locking button there and pushi...

Страница 42: ...ed Keep the trigger pressed and lower side parts Figure 7 Side rail operation The side rails only fulfil the protective function when the head section and foot section are lowered If a patient with ra...

Страница 43: ...re operated with the manual switch Each row of keys is labeled according to its function Figure 9 Operating the functions Each upward or downward movement of the head section the height adjustment and...

Страница 44: ...g the lifting pole ensure that lifter tube with the metal bolt is pushed far enough into the socket bushing so that the metal bolt is fully located in the recessed slot on the socket bushing Thus the...

Страница 45: ...mitted for any part of the patient s body to protrude out from the lying surface nor for feet to rest on the bed underframe when operating the adjustment functions Before moving the bed the mains plug...

Страница 46: ...ccording to DIN EN 60601 2 52 the medical device can be used in the following application environment Application environment 3 Long term care in a medical setting where medical supervision is require...

Страница 47: ...ing load max patient weight 175 kg 135 kg Dimensions the lying surface 200cm x 90cm Dimensions of the nursing bed Bed complete without side rails 69 7 kg Wooden cladding of the lifting mechanism 1 pie...

Страница 48: ...o ensure that the bed functions properly each ISKO bed should be cleaned disinfected and checked after each use so that it can be used again immediately Improper cleaning disinfection of the bed can c...

Страница 49: ...f keys until the motors have retracted completely After initialization the drives can be used again Table 6 Operational faults and solutions For issues which cannot be rectified using the aforemention...

Страница 50: ...hall be paid to the following points Function of all electrically operated movements Fully extend and retract all motors on the nursing bed without mattress without patient until they switch off by th...

Страница 51: ...bed 17 Disposal 17 1 Disposal of the device Disposal of the device and accessories if any should be carried out in an environmentally friendly manner and in accordance with the legal regulations Pleas...

Страница 52: ...tion of Conformity As the manufacturer we declare under our sole responsibility that our folding beds complies with the basic requirements of the EC Directive for Medical devices 2017 745 Annex II ISK...

Отзывы: