Chapter 11 SETUP MODE
Press the [
<
] or [
>
] button to select whether or not to allow open
prices system.
OPEN PRICE
0: Yes
1: No
UNIT PRICE
Enter a unit price and press this field.
M/D AMOUNT
Enter a markdown amount or percentage and press this field.
QTY
Enter a quantity and press this field.
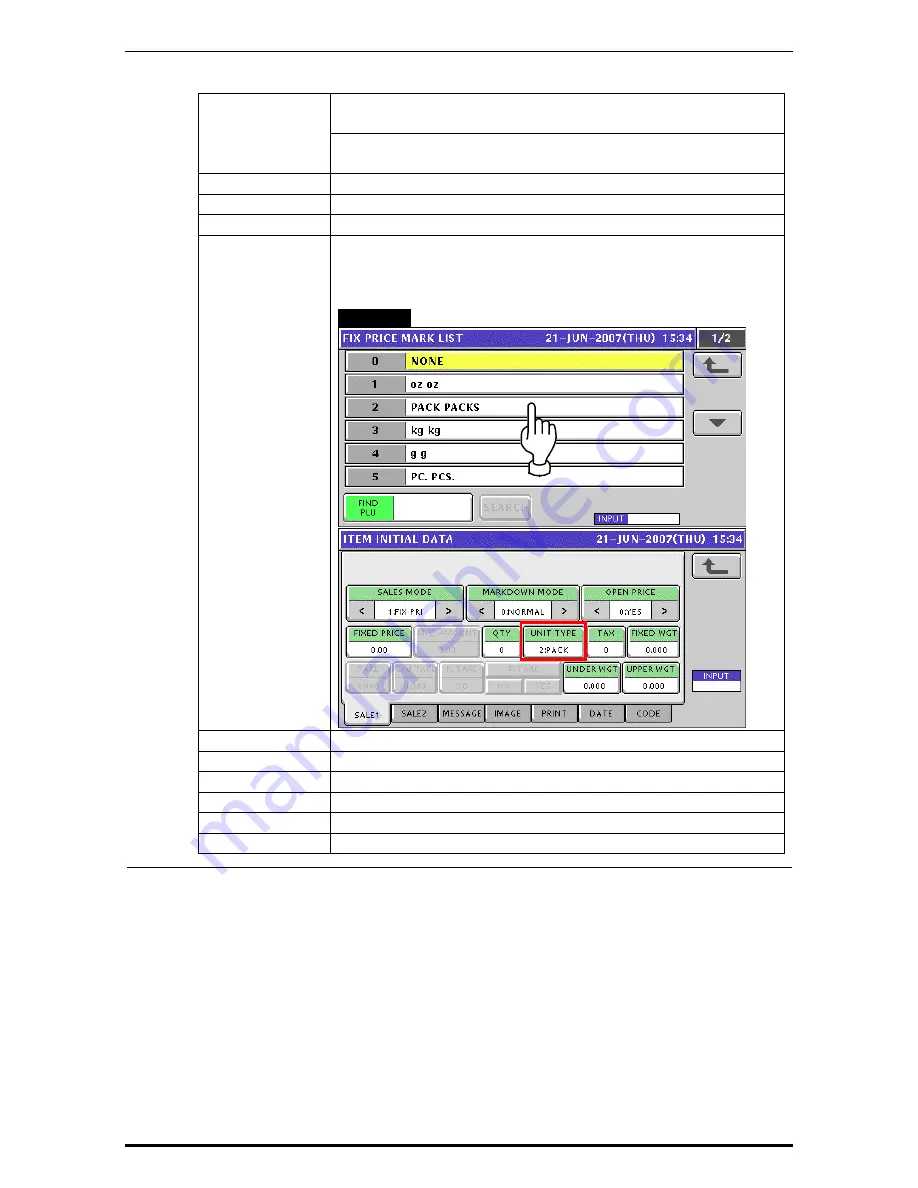
UNIT TYPE
Press this field to display the Fix Price Mark List screen.
Then, select a desired price mark by pressing the corresponding
field.
EXAMPLE
“Pack Packs”
FIXED PRICE
Enter a fixed price and press this field.
TAX
Enter a tax number and press this field.
FIXED WEIGHT
Enter a fixed weight and press this field.
TARE
Enter a tare weight and press this field.
UNDER WEIGHT Enter a lower weight limit and press this field.
UPPER WEIGHT Enter an upper weight limit and press this field.
11-22
UNI-5 User’s Manual
Содержание Uni-5
Страница 7: ...Chapter 12 ADJUSTMENT MODE 5 Press the SET button to confirm calibration UNI 5 User s Manual 12 5 ...
Страница 50: ...Chapter 3 RECEIPT ISSUE 8 Press the PRINT key on the key sheet to issue the receipt UNI 5 User s Manual 3 9 ...
Страница 51: ...Chapter 3 RECEIPT ISSUE 9 The Subtotal screen appears for the settlement 3 10 UNI 5 User s Manual ...
Страница 64: ...Chapter 3 RECEIPT ISSUE 14 The Subtotal screen appears for the settlement UNI 5 User s Manual 3 23 ...
Страница 67: ...Chapter 3 RECEIPT ISSUE 7 The Subtotal screen appears for the settlement 3 26 UNI 5 User s Manual ...
Страница 77: ...Chapter 5 TEMPORARY CHANGE OPERATIONS Fixed Unit Price Products 5 2 UNI 5 User s Manual ...
Страница 79: ...Chapter 5 TEMPORARY CHANGE OPERATIONS Weighing Fixed Price Products 5 4 UNI 5 User s Manual ...
Страница 81: ...Chapter 5 TEMPORARY CHANGE OPERATIONS Fixed Unit Price Products 5 6 UNI 5 User s Manual ...
Страница 83: ...Chapter 5 TEMPORARY CHANGE OPERATIONS Fixed Unit Price Products 5 8 UNI 5 User s Manual ...
Страница 85: ...Chapter 5 TEMPORARY CHANGE OPERATIONS Weighing Fixed Price Products 5 10 UNI 5 User s Manual ...
Страница 87: ...Chapter 5 TEMPORARY CHANGE OPERATIONS Weighing Fixed Price Products 5 12 UNI 5 User s Manual ...
Страница 98: ...Chapter 7 ACCUMULATOR MODE 6 Remove the product from the weigh platter UNI 5 User s Manual 7 5 ...
Страница 101: ...Chapter 7 ACCUMULATOR MODE 6 The registration has been completed 7 8 UNI 5 User s Manual ...
Страница 104: ...Chapter 7 ACCUMULATOR MODE 6 Remove the product from the weigh platter UNI 5 User s Manual 7 11 ...
Страница 109: ...Chapter 8 TOTAL ADJUST MODE 6 Remove the product from the weigh platter UNI 5 User s Manual 8 5 ...
Страница 112: ...Chapter 8 TOTAL ADJUST MODE 6 The registration has been completed 8 8 UNI 5 User s Manual ...
Страница 115: ...Chapter 8 TOTAL ADJUST MODE 6 Remove the product from the weigh platter UNI 5 User s Manual 8 11 ...
Страница 120: ...Chapter 9 TOTAL MODE UNI 5 User s Manual 9 5 ...
Страница 128: ...Chapter 10 PROGRAM MODE 10 2 UNI 5 User s Manual ...
Страница 151: ...Chapter 10 PROGRAM MODE UNI 5 User s Manual 10 25 9 Repeat steps 4 through 8 for more registrations ...
Страница 168: ...Chapter 10 PROGRAM MODE 10 42 UNI 5 User s Manual 8 The selected PLU has been assigned to the selected membrane key ...
Страница 248: ...Chapter 10 PROGRAM MODE 10 122 UNI 5 User s Manual 4 Press the STRAT button to print the labels ...
Страница 250: ...Chapter 11 SETUP MODE 11 2 UNI 5 User s Manual ...
Страница 255: ...Chapter 11 SETUP MODE UNI 5 User s Manual 11 7 ...
Страница 259: ...Chapter 11 SETUP MODE UNI 5 User s Manual 11 11 ...
Страница 260: ...Chapter 11 SETUP MODE 11 12 UNI 5 User s Manual ...
Страница 264: ...Chapter 11 SETUP MODE 3 Press the WEEKLY tab to display the Preset Report Weekly screen 11 16 UNI 5 User s Manual ...
Страница 278: ...Chapter 11 SETUP MODE 11 30 UNI 5 User s Manual ...
Страница 279: ...Chapter 11 SETUP MODE UNI 5 User s Manual 11 31 ...
Страница 285: ...Chapter 11 SETUP MODE 9 The edited logo image has been registered UNI 5 User s Manual 11 37 ...


