background image

Manual No. 0149A

IWX Operation Manual Kg Version   

19

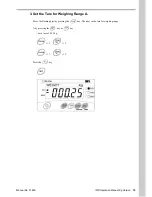
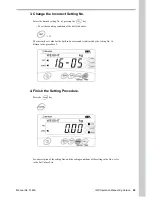
3. Set the Tare for Weighing Range A.

Move the flashing digit by pressing the 

 key.  Then key in the tare for weighing range 

A by pressing the

 key or 

 key.

- For a tare of 0.25 kg:

×

3   

×

2

×

1   

×

5

Press the 

 key.

Содержание IWX-150/30

Страница 1: ...t carry out installation operation service or mainte nance until thoroughly understanding the contents of this manual Keep this manual available at all times for installation oper ation service and maintenance ISHIDA CO LTD ...

Страница 2: ...s and by recommend ing improvements Please convey your comments to the near est Ishida Company regional representa tive Thank you Copyright c 2001 by Ishida Co Ltd All Rights Reserved No part of this manual may be reproduced in any form by mimeograph or any other means without written permission of the publisher ...

Страница 3: ...n personal safety do not perform any maintenance procedures which are not specified in the manual Diconnect the power supply before servicing To ensure your personal safety disconnect the power supply before servicing Power supply to the machine is disconnected only when the electrical plug is removed from the electrical outlet For safe operation of this machine connect the plug to the nearest and...

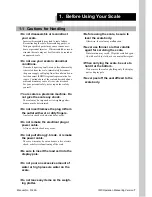
Страница 4: ...om the electrical outlet CAUTIONS FOR USE Always operate the scale on a level surface Do not drop or apply a strong shock to the scale Do not expose the scale to direct sunlight for long period Do not disassemble the scale When cleaning the scale only use a soft dry cloth wetted with a neutral cleanser Never use thinner or other volatile liquids Do not allow any liquids to come into contact with t...

Страница 5: ...ed with fluctuating power supply voltage Use of an electrical outlet also being used for a vibrator radio or other noise sources may affect the performance of the scale Be sure to provide an outlet exclusively for use by the scale Also avoid putting many loads on one electrical outlet Power Supply Use a power supply that conforms to product specifications Provide a power line to be exclusively use...

Страница 6: ... Display Pole and Setting Up the Scale 9 3 2 Vertical Adjustment of the Display Unit 12 4 Weighing 13 5 Tare Key in Mode 15 6 Confirming the Tare 17 7 Using the Preset Function 18 7 1 Presetting 18 7 2 Calling the Preset Value 22 8 Setting Mode 24 8 1 Setting Method 24 8 2 Set Values List 26 9 Routing Servicing and Cleaning 29 9 1 Routine Servicing 29 9 2 Cleaning Methods 29 10 Troubleshooting Gui...

Страница 7: ...or its weighing perfor mance may be deteriorated Do not insert remove the plug in from the outlet with wet or dirty fingers An electric shock or short circuit may occur Do not remake the electrical plug or power cable A fire or electric shock may occur Do not pull strongly break or remake the power cable The core wires may be cut and cause a fire electric shock or defective functioning of the scal...

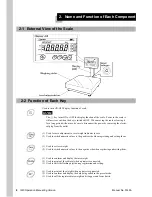
Страница 8: ...tor to zero 2 Used to switch numeric values to the positive side when registering and setting them 1 Used to set tare weight 2 Used to switch numeric values to the negative side when registering and setting them 1 Used to conform and display the tare weight 2 Used to print out the subtotal when a printer is connected 3 Used to shift the flashing digit during registration and setting 1 Used to prin...

Страница 9: ...able protruding from the bracket pipe base into the display pole Do not pull strongly on the load cell cable when pushing it into the display pole Other wise it may be cut If the cable covering material is scratched water may penetrate into the cable and cause unreliable weighing or the core material may corrode and cause the scale to fail 3 Stand the Display Pole against the Bracket Pipe Base Sta...

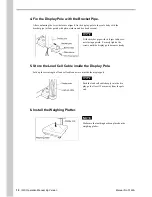
Страница 10: ...ws Fit the bracket pipe with its larger radius cor ners facing upward Securely tighten the screws until the display pole becomes steady 5 Store the Load Cell Cable inside the Display Pole Fold up the extra length of load cell cable and store it inside the display pole Push the load cell cable deeply into the dis play pole at least 15 mm away from the pole end 6 Install the Weighing Platter Make su...

Страница 11: ...et Ground the plug if the scale will be used in a place with a chance of electrical leakage or static electricity or in such an area exposed to electrical noise as the vicinity of an electric motor To disconnect the power supply remove the electrical plug from the electrical outlet 9 Turn on the Power Switch With nothing placed on the weighing platter press the key The display unit will turn on Ma...

Страница 12: ... No 0149A 10 Adjust the Zero Point When no zero point mark is displayed press the key 3 2 Vertical Adjustment of the Display Unit After loosening the display unit tightening knob adjust the unit at an easy to see angle Then retighten the knob ...

Страница 13: ...platter press the key The display unit will turn on Make sure that the display indicates all 0 s 2 Subtract the Tare After placing a tare container on the weighing platter press the key The tare can also be sub tracted by the following procedure Call the preset value Set the tare to the tare key in mode 4 Weighing ...

Страница 14: ...pper and lower limit values have been set the following will be displayed Weighing result Weighing condition Indication on scale When the built in buzzer is set to distin guish between the upper and lower limits Over Weight upper limit weight beep beep beep Accept Lower limit weight weight upper limit weight beep Under Weight lower limit weight beep beep beep ...

Страница 15: ...re Key in Mode After confirming the scale is in a stable condition with nothing on the platter press the key for two seconds 2 Set the Tare Move the flashing digit by pressing the key and press the key or key to key in the tare For a tare of 0 8 kg 3 2 5 Tare Key in Mode ...

Страница 16: ...16 IWX Operation Manual Kg Version Manual No 0149A 3 Press the Key The tare will be set ...

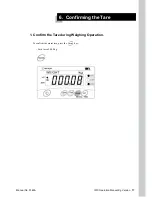
Страница 17: ...Manual No 0149A IWX Operation Manual Kg Version 17 1 Confirm the Tare during Weighing Operation To confirm the preset tare press the key For a tare of 0 08 kg 6 Confirming the Tare ...

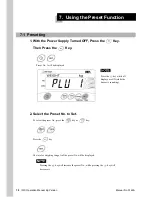
Страница 18: ...l be displayed Press the key while all displays are ON while the buzzer is sounding 2 Select the Preset No to Set To select the preset No press the key or key Press the key The tare for weighing range A of the preset No will be displayed Pressing the key will increase the preset No while pressing the key will decrease it 7 Using the Preset Function ...

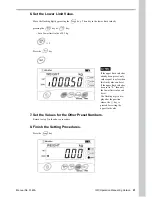
Страница 19: ...peration Manual Kg Version 19 3 Set the Tare for Weighing Range A Move the flashing digit by pressing the key Then key in the tare for weighing range A by pressing the key or key For a tare of 0 25 kg 3 2 1 5 Press the key ...

Страница 20: ...ition where the key is pressed for setting the tare for weighing range A 5 Set the Upper Limit Value Move the flashing digit by pressing the key Then key in the upper limit value by pressing the key or key For an upper limit value of 1 kg 4 1 Press the key If the lower limit value has already been preset only values equal to or larger than this limit value can be set The flashing digit is dis play...

Страница 21: ...If the upper limit value has already been preset only values equal to or less than this limit value can be set If the upper limit value has been set to 0 then only the lower limit value can be set The flashing digit is dis played at the position where the key is pressed for setting the upper limit value 7 Set the Values for the Other Preset Numbers Return to step 3 in the above procedure 8 Finish ...

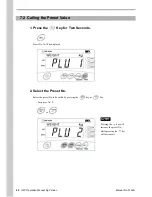
Страница 22: ...he Preset Value 1 Press the Key for Two Seconds Preset No 1 will be displayed 2 Select the Preset No Select the preset No to be called by pressing the key or key For preset No 2 or Pressing the key will increase the preset No while pressing the key will decrease it ...

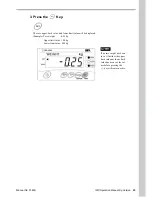
Страница 23: ...mit value and lower limit value will be displayed Example Tare weight 0 25 kg Upper limit value 1 00 kg Lower limit value 0 50 kg If no tare weight has been set or if neither the upper limit value nor lower limit value has been set the val ues before pressing the key will remain active ...

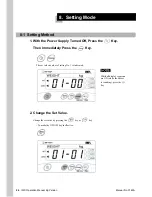
Страница 24: ...wer Supply Turned Off Press the Key Then Immediately Press the Key The set value number of setting No 1 is indicated While all display segments are ON while the buzzer is sounding press the key 2 Change the Set Value Change the set value by pressing the key or key To make the ON OFF key ineffective ...

Страница 25: ...y To set the sounding condition of the built in buzzer 15 The currently set value for the built in buzzer sound is indicated by the setting No 16 Return to the procedure 2 4 Finish the Setting Procedure Press the key For a description of the setting Nos and the setting conditions of the setting value Nos refer to the Set Values List ...

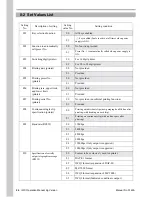
Страница 26: ...d F06 Printing tare upper limit and lower limit printer 00 Not provided 01 Provided F07 Printing serial No printer 00 Not provided no subtotal printing function 01 Provided F08 Continuous single slip specification printer 00 Printing on individual slips new paragraph on 8th line after printing with heading on each slip 01 Printing on continuous slip with no line space after printing F09 Baud rate ...

Страница 27: ...n and without limit zero return output printing 07 Manual within and without limit zero return output printing F13 Setting connector output signal connector box 00 1 Stable 2 Zero point marking 3 OK 4 Over 01 1 Stable 2 Zero indication 3 OK 4 Over 02 1 Stable 2 Zero indication 3 OK 4 Outside limit 03 1 Stable 2 Under 3 OK 4 Over 04 1 Under tare subtraction 2 Under 3 OK 4 Over F14 Setting connector...

Страница 28: ...uzzer OFF when weighing is stabilized under OVER condition normally ON 14 Buzzer OFF when weighing is stabilized under OK condition normally ON 15 Buzzer OFF when weighing is stabilized outside limit normally ON F16 Buzzer sound setting 00 During stable weighing outside limit 01 During stable weighing under OK condition 02 During stable weighing under OVER condition 03 No buzzer sound even in case...

Страница 29: ... and rub the platter sur face gently with a soft brush or soft cloth soaked with water diluted neutral detergent Then wash the platter in water and dry 2 Remove the weighing platter from the scale dip it in hot water 70 to 90 for about 30 minutes and then dry Be careful not to get scalded Weighing unit display pole and display unit parts other than the weighing platter Wash the outer surface in wa...

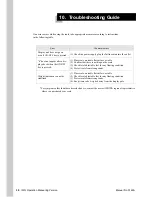
Страница 30: ... 1 Check the power supply plug for full insertion into the outlet 0 does not appear after a dis play check when the ON OFF key is pressed 1 Place scale on stable flat surface or table 2 Confirm that there is nothing on the scale 3 Check level adjustable feet for any floating condition 4 Protect scale from strong winds Weight indication can not be stabilized 1 Place scale on stable flat surface or ...

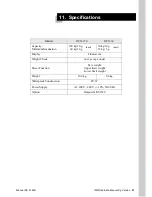
Страница 31: ...50 kg 50 g 60 kg 20 g 30 kg 10 g 15 kg 5 g Display Fluorescent Weight Check over accept under Preset Function Tare weight Upper limit weight Lower limit weight Weight 16 8 kg 9 4 kg Waterproof Construction IP 67 Power Supply AC 100V 240 V 10 50 60 Hz Option Output via RS232C 11 Specifications dual dual ...

Страница 32: ...2001 Aug ...

Отзывы: