background image

Program Mode

© Rice Lake Weighing Systems 

 All Rights Reserved

17

4.1

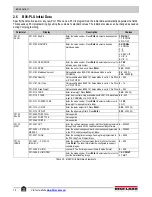
P01-PLU Data

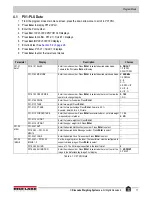
1. From the program mode main menu screen, press the down arrow once to scroll to P01 PLU.
2. Press 

Enter

 to display P01-00 PLU.

3. Enter the PLU number.
4. Press 

PLU

13001-0000 ENT OR CLR displays.

5. Press 

Enter

 to confirm. P01-01 < SALE1 > displays. 

6. Press 

Edit

INP 0001-0000 00 displays

7. Enter/edit text. See 

Section 5.2 on page 28

.

8. Press 

Enter

P01-01 < SALE1 > displays.

9. Press 

Enter

 to enter the lower level menus.

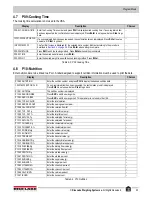
Parameter

Display

Description

Choices

P01-01
Sale1

P01-01-01 SALES

Enter the mode number. Press 

Enter

 to select a desired sales mode. 

To delete the PLU press 

Zero

 at this step.

0: WEIGHT
1: FIX PRI
2: WGT F/PRI

P01-01-02 MD MODE

Enter the mode number. Press 

Enter

 to select a desired markdown mode. 0: NORMAL

1: SPECIAL
2: -$
3: -%
4: SPEC. U/P
5. U/P -$
6: U/P -%

P01-01-03 OPEN PRICE

Enter the mode number. Press 

Enter

 to select whether or not to allow the 

operator to change the price.

0: YES
1: NO

P01-01-04 PRICE

Enter the unit or fixed price. Press 

Enter

--

P01-01-10 TARE

Enter tare weight. Press 

Enter

--

P01-01-12 P TARE

Enter the tare percentage. Press 

Enter

. Format is X.X%

Example: Enter 60 for a 6.0% tare.

--

P01-01-13 FORCED TARE

Enter the mode number. Press 

Enter

 to select whether or not a tare weight 

is required to print a label.

1: YES
2: NO

P01-01-14 LO WGT

Enter the lower weight limit. Press 

Enter

--

P01-01-15 UP WGT

Enter the upper weight limit. Press 

Enter

--

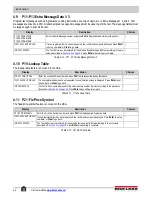
P01-03
MSG.

P01-03-01 NUT.

Enter the desired Nutrition Facts number. Press 

Enter

 to select. 

--

P01-03-02 — P01-03-04 
MSG1-3

Enter the desired Extra Message number. Press 

Enter

 to select. 

--

P01-03-07 COOK

Enter the desired Cook Time number. Press 

Enter

 to select. 

--

P01-04
IMAGE

P01-04-01— P01-04-03 
IMAGE 1-3

Set the image to print on the label. The label format must be configured to 
support variable images. Press 

Enter

 to select. 

--

P01-04-05 S H IMG

Leave at 0. The SH image is specified in the label format.

0

P01-04-06 S H IMG PRN

Enter the mode number. Press 

Enter

 to select whether or not to print the 

image in the Safe Handling Image Print display. 

1: NO PRINT
2: PRINT

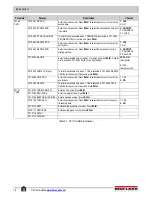
Table 4-1.  P01 PLU Data

Содержание 185822

Страница 1: ...Ishida Astra II Price Computing Scale With Printer Operation Manual Bench Model Pole Model PN 184270 Rev A May 30 2018 ...

Страница 2: ...emarks of their respective companies All information contained within this publication is to the best of our knowledge complete and accurate at the time of publication Rice Lake Weighing Systems reserves the right to make changes to the technology features specifications and design of the equipment without notice The most current version of this publication software firmware and all other product ...

Страница 3: ...t the IP Address of the PC 7 2 0 Setup Mode 8 2 1 B01 Machine Number 9 2 2 B02 Sales Mode 9 2 3 B03 Password 10 2 4 B05 Data Storage 11 2 5 B07 PLU Overwrite 11 2 6 B08 PLU Initial Data 12 3 0 Adjustment Mode 14 3 1 C01 Date Time 14 3 2 C03 Display Check 14 3 3 C05 Firmware Details 15 4 0 Program Mode 16 4 1 P01 PLU Data 17 4 2 P02 Campaign 19 4 3 P04 Preset Key Registration 20 4 3 1 Default Prese...

Страница 4: ...Ishida Astra II ii Visit our website www RiceLake com Rice Lake continually offers web based video training on a growing selection of product related topics at no cost Visit www ricelake com webinars ...

Страница 5: ...Failure to follow the instructions or heed the warnings could result in injury or death Contact any Rice Lake Weighing Systems dealer for replacement manuals Failure to heed could result in serious injury or death Do not allow minors children or inexperienced persons to operate this unit Do not operate without all shields and guards in place Do not use for purposes other than weight taking Do not ...

Страница 6: ...cal value Used to call Menu Select display Used to call a registered product data Used to move left Used to feed labels Used to move right Used to issue a label Used to move up Used to enter tare weight Used to move down Used to reset a weight to zero Used to escape from the current mode Table 1 1 Function Keys LAN USB Weighing Platter Power Switch Level adjustment leg Keyboard Printer Level gauge...

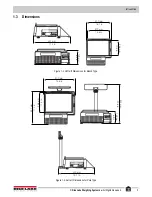
Страница 7: ...3 Dimensions Figure 1 3 Astra II Dimensions for Bench Type Figure 1 4 Astra II Dimensions for Pole Type 410 mm 16 1 in 370 mm 14 6 in 266 mm 10 5 in 159 mm 6 5 in 437 mm 17 2 in 370 mm 14 6 in 266 mm 10 5 in 437 mm 17 2 in 159 mm 6 3 in 524 mm 20 6 in 500 mm 19 7 in ...

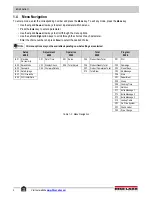
Страница 8: ...e All menu options may not be available depending on what settings are selected Table 1 2 Menu Navigation Setup 6000 Adjustment 4000 Operation 2000 Total 8000 Program 9000 B01 Machine No comms C01 Date Time S01 Sales F05 Product Daily Total P01 PLU B02 Sales Mode C03 Display Check S06 Total Adjust F06 Product Weekly Total P02 Campaign B03 Password C05 Firmware Details F07 Product Cumulative Total ...

Страница 9: ... information 1 Remove the Speed Key Insert page if in use over the keys 2 Enter 9000 then press Mode P00 PROGRAM displays 3 Press 6 then press Enter P06 STORE displays 4 Press Enter P06 00 no XXXX displays 5 Enter Store Number then press PLU 13001 0000 ENT OR CLR displays If store information has been programmed it will display If necessary store information may be edited by pressing Edit To delet...

Страница 10: ...4 Press Enter P04 01 000 0 displays 5 Enter the appropriate Key Flag No from Table 1 3 then press the PLU key 6 If the key type requires a specific value such as PLU No or Tare enter the number Otherwise enter 0 To add a new PLU see Section 4 1 P01 PLU Data on page 17 7 Press desired speed key The Key Flag No key position number and key data value display 8 Repeat steps 5 7 for all preset speed ke...

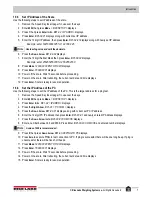
Страница 11: ... 5 6 Set the IP Address of the PC Use the following steps to set the IP address of the PC This is the target address for a ping test 1 Remove the Speed Key Insert page if in use over the keys 2 Enter 6000 then press Mode B00 SETUP displays 3 Press Enter twice B01 02 IP ADDR displays 4 Press the Right Arrow B01 03 PC COM displays 5 Press the Down Arrow B01 03 01 displays along with current set PC I...

Страница 12: ... select the appropriate choice Example 1 Enter 6000 and press the Mode key to enter the main menu in the Setup mode 2 Press the Down Arrow three times to scroll to B03 PASSWORD 3 Press Enter B03 01 PSWD displays 4 Key in a 6 digit password and then press the Zero key to save the password Example Key in 001234 and then press the Zero key To change the password key in a new 6 digit number and press ...

Страница 13: ...he full 12 digit number including leading zeros Do not enter decimal points B01 03 02 PORT NO PC port number used for communication Do not change 8071 B01 03 03 COM CHK COM check time seconds 600 Recommended 30 9999 0 B01 03 04 TIME OUT COM check time out seconds Do not change 2 B01 03 05 FTP USER Enter user name for FTP transmission Press Edit and enter character string edit B01 03 06 FTP PASS En...

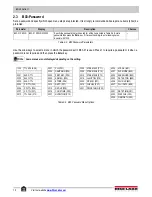
Страница 14: ...will be used for all the items listed in Table 2 4 Enter a password then press the Zero key If it is less than 6 digits enter leading zeros Example 001234 Table 2 3 B03 Password Parameters Note 3001 PLU P01 3002 CAMPAIGN P02 3004 PRST KEY P04 3005 AD MSG P05 3003 STORE P06 3012 DEPT P07 3013 GROUP P08 3019 COOK TIME P09 3007 NUTRITION P10 3008 XTRA MSG1 P11 3009 XTRA MSG2 P12 3010 XTRA MSG3 P13 30...

Страница 15: ... Description Choices B07 PLU OVERWRITE B07 01 UNIT PRICE F P Select if a price change is saved 1 YES 2 NO B07 02 MD MODE AMT Select if a markdown is saved B07 03 UNIT TYPE QTY Select if a change of the number of pieces is saved B07 04 FIXED WEIGHT Select if a change of fixed bakery weight is saved B07 05 PACK DATE TIME Select if a pack date or pack time change is saved B07 06 SELL BY D T Select if...

Страница 16: ... Price 0 999 P01 01 10 TARE Enter tare weight Press Enter 0 00 9 99 lb P01 01 12 P TARE Enter a percent tare Only available when B08 01 01 Sales Mode is set to 0 NORMAL or 2 WGT F PRI 0 0 50 0 P01 01 13 FORCED TARE Enter the mode number Press Enter to select whether or not a tare weight is required to print a label 1 YES 2 NO P01 01 14 LO WGT Enter the lower weight limit Press Enter 0 00 30 00 lb ...

Страница 17: ...08 06 05 Sell By Time Print setting 00 00 23 59 Designate 0 1439 Relative min P01 06 07 SHELF LF Enter the number of days and press Enter 0 9999 1 P01 06 08 DATE PRN Enter the mode number Press Enter to select whether or not to print the use by date 1 YES 2 NO P01 07 CODE P01 07 01 CODE Enter an item code Press Enter 0 99999999 P01 07 02 REGI CODE Enter the register code Press Enter 0 9999 P01 07 ...

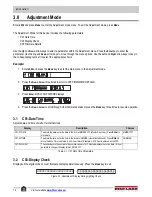
Страница 18: ...Down Arrow to scroll through other firmware details or press the Mode key three times to resume operation 3 1 C01 Date Time Adjusts date and time of Astra II s internal clock 3 2 C03 Display Check Displays all the digits of the vacuum fluorescent display simultaneously Press the Mode key to exit Figure 3 1 Examples of Display During Lighting Check Display Description Choices C01 01 DATE To adjust ...

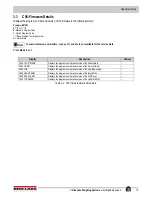
Страница 19: ...the version mark Press Mode to exit Display Description Choices C05 01 SOFTWARE Displays the program number and version of the title software C05 02 MAIN Displays the program number and version of the main software C05 03 OS Displays the program number and version of the operating system C05 04 BOOT ROM Displays the program number and version of the Boot ROM C05 06 SCALE DRI Displays the program n...

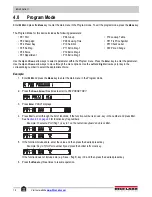
Страница 20: ...ee times to scroll to P04 PRESET KEY 3 Press Enter P04 01 displays 4 Press PLU to scroll through the list of functions If the function number is known key in the number and press PLU See Section 4 3 on page 20 for function key flag numbers Example To select a PLU flag 1 key in 1 on the numeric keyboard and press PLU 5 If the function includes data enter the value and then press the desired preset ...

Страница 21: ...ce 0 YES 1 NO P01 01 04 PRICE Enter the unit or fixed price Press Enter P01 01 10 TARE Enter tare weight Press Enter P01 01 12 P TARE Enter the tare percentage Press Enter Format is X X Example Enter 60 for a 6 0 tare P01 01 13 FORCED TARE Enter the mode number Press Enter to select whether or not a tare weight is required to print a label 1 YES 2 NO P01 01 14 LO WGT Enter the lower weight limit P...

Страница 22: ... is based on P01 06 05 Sell By Time Print setting 00 00 23 59 Designate 0 1439 Relative min P01 06 07 SHELF LF Days This field is available only when 1 YES is selected in P01 06 04 SB DATE PRN Enter the number of days and press Enter P01 06 08 DATE PRN Enter the mode number Press Enter to select whether or not to print the use by date 1 YES 2 NO P01 06 09 UB DATA This field is available only when ...

Страница 23: ...e in MMDDYYYY and press Enter P02 01 03 S T Enter desired start time in HH MM 24 hour format Press Enter P02 01 04 E D Enter desired end date in MMDDYYYY and press Enter P02 01 05 E T Enter desired end time in HH MM 24 hour format Press Enter P02 02 DATA P02 02 01 CALL PLU Enter desired PLU number and press PLU P02 02 02 PLU No Displays the PLU number for confirmation P02 02 03 MD MODE Enter the d...

Страница 24: ...tal Display 16 Extra1 Extra Message 1 17 Extra2 Extra Message 2 18 Extra3 Extra Message 3 19 F P Weigh Fixed Price Weight price change 20 SP U P Special unit price 22 Format Change of label format 23 Image 1 Image 1 24 Image 2 Image 2 25 Price U P Unit Price 26 Peel MD Displays the current Peel Sensor status INDIV on or W BACK off 32 U P Unit price change 33 P Date Enter a temporary Pack Date 34 S...

Страница 25: ...ubtotal in 167 Charge p Add an assigned cost to subtotal in 170 p Subtract an assigned dollar amount from the total price 171 p Subtract an assigned percentage amount from the total price 172 Head Usage Display the printed label length in km same as step C07 01 03 173 p Special Set an assigned special total price amount 174 p Spcl U P Subtract an assigned special unit price 175 p U P Subtract an a...

Страница 26: ...ter when editing is complete P06 01 NAME Press Edit to edit store name P06 02 ADDRESS Press Edit to edit store address P06 03 DELETE Press Zero to delete store P06 04 PRINTER1 Enter desired store number to print on labels Table 4 5 P06 Store Data Display Description Choices P07 00 DEPARTMENT Enter the department number and press PLU to display desired store data 13001 0000 ENT OR CLR If a non regi...

Страница 27: ...a 13001 0000 ENT OR CLR If a non registered item has been requested the confirmation prompt is displayed Press Enter to set up new data or Clear to go back P10 01 NUTRI No The nutrition number is displayed P10 02 SERVING SIZE Press Edit to edit the serving size P10 03 SERVI SIZE2 Press Edit to edit the serving size 2 This parameter is not used in the USA P10 04 TOTAL CALOR Enter the total calories...

Страница 28: ...o the pro cedure described in Section 5 2 on page 28 Press Enter when editing is complete Table 4 10 P11 P13 Extra Message Data 1 3 Display Description Choices P19 00 LOOKUP TBL Enter the Lookup Table number and press PLU to display desired lookup table data 13001 0000 ENT OR CLR If a non registered item has been requested the confirmation screen is displayed Press Enter to set up new data or Clea...

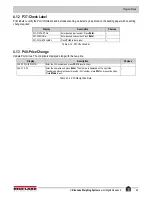
Страница 29: ...escription Choices P37 01 START No Enter desired start number Press Enter P37 02 END No Enter desired end number Press Enter P37 03 CHECK LABEL Press Print to check label Table 4 13 P37 Check Label Display Description Choices P40 00 PLU 8 DIGITS Enter the PLU number and press PLU to recall an item P40 01 0 00 Enter the new price and press Enter The old price is displayed on the right side To updat...

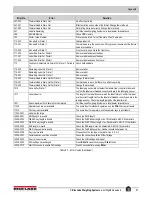
Страница 30: ...heck store number program if necessary see Section 4 3 1 on page 21 221 Tare Limit Over g Re program tare weight 222 Tare Weight is 0 g Set tare weight 223 Label Setting Master Is Not Programmed Check label number program if necessary 266 000 File Input Error There is a file that failed during input check USB 266 001 File Input Error Failed in reconstruction of SRAM data 267 000 File Output Error ...

Страница 31: ...label gap sensor did not detect the labels Open the printer door and confirm the labels are threaded correctly and are in the label gap sensor 1011 Label size error The length of the label does not match the label format Confirm the label are the correct length Confirm the label are threaded correctly and are in the label gap sensor Check the length height of the label format 1601 Span Adjustment ...

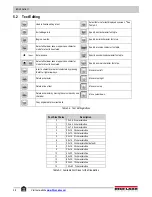
Страница 32: ...t a character or select characters by pressing the left or right arrow keys Move cursor left Delete a character Move cursor right Delete a line of text Move cursor up Delete a character by moving the cursor back by one character Move cursor down Copy original data to current data Font Size Choice Description 0 10 x 5 62 characters line 1 10 x 6 54 characters line 2 14 x 7 48 characters line 3 20 x...

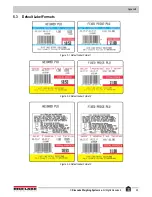
Страница 33: ...Appendix Rice Lake Weighing Systems All Rights Reserved 29 5 3 Default Label Formats Figure 5 1 Default Label Format 1 Figure 5 2 Default Label Format 2 Figure 5 3 Default Label Format 3 ...

Страница 34: ...Ishida Astra II 30 Visit our website www RiceLake com Figure 5 4 Default Label Format 4 Figure 5 5 Default Label Format 5 Figure 5 6 Default Label Format 6 ...

Страница 35: ...Appendix Rice Lake Weighing Systems All Rights Reserved 31 Figure 5 7 Default Label Format 7 Figure 5 8 Default Label Format 8 ...

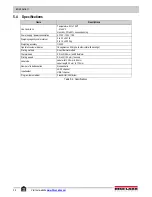
Страница 36: ... 0 01 lb 0 to 15 x 0 005 kg Weighting accuracy 1 3000 Operator customer display 16 segments x 23 digits liquid crystal with backlight Printing method Direct thermal method Thermal head 2 2 inch 56 mm and 8 dots mm Printing speed 3 9 inch 100 mm second Label size Label width 38 mm to 64 mm Label length 30 mm to 175 mm Number of label cassettes Non cassette Input output LAN 1 channel USB 1 channel P...

Страница 37: ......

Страница 38: ...Canada Mexico 800 321 6703 International 715 234 9171 Europe 31 0 26 472 1319 Rice Lake Weighing Systems is an ISO 9001 registered company Rice Lake Weighing Systems Specifications subject to change without notice www ricelake com PN 184270 Rev A May 30 2018 ...

Отзывы: