


12
Alignment and Fusion of Multiple Scans
Menu “Shape Fusion“
This menu offers to 1. align several scans to each other and 2. fuse them to one closed 360°
model. You can export the fused object in various file formats and use it e.g. for 3D printing. In the
following we describe the general case of aligning scans from arbitrary perspectives.
1. Scan
Alignment
Single scans are usually collected in the List of Scans, using the “Add to List” button during
scanning. You can also import scans from OBJ files by drag-and-drop or with the “+” button
below the list.
Hint: Each scan can be toggled visible/invisible with the
button.
Hint: If necessary, you can clean your scan with the Selection Tool. At this time you should
only remove surface areas which are not useful for alignment, i.e. which no pair of scans
have in common.
Hint: With the Arrange buttons
you can arrange all scans next to each other in
order to get a good overview.
ISY 3D SCAN offers several alignment modes. In general you should start with the “Free”
mode, which aligns one scan to one other with each step. In order for the automatic mode to
find the correct alignment, the scans have to overlap sufficiently, i.e. contain a good portion
of identical areas.
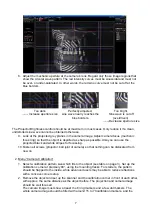
The button
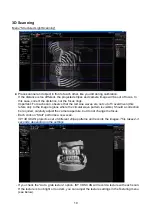
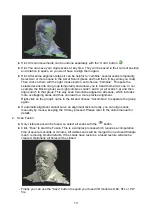
starts the alignment mode. In the 3D view, first click on the scan you want to
align, “Scan A”. Then click on the scan you want to align it to, “Scan B”. These images show
an alignment of the blue scan to the green one:
Subsequently, align more scans to those previously aligned. Always select pairs which
overlap as much as possible. In the example shown above, a good next step would be to
align the yellow scan to the blue one, and so on.
After all scans have been aligned, you should run the „Global Fine Registration“ mode.