background image

32

C

HAPTER

 11

W

EB

 I

NTERFACE

: L

OGGING


INTO


THE

 M

ICRO

RAPTOR

11. Web Interface: Logging into the MicroRAPTOR

This section describes how to login to the MicroRAPTOR via the 

Web UI

 (Web User Interface).

P

REREQUISITE

:

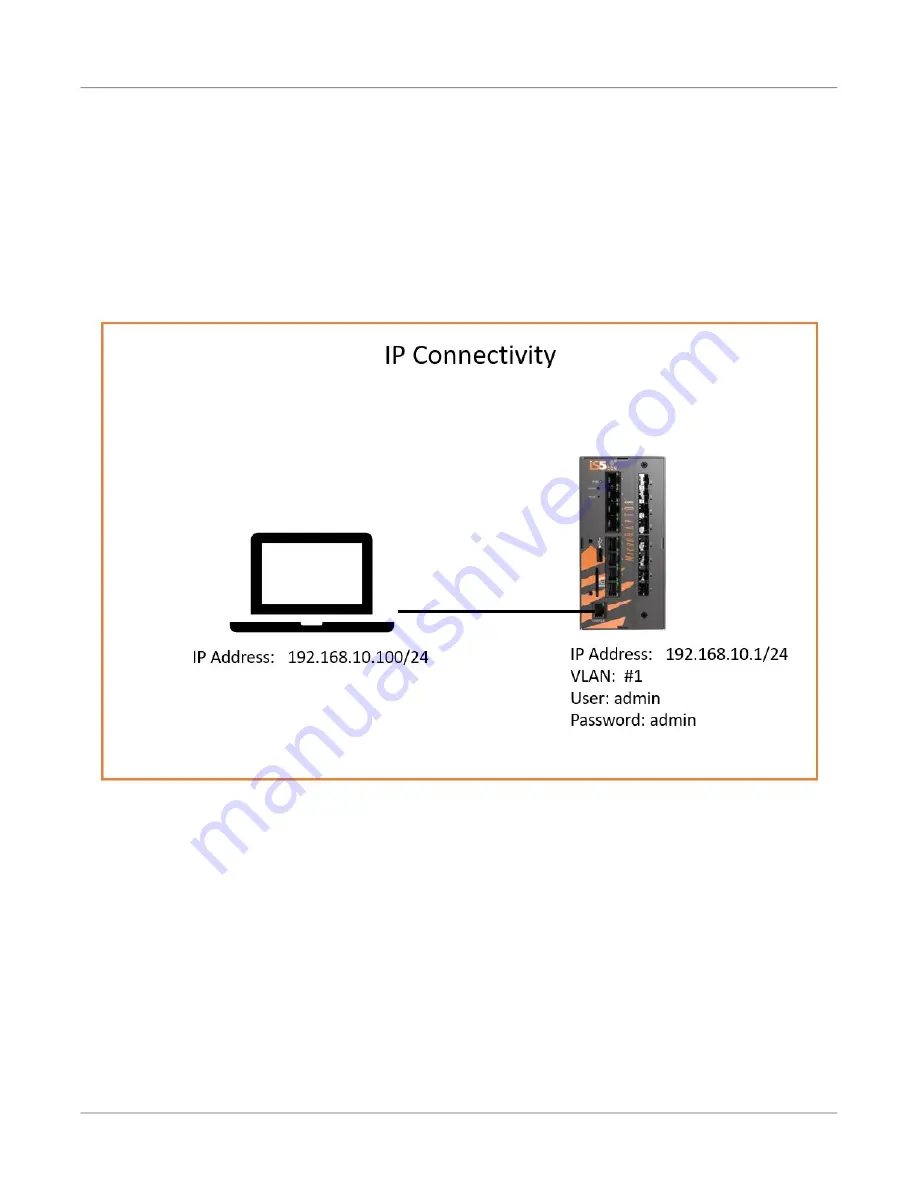
Figure 1:

Ethernet / IP Connectivity


C

ONTEXT

:

RAPTOR can be configured through Web User Interface ( 

Web UI

) from web browsers. The 

Web UI

 allows 

the user to control various parameters at the System and Protocol level.
Before configuring the Raptor from a PC, confirm accessibility of MicroRAPTOR’s firmware by pinging it 

from the PC.
1.

An Ethernet cable must connect the switch and a computer. The computer interface should be 

assigned an IP address on the 192.168.10.0/24 network. This is summarized i

Figure 1

.

F

OR


EXAMPLE

:

An address of 192.168.10.100 with a subnet mask of 255.255.255.0 is one such suit

-

able combination of an IP address and submask to be assigned for the computer to be used in the 

connection.

Содержание MicroRAPTOR iMR920

Страница 1: ...i MICRORAPTOR QUICK START GUIDE MicroRAPTOR Quick Start Guide Intelligent Cyber Secure Platform iMR920 Version 1 13 05 2 Date June 2022 2022 iS5 Communications Inc All rights reserved...

Страница 2: ...can generate 4 29 109 address space Fragmentation performed by Sender and forwarding routers In IPv4 Packet flow identification is not available In IPv4 checksum field is available It has broadcast Me...

Страница 3: ...area network that is created via software rather than manually moving cables in the wiring closet Web UI Web User Interface Web UI is a control panel in a device presented to the user via the Web bro...

Страница 4: ...osts This warranty does not cover product modifications or repairs done by persons other than iS5 approved personnel and this warranty does not apply to products that are misused abused improperly ins...

Страница 5: ...or purposes of these terms and conditions software shall mean scripts programs macros computer pro grams application programming and other interfaces tools and other instructions and sets of in struct...

Страница 6: ...accept and comply with all applicable Export Control and Sanctions in effect and as amended from time to time pertaining to the export re export and transfer of Supplier s products documentation and...

Страница 7: ...ms and Conditions or such other terms and conditions between iS5Com or if applicable a reseller for iS5Com and the Customer as defined below in either case the Contract 1 DEFINITIONS Confidential Info...

Страница 8: ...perty rights set out herein all future income and proceeds from the intellectual property rights set out herein and all rights to damages and profits by reason of the infringement of any of the intell...

Страница 9: ...any Update or Upgrade includes an amended version of this EULA Customer will be required to agree to such amended version in order to use the applicable iS5Com Materials and such amended EULA shall b...

Страница 10: ...n the event of a breach by the Customer of any of such pro visions the Customer hereby consents to an injunction against it restraining it from any fur ther breach of such provisions 4 3 Security Any...

Страница 11: ...een this EULA and the Contract or any such applicable click wrap agreement this EULA shall take precedence over the Contract and such click wrap agree ment In the event that one or more of the provisi...

Страница 12: ...ut limitation All remedies provided for iS5Com under this EULA are non ex clusive and are in addition and without prejudice to any other rights as may be available to of iS5Com whether in law or equit...

Страница 13: ...vel Agreements can be tailored to suit your needs with our standard Service Level Agreement packages or through customized solutions Return Manufacturing Authorization is easy and simplified for our c...

Страница 14: ...the MicroRAPTOR 2 Chapter 3 SSH Logging into the MicroRAPTOR 10 Chapter 4 Command Line Switch Name 14 Chapter 5 Command Line Switch Prompt 15 Chapter 6 Command Line IP Address Configuration 16 Chapte...

Страница 15: ...apter 12 Web Interface System Settings 37 Chapter 13 Web Interface IP Address and Default Routes 38 Chapter 14 Web Interface User Password 41 Chapter 15 Web Interface Save and Restore Configurations 4...

Страница 16: ...rface CLI interface and Web user interface WebUI to perform the following tasks Login to the MicroRAPTOR Create an IP address for VLAN 1 Set password switch name banner name and prompt Save configurat...

Страница 17: ...l console interface on the MicroRAPTOR is used to configure an IP Address save a configuration and upgrade the firmware 1 On a laptop install a terminal emulator A popular option is Putty a A link to...

Страница 18: ...of the MicroRAPTOR by attaching the console port to the USB port of your laptop or PC and the RJ45 termination to the console port on the MicroRAPTOR 3 To determine the communications port being used...

Страница 19: ...CRORAPTOR b Navigate to Ports to determine which COM number the serial connection is using You may have to unplug and reinsert the USB connection on your PC to make a determination of which COM number...

Страница 20: ...Putty can be configured by selecting the type of connection entering the port number and setting the baud rate a Additional serial parameters can be configured in Putty by selecting the Serial categor...

Страница 21: ...R Flow Control none b You should confirm in Putty s user interface that it has been configured with the appropriate Baud rate Data Parity stop and flow control values STEP RESULT The following image p...

Страница 22: ...7 CHAPTER 2 CONSOLE PORT LOGGING INTO THE MICRORAPTOR 5 Click Open to launch a terminal STEP RESULT A blank terminal window will appear...

Страница 23: ...set Please change the password Enter old password 8 Enter the old password which is admin STEP RESULT You will now be prompted for a new password Enter new password NOTE The new password must meet the...

Страница 24: ...9 Enter the new password STEP RESULT You will be prompted to confirm the new password Re enter new password 10 Re enter the new password STEP RESULT The console prompt will appear iS5comm RESULT You...

Страница 25: ...roRAPTOR from a PC confirm accessibility of MicroRAPTOR s firmware by pinging it from the PC 1 On a laptop install a terminal emulator A popular option is Putty a A link to download Putty is https www...

Страница 26: ...THE MICRORAPTOR 3 Open Putty select the connection type of SSH and provide the default IP address of the MicroRAPTOR of 192 168 10 1 Then click Open FOR EXAMPLE The following image is an example of t...

Страница 27: ...nter the old password which is admin STEP RESULT You will now be prompted for a new password Enter new password NOTE The new password must meet the following criteria Password length should be in the...

Страница 28: ...13 CHAPTER 3 SSH LOGGING INTO THE MICRORAPTOR 7 Re enter the new password STEP RESULT The console prompt will appear iS5comm RESULT You have logged into the MicroRAPTOR via a SSH connection...

Страница 29: ...REQUISITE To perform the tasks in this section you will have already logged into the MicroRAPTOR via the console cable or through SSH 1 Configure the switch name FOR EXAMPLE At the command prompt type...

Страница 30: ...r to perform the tasks in this section you will have already logged into the MicroRAPTOR via the console cable or through SSH 1 Configure the switch prompt FOR EXAMPLE At the command prompt type iS5co...

Страница 31: ...Mask Default Route These values will be needed to configure the MicroRAPTOR 1 Configure the IP Address FOR EXAMPLE At the command prompt type iS5comm configure terminal iS5comm config interface vlan 1...

Страница 32: ...tasks in this section you will have already logged into the MicroRAPTOR via the console cable or through SSH 1 Configure the administrator password FOR EXAMPLE At the command prompt type iS5comm conf...

Страница 33: ...on to USB Insert a USB drive into the MicroRAPTOR and type the following FOR EXAMPLE iS5comm copy startup config usb STEP RESULT The following text will appear followed by a prompt Configuration is co...

Страница 34: ...through the console port For all upgrades it is recommended that user s backup their current running configuration prior to commencing the upgrade process Valid Upgrade Paths If the release that your...

Страница 35: ...MicroRAPTOR firmware a Rename the upgrade software to firmware upgrade tgz and copy the file to the USB stick b Insert USB stick into front panel USB connector c Type the following FOR EXAMPLE iS5com...

Страница 36: ...Do not interact with it STEP RESULT Do not interact with this menu and the boot process will proceed automatically The clock will expire and the upgrade will proceed without user intervention The upgr...

Страница 37: ...erclip is recommended You will also need a serial console cable used to login to the device For all upgrades it is recommended that user s backup their current running configuration prior to commencin...

Страница 38: ...pgrade the MicroRAPTOR firmware a Login to the MicroRAPTOR via the console cable b Hold the reset button for more than 2 seconds and use the u boot menu to disable the silent boot by navigating to the...

Страница 39: ...ADING THE MICRORAPTOR RESULT A Linux login prompt will appear d Use root as the MicroRAPTOR username and the device s Admin level password as the Pass word to enter the Linux shell STEP RESULT The fol...

Страница 40: ...he IP address on the management port by executing the following command from the serial console This example uses 192 168 15 255 as the IP address we wish to assign the IP address should be on the sam...

Страница 41: ...s the OK button FOR EXAMPLE The Tera Term new connection screen STEP RESULT The Linux shell login prompt will appear 5 Login to the Linux shell by typing your Admin level password at the prompt STEP R...

Страница 42: ...27 CHAPTER 10 XMODEM UPGRADING THE MICRORAPTOR 7 Use Tera Term to upload the file to the MicroRAPTOR by selecting the menu option File Transfer XMODEM Send FOR EXAMPLE...

Страница 43: ...E MICRORAPTOR STEP RESULT The following screen will appear 8 Select the 1K box at the bottom left of the screen This will significantly reduce the file upload time STEP RESULT The following image high...

Страница 44: ...the firmware upgrade file you wish to upload select it and then press Open FOR EXAMPLE A screen similar to the following is typical STEP RESULT Once Open is pressed the upload will commence This will...

Страница 45: ...mand to perform the firmware upgrade FOR EXAMPLE upgrade firmware_upgrade sh 12 Wait until the upgrade completes The Telnet connection will close as the device reboots as part of the upgrade process S...

Страница 46: ...DEM UPGRADING THE MICRORAPTOR 13 Login to the MicroRAPTOR and execute the reload command Enter Y when prompted FOR EXAMPLE RESULT The device will restart The MicroRAPTOR has been upgraded and users ma...

Страница 47: ...control various parameters at the System and Protocol level Before configuring the Raptor from a PC confirm accessibility of MicroRAPTOR s firmware by pinging it from the PC 1 An Ethernet cable must...

Страница 48: ...IP address of the MicroRAPTOR s interface is 192 168 10 1 The https protocol is now the default protocol FOR EXAMPLE https 192 168 0 1 STEP RESULT Warnings from the browser about the web site having a...

Страница 49: ...TEP RESULT The following screen will appear 4 Launch a web browser to enter the MicroRAPTOR s default IP address The IP address of the MicroRAPTOR s interface is 192 168 10 1 Enter https 192 168 10 1...

Страница 50: ...P RESULT If this is the first login to the device the user will be prompted to change the password NOTE The new password must meet the following criteria Password length should be in the range of 8 20...

Страница 51: ...least 1 special characters New Password must be different from previous password 6 Enter the User Name admin and Password admin and then a new password in the New Pass word and Re enter New Password f...

Страница 52: ...e following fields Switch Name enter the name for identifying the device The default value is iS5 This value range is a string of size 15 Prompt Name enter the prompt name to be used The default value...

Страница 53: ...rk Administrator to determine the values of the following parameters IP Address IP Address Mask Default Route These values will be needed to configure the MicroRAPTOR 1 Configure the VLAN settings by...

Страница 54: ...onfigured 4 Configure the PIv4 settings of the VLAN by first navigating to the PIv4 Settings Page FOR EXAMPLE Go to Layer 3 Management IP IPv4 AddrConf IPv4 Interface Settings STEP RESULT The followin...

Страница 55: ...e IP Address configured in section 0 the subnet mask the interface should be vlan1 the switch option should be default and the distance should be 0 Click Add b Configure the default gateway The destin...

Страница 56: ...e Web UI 1 Navigate to the Users page FOR EXAMPLE In the Home Page go to System Users STEP RESULT The following screen will appear Figure 1 User Manager 2 Click the admin radial button STEP RESULT The...

Страница 57: ...this section you will have already logged into the MicroRAPTOR via the Web UI 1 To save the configuration to flash memory perform the following a Navigate to the Save Configuration screen FOR EXAMPLE...

Страница 58: ...conf Use the default file name c Click Apply to save the changes STEP RESULT The running configuration will now be saved to flash memory Without saving to flash the configuration will be lost in the e...

Страница 59: ...is human readable File Name default file name where the switch configurations are saved is iss conf Use the default file name c Insert the USB thumb drive into the USB port on the front of the MicroR...

Страница 60: ...T The MicroRAPTOR will restore the configuration on the USB e For the changes to take effect the RAPTOR must be rebooted Navigate to the reboot screen FOR EXAMPLE Go to System Reboot RESULT The follow...

Страница 61: ...UI For all upgrades it is recommended that user s backup their current running configuration prior to commencing the upgrade process Valid Upgrade Paths If the release that your device is running is n...

Страница 62: ...are not supported 1 To Upgrade a Configuration from USB navigate to the Upgrade page FOR EXAMPLE Go to System System Upgrade STEP RESULT The upgrade page appears System Upgrade 2 Set the fields as fol...

Страница 63: ...WEB INTERFACE UPGRADE THE MICRORAPTOR 3 Click Apply to upgrade the MicroRAPTOR STEP RESULT A timer will appear providing the elapsed time since the upgrade started The screen will appear similar to t...

Страница 64: ...ERFACE UPGRADE THE MICRORAPTOR The screen will eventually change to the following RESULT The MicroRAPTOR will be upgraded and reloaded automatically After about 5 minutes the device will be ready for...

Страница 65: ...on of the document 1 Putty Session Configuration 6 11 R Return Manufacturing Authorization xiii S Service Level Agreements xiii SSH Logging into 10 new password criteria 12 V Valid Upgrade Paths 46 W...

Отзывы: