background image

Page 16 of 19 


Parts Diagram 


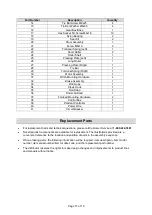
Parts List 

Part Number 

Description 

Quantity 

Hex Socket FH Screw M4x20 

10 

Lock Washer Ø4 

22 

Gearbox End Cover 

Washer 

Bearing 

Sun Gear (Input) 

Clutch Handle Assembly 

1   

Gear Box Tube 

Clutch Gear 

10 

Gear Carrier Assembly (Input) 

11 

Gear Carrier Assembly (Intermediate) 

12 

Washer 

13 

Gear Carrier Assembly (Output) 

Содержание 54126

Страница 1: ...tric Truck Winch Owner s Manual WARNING Read carefully and understand all ASSEMBLY AND OPERATION INSTRUCTIONS before operating Failure to follow the safety rules and other basic safety precautions may...

Страница 2: ...at you read the entire manual to become familiar with this product before you begin using it This electric truck winch is designed for certain applications only Northern Tool Equipment is not responsi...

Страница 3: ...cations 4 Important Safety Information 5 Specific Operation Warnings 6 Assembly Instructions 8 Before Each Use 10 Operating Instructions 10 After Each Use 14 Maintenance 14 Troubleshooting 14 Parts Di...

Страница 4: ...s Duty Cycle Rating 5 45 sec at Max Rated Load 14min 15 sec Rest Pendant Controller Wired 12 ft 3 7m Long Gear Train 3 stage Planetary Gear Ratio 265 1 Freespool Sliding Ring Gear Brake Auto Load Hold...

Страница 5: ...electric winch was designed Use the right tool for the job DO NOT attempt to force small equipment to do the work of larger industrial equipment There are certain applications for which this electric...

Страница 6: ...bends damage frayed or kinked wire rope and any other conditions that may affect the safe operate of the winch Do not use the winch even if minor damage appears A kink permanently weakens the wire ro...

Страница 7: ...s closed and not supporting load Never apply load to hook tip or latch Apply load only to the center of hook Never use a hook whose throat opening has increased or whose top is bent or twisted Keep cl...

Страница 8: ...tacle that may interfere with safe operation of the winch Always use supplied hook strap whenever spooling winch rope in or out during installation and during operation Always take time to use appropr...

Страница 9: ...good condition 1 Plan a route for the wiring from the point of the vehicle where the winch will be mounted or used to the battery This route must be secured and out of the way of moving parts road de...

Страница 10: ...switch the Motor Cable connections on the Motor Assembly then reconnect the Battery Cables 9 Disconnect the pendant controller when not in use Preparing the Wire Rope 1 The wire rope must be properly...

Страница 11: ...nnections must be tight and clean 4 Put the vehicle s transmission in Neutral 5 If the vehicle where the winch is mounted is not supposed to be moved engage the emergency brake and block the wheels us...

Страница 12: ...feet from the hook to help absorb the force released if the wire rope breaks 11 Re engage the clutch by moving the clutch handle to the engaged position see the following picture WARNING Do not allow...

Страница 13: ...must be pulled at an angle in relation to the winch use a pulley sold separately and an anchor point directly in front of the winch as shown in the following picture to keep the wire rope pull straig...

Страница 14: ...xternal surfaces of the winch with a clean cloth Maintenance WARNING To prevent serious injury from accidental operation disconnect the battery cables before performing any inspection maintenance or c...

Страница 15: ...noid to loosen contacts Apply12 volts to coil terminals directly A clicking indicates proper activation 5 Replace switch assembly 6 Check for voltage at armature port with switch pressed If voltage is...

Страница 16: ...t FH Screw M4x20 10 2 Lock Washer 4 22 3 Gearbox End Cover 1 4 Washer 2 5 Bearing 1 6 Sun Gear Input 1 7 Clutch Handle Assembly 1 8 Gear Box Tube 1 9 Clutch Gear 1 10 Gear Carrier Assembly Input 1 11...

Страница 17: ...36 Roller Fairlead 1 37 Fairlead Mounting Hardware 2 38 Control Box 1 39 Pendant Controller 1 40 Power Wire 1 41 Circuit Breaker 1 Replacement Parts For replacement parts and technical questions plea...

Страница 18: ...claim contact Us at 1 800 222 5381 identify the product by make and model number and follow the claim instructions that will be provided The product and the purchase receipt must be provided to Us in...

Страница 19: ...Page 19 of 19 Distributed by Northern Tool Equipment Company Inc Burnsville Minnesota 55306 www northerntool com Made in China...

Отзывы: