Page of 11
7
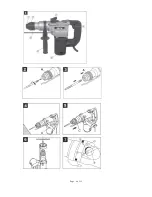
Fitting and changing tools (Fig.2)
The device is equipped with a SDS-plus attachment system.
• Clean tools and grease with a thin layer of machine grease before fitting.
• Pull back fastening sleeve (A, Fig.2) and hold.
• Push and rotate the dust-free tool into the tool holder as far as it will go. The tool will lock
automatically.
• Check that it has locked by pulling the tool.
Removing SDS-plus tool (Fig.3)
Pull back fastening sleeve (A), hold and remove the tool.
Starting work (Fig.1)
Switching ON/OFF
• Switching on: Press the operating switch (3).
• Switching off: Press the operating switch (3) briefly and let go.
Handle attachment (Fig.4)
For safety reasons, only use the hammer drill with handle attachment.
You will be able to achieve a safe body position during operation by rotating the handle
attachment.
Loosen and turn the handle attachment in counterclockwise direction. Then tighten the handle
attachment.
Depth stop (Fig.5)
Loosen the handle attachment and place the straight part of the depth stop into the hole. Adjust the
depth stop and re-tighten the handle attachment.
Dust collection device (Fig. 6)
Before doing any overhead hammer-drilling work, attach the dust-collecting cup over the drill bit.
Drill Stop (Fig.7)
• You can deactivate the drilling action of the hammer drill when using it for chiseling work.
• Turn the lever selector (d) so that the mark
coincides with the arrow (a) on the machine
case.
• To reactivate the drilling action, the lever selector (d) has to be reset so that the mark (b)
coincides with the arrow (a).
Important!
Too much pressure will place unnecessary load on the motor. Check the drill bits
regularly. Re-sharpen or replace blunt drill bits.
Содержание 46478
Страница 6: ...Page of 11 6 ...
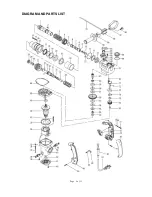
Страница 9: ...Page of 11 9 DIAGRAM AND PARTS LIST ...


