background image

Page      of 17 


unless they have been given supervision or instruction concerning use of the appliance by a 
person responsible for their safety. 


Always use an approved extension cord suitable for the power input of this tool. Before use, 
inspect the extension cord for signs of damage, wear and ageing. Replace the extension cord if 
damaged or defective. 


When using an extension cord on a reel, always unwind the cord completely. Use of an 
extension cord not suitable for the power input of the tool or which is damaged or defective may 
result in a risk of fire and electric shock. 


It is recommended that the extension cord is a maximum of 82 feet in length. Do not use multiple 
extension cords. 


Before drilling into walls, ceilings etc, ensure there are no concealed power cables or pipes in the 
cavity. 


Keep the cord clear of the accessory being used. Do not wrap the cord around your arm or wrist. 


Hold the tool by the insulated gripping surfaces when performing an operation where the 
accessory may contact hidden wiring or its own cord. 


Use thick cushioned gloves and limit the exposure time by taking frequent breaks. 


Vibration caused by the hammer action may be harmful to your hands and arms. 


When removing an accessory from the tool avoid contact with skin and use proper protective 
gloves when grasping the bit or accessory. Accessories may be hot after prolonged use. 


ASSEMBLY   

Assembly of Demolition Breaker 

Chisels come with or without collars. Figure 1 shows installation of a chisel without a collar (the two 
included chisels are without a collar). Figure 2 shows installation of a chisel with a collar. 


Without a Collar: 

1.  Pull the retaining ring to the side just far enough to allow the bit to be inserted, as shown in 

Figure 1. 

2.  Insert the bit. Slide the chisel in as far as it will go. 
3.  Pull the retaining ring down approximately 120º until it contacts the housing. Physically check 

that the chisel is secure before operating. 

Note: If the Chisel Bit doesn’t slide in easily, apply some grease on the loading end of the Chisel Bit. 

Содержание 45998

Страница 1: ...CART OWNER S MANUAL WARNING Read carefully and understand all ASSEMBLY AND OPERATION INSTRUCTIONS before operating Failure to follow the safety rules and other basic safety precautions may result in...

Страница 2: ...be performed on the product For technical questions please call 1 800 222 5381 INTENDED USE Your Ironton Demolition Breaker has been designed for rapid breaking and chipping of concrete block and maso...

Страница 3: ...use the cord for carrying pulling or unplugging the power tool Keep cord away from heat oil sharp edges or moving parts Damaged or entangled cords increase the risk of electric shock e When operating...

Страница 4: ...wer tool for operations different from those intended could result in a hazardous situation 5 Service a Have your power tool serviced by a qualified repair person using only identical replacement part...

Страница 5: ...ulated gripping surfaces when performing an operation where the accessory may contact hidden wiring or its own cord Use thick cushioned gloves and limit the exposure time by taking frequent breaks Vib...

Страница 6: ...lock the chisel in place Physically check that the chisel is secure before operating Before each use check the Chisel for cracks or other damage Never use a damaged chisel CAUTION Always assure that...

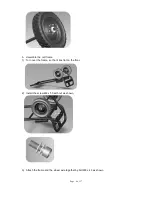
Страница 7: ...Attach the wheels 1 Insert the axle into the bottom bracket as shown 2 Attach the wheels to the axle 3 Place the appropriate washer 15 as shown then insert cotter pin 4 Bend cotter pin into place as...

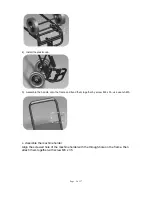
Страница 8: ...f 17 8 b Assemble the cart frame 1 Turn over the frame so that it lies flat on the floor 2 Install the screw M8 x 50 with nut as shown 3 Attach the frame and the wheel axle together by bolt M8 x 40 as...

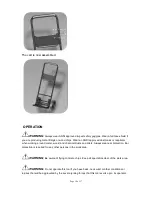
Страница 9: ...semble the handle onto the frame and fixed them together by screw M8 x 35 use wrench M5 c Assemble the machine holder Align the screwed hole of the machine holder with the through hole on the frame th...

Страница 10: ...when working around metal wood and chemical dusts and mists Always wear ear protection Ear protection is required fro any other persons in the work area WARNING Be aware of flying concrete chips Keep...

Страница 11: ...ou want to section breaking concrete as you go If the Breaker Hammer jumps off of the line or section release the Switch Knob 87 and reposition the Breaker Hammer 6 When you are finished release the S...

Страница 12: ...ipe the tool with a lint free cloth after each use Remove all dust and grit from the tool 2 Add a drop or two of a lightweight oil to the Switch assembly area to lubricate the Switch Knob 87 3 Examine...

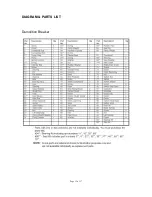
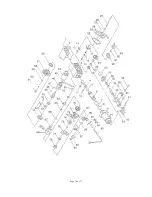
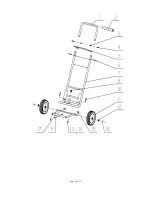
Страница 13: ...Page of 17 13 DIAGRAM PARTS LIST Demolition Breaker...

Страница 14: ...Page of 17 14...

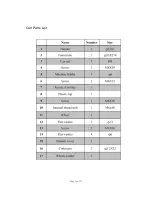
Страница 15: ...Page of 17 15 Cart Parts List...

Страница 16: ...Page of 17 16...

Страница 17: ...lica from bricks and cement and other masonry products and arsenic and chromium from chemically treated lumber Your risk from these exposures varies depending on how often you do this type of work To...

Отзывы: