11
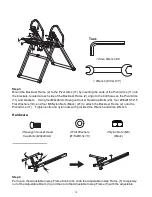
holes facing up. Release the Adjustable Instep Frame Knob (40) and adjust the Adjustable Instep
Frame (5) slightly until the Adjustable Instep Frame Knob (40) locks into place.
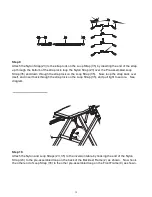
Step 5
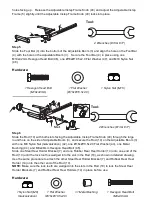
Slide the Foot Bar (4) into the bottom of the Adjustable Boom (3) and align the hole on the Foot Bar
(4) with the hole on the Adjustable Boom (3). Secure the Foot Bar (4) in place using one
M10x42mm Hexagon Head Bolt (46), one Ø18xØ10.5x2.0 Flat Washer (47), and M10 Nylon Nut
(48).
Hardware:
․․․․․․․․․․․․․․․․․․․․․․․․․․․․․․․․․․․․․․․․․․․․․․․․․․․․
․․․․․․․․․․․․․․․․․․․․․․․․․․․․․․․․․․․․․․․․․․․․․․․․․․․․
․․․․․․․․․․․․․․․․․․․․․․․․․․․․․․․․․․․․․․․․․․․․․․․․․․․․
․․․․․․․․․․․․․․․․․․․․․․․․․․․․․․․․․․․․․․․․․․․․․․․․․․․․
Step 6
Slide the Rod (10) with both slots facing the Adjustable Instep Frame Knob (40) through the large
round hole on the side of Adjustable Boom (3), and secure the Rod (10) on the Adjustable Boom (3)
with one M8 Nylon Nut (Galvanization) (42), one Ø16xØ10.5x2.0 Flat Washer (43), one Metal
Bushing (44), and M8x48mm Hexagon Head Bolt (45).
Slide one Steel Heel Holder Bracket (7) and one Rubber Rear Heel Holder (14) onto one end of the
Rod (10) until the lock tooth is wedged into the slot in the Rod (10), as shown in detailed drawing.
Use the same procedure to attach the other Steel Heel Holder Bracket (7) and Rubber Rear Heel
Holder (14) onto the other end of the Rod (10).
NOTE: Make sure the lock teeth are wedged into the slots in the Rod (10) to lock the Steel Heel
Holder Brackets (7) and Rubber Rear Heel Holders (14) in place before use.
Hardware:
3
4
46
48
47
Tool:
2 Wrenches (#13 & #17)
1 Flat Washer
(Ø18xØ10.5x2.0)
1 Hexagon Head Bolt
(M10x42mm)
1 Nylon Nut (M10)
1 Flat Washer
(Ø16xØ10.5x2.0)
1 Nylon Nut (M8)
(Galvanization)
1 Metal Bushing
1 Hexagon Head Bolt
(M8x48mm)
Tool:
2 Wrenches (#13 & #17)
14
14
7
10
42
43
4
4
45
7
3
40
Slot
Содержание 5501
Страница 5: ...4 WARNING LABEL PLACEMENT ...

