background image

0 9

Brand : SanDisk, Transcend

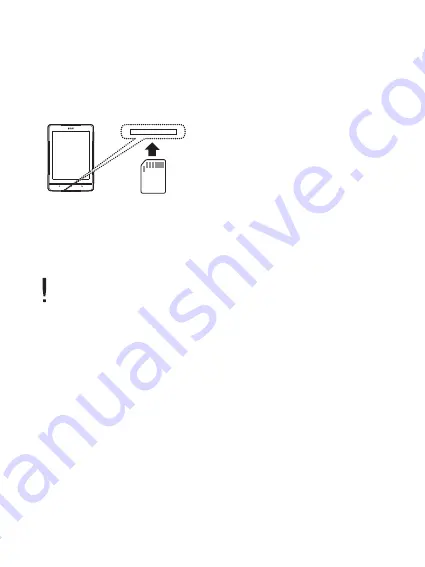
Insert/remove the SD Card

Recommended SD Cards

1. Gently insert and push the Micro SD card in the card slot as
    shown in the figure below while the product is powered off.
2. Gently press the SD card again to remove it.

Insert/remove the SD card when the product is powered off.

To avoid damage, do not apply excessive force when 

inserting the SD card.

Do not remove the SD card while in use. Doing so may delete 

data, damage the EB12 or cause damage to the SD card.

Do not repeatedly insert/remove the SD card.

Improper handling of the SD card may cause damage to the 

EB12 or to the SD card.

Use of an unauthorized SD card may result in a malfunction 

of the EB12.

Transfer speed of the SD card may vary depending on the PC 

status.

Formatting the SD card deletes all data. Please back up the 

card before formatting it.

Please format the SD card as FAT 32 system and format any 

SD card that is not recognized or may cause damage to the 

EB12 or to the SD card.

SD cards up to 32 GB are supported by the EB12.

Gatting Started

Содержание Kyobo Sam EB12

Страница 1: ...U S E R G U I D E...

Страница 2: ...CONTENTS 01 02 03 Gatting Started Troubleshooting and Other Resources Basics...

Страница 3: ...rmance or quality of the product Main Body Quick start guide warranty information USB cable Quick Start Guide Basic guide to using the EB12 Product Warranty Please keep this warranty in a safe place i...

Страница 4: ...ng Started EB12 at a Glance Product appearance printed and engraved information may vary depending on the model Menu Button Home Button Previous Button Micro SD Card Slot USB Jack Power Insert a Micro...

Страница 5: ...vice will be automatically powered off See page 25 Turning to standby mode Using the reset function 1 Manually switch to standby mode by pressing the key briefly when the power is on 2 Return to norma...

Страница 6: ...n Connect the provided cable to the high power USB 2 0 port Connecting the cable to a low power USB port keyboard or USB hub without power supply may not recharge the device Charging may be interrupte...

Страница 7: ...er and the USB cable only after all functions of the EB12 have been stopped Check that the EB12 is connected to a high power USB 2 0 port Connecting to a keyboard or a USB hub without its own power su...

Страница 8: ...B12 Delete files folders in the EB12 1 To copy a file folder from the computer select the file and use the drag drop method to add the files to the device Please connect the USB cable properly and use...

Страница 9: ...g so may delete data damage the EB12 or cause damage to the SD card Do not repeatedly insert remove the SD card Improper handling of the SD card may cause damage to the EB12 or to the SD card Use of a...

Страница 10: ...nd password on your Kyobo Book account 5 Select Login 6 Once logged in you will see the Kyobo Book website 7 Enter the title or author to search for the desired eBook 8 Once you select an eBook detail...

Страница 11: ...1 1 4 1 2 3 4 2 3 Home Page Screen Home Page Legend User Name List Category eBook List Recently Views eBooks Shows the user name Shows list of eBook Shows eBook list Shows recently read eBooks Basics...

Страница 12: ...Service Wireless Network Battery Time and Date Search eBooks by entering book titles Shows eBook list s page information Shows how to use membership service Shows the status of wireless network conne...

Страница 13: ...3 11 12 Connecting to Kyobo Book website 11 12 Connecting to Kyobo Book Shows whether the micro SD card is inserted Micro SD Card Basics Press the key while using the device to see the home page scree...

Страница 14: ...alphabetical order Fully Read Shows the list of fully read eBooks Purchased Date Shows the list of eBooks by purchase date ePUB Only Shows ePUB files only PDF Only Shows PDF files only 2 Select the d...

Страница 15: ...nd share Memo Highlighter Dictionary Lookup Share Not supported on Comic Viewer and Office View While reading press the key to display the previous screen eBook Formats Supported by the Device PDF ePU...

Страница 16: ...ur ID and password Setup Set up the device s environment Connecting Wireless Internet 1 Select Wireless Internet Connect Disconnect on the option list 2 Check the Wi Fi item to display the accessible...

Страница 17: ...cords Languages Select the preferred language Auto Power Off The device automatically turns off after a certain time has elapsed Auto Standby Mode The device automatically switches to the standby mode...

Страница 18: ...ake it to the nearest iriver service center problems resulting from exposure to moisture will be repaired for a fee regardless of the warranty period and in some instances may not be repairable Do not...

Страница 19: ...Please back up important data stored in the device in a safe place The EPD s panel is thin and may be damaged from impact or pressure Utilize caution when using storing the device Do not operate the d...

Страница 20: ...perating system of your computer The screen does not look normal Check for and remove any foreign material on the screen The device cannot be connected to the computer Connect the device to the USB po...

Страница 21: ...s without permission The names of companies institutions products persons and incidents in this manual are fictional iriver has no intention to be associated with any company institution product perso...

Страница 22: ...rence by one or more of the following measures Reorient or relocate the receiving antenna Increase the separation between the equipment and receiver Connect the equipment into an outlet on a circuit d...

Страница 23: ...ce The information contained in this instruction book is based on the current iriver device specifications Specifications are subject to change without any prior notice to the user There is no warrant...

Страница 24: ...esting warranty service for fastest service There is a risk of damage from impact during shipment so pack the device carefully to prevent damage Include your name contact information and description o...

Отзывы: