background image

IPU 40060 Issue 9 


Page 4 of 27 

NOTE:


A  set  of  4  AA  batteries  will  power  the  IRISYS  IRI  1011  Universal  Thermal  Imager  for 
approximately 8 hours.  


CAUTION:    If  the  IRI  1011’s  red  LED  starts  flashing  it  means  that  the 
batteries are running low and need to be replaced immediately.  


1.2.2


Using AC Mains Power  


1.


Make sure the Thermal Imager is turned off. 

2.


Connect  the  provided  12V  power  supply  into  the  socket  on  the  side  of  the  IRI 
1011 imager, see 

Figure 4

3.


Attach the appropriate supplied regional adapter to the power supply. 

4.


Plug the power supply into a mains socket.  

5.


Switch on the thermal imager. 


CAUTION: When using AC mains, use only the power supply included with 
the  IRI  1011.    Using  other  power  supplies  may  damage  the  IRI  1011 
Thermal Imager. 


NOTE:  


It  is  recommended  that  the  IRISYS  Universal  Thermal  Imager  (not  the  ‘Pocket  PC’/Palm) 
should  be  switched  on  approximately  2  minutes  before  use.    This  is  to  allow  the  internal 
electronics to warm up and stabilise, so as to achieve optimum performance. 


The mains power supply included with the IRI 1011 is only for powering the IRI 1011; it will 
not recharge the batteries. 


1.3


Connecting the IRI 1011 to a ‘Pocket PC’ or Palm 


This  section  tells  you  step  by  step  how  to  get  the  Thermal  Imager  up  and 
running with a ‘Pocket PC’/Palm.   


1.


Make  sure  the  IRI  1011  is  powered  by  either  4  AA  size  batteries  or  the  12V 
power supply. 

2.


Make sure the Thermal Imager software has been installed onto the ‘Pocket PC’ 
or Palm, see Section 

2.3.1.1 

or Section 

2.4.1.1 

respectively. 

3.


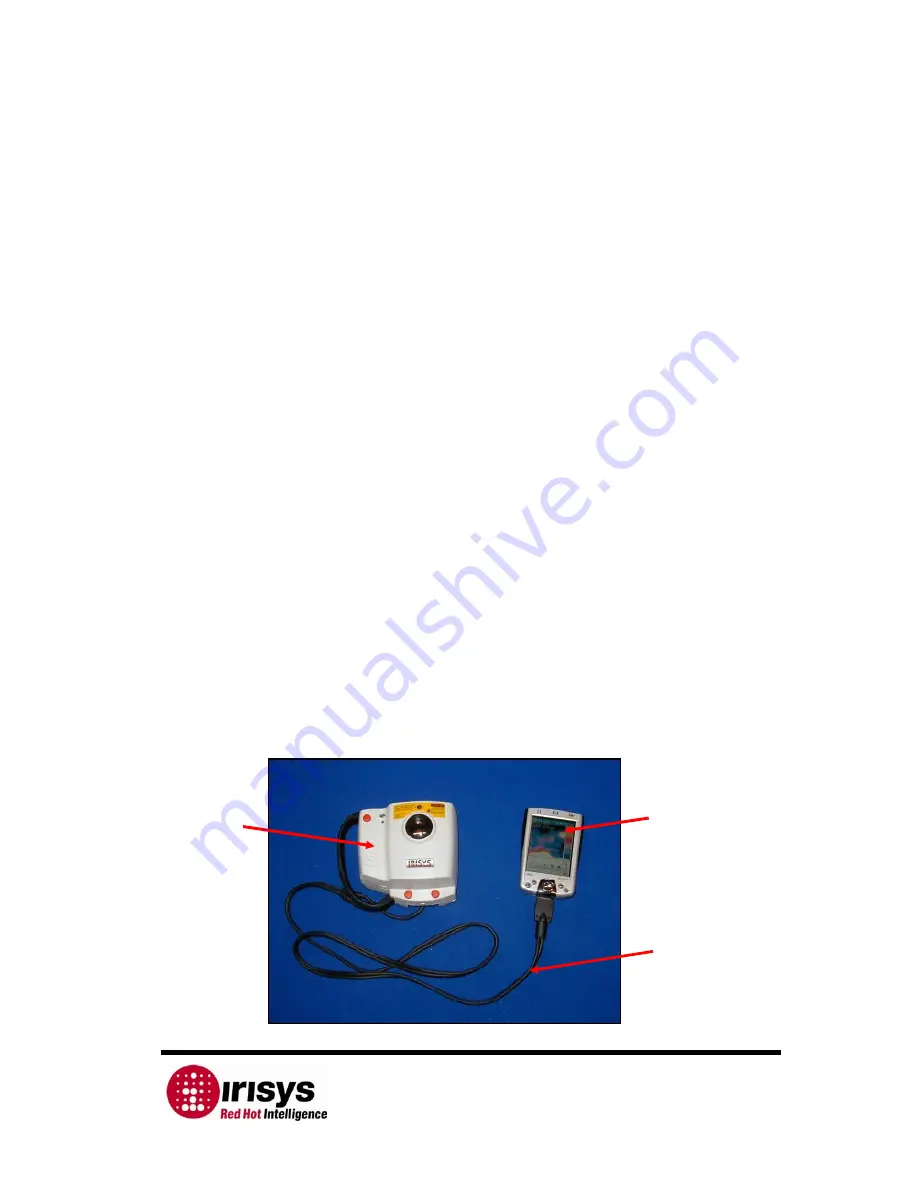
Connect the Pocket PC’s/Palm’s RS232 serial sync cable into its socket and the 
other end into the IRI 1011 RS232 socket, see 

Figure 3


Figure 3: The IRI 1011 Thermal Imager connected to a ‘Pocket PC’, 
configured for two handed operation 


Pocket PC, 
not 
supplied 
with IRI 
1011 

IRI 
1011 
Therm
al 
Imager  

Pocket PC 
Manufactur
er’s RS232 
Serial Sync 
Cable 

Содержание IRI 1011

Страница 1: ...re irreversible damage to the eye may occur The laser should not be operated when there are personnel in the imager s field of view Caution use of controls or adjustments or performance of procedures...

Страница 2: ...GER WITH A PALM 12 2 4 1 Setting up the Palm with the IRI 1011 Thermal Imager 12 2 4 1 1 Installing the IRISYS 1011 Imager software onto a Palm 12 2 4 1 2 Switching off the Palm s automatic shutdown 1...

Страница 3: ...hows where the on off button is 2 Open up the battery compartment on the bottom of the IRI 1011 Thermal Imager by sliding the battery cover off 3 Carefully remove the battery holder and insert 4 AA si...

Страница 4: ...et PC Palm should be switched on approximately 2 minutes before use This is to allow the internal electronics to warm up and stabilise so as to achieve optimum performance The mains power supply inclu...

Страница 5: ...ermal Imager Safety notice The laser used in this device is designated Class II Under no circumstances should personnel look straight into the laser Components of the IRI 1011 Thermal Imager The IRI 1...

Страница 6: ...run Microsoft Pocket PC 2000 2002 or 2003 see Section 2 3 3 for recommended Pocket PC s The Pocket PC can be used to display process and store snapshots of thermal images 1 Ensure that ActiveSync is i...

Страница 7: ...lowed to fully discharge the imager software will be lost and must be re installed either from memory storage or from the CD again The Pocket PC uses power even when it is switched off Regular recharg...

Страница 8: ...set the path directory to which snapshot images are saved Ambient o C The user can set the ambient temperature if the emissivity see below is not given the value of 1 the software compensates for the...

Страница 9: ...e The user can select a displayed resolution of 16x16 pixels or 96x96 pixels 2nd Element The user can select whether to have the second SP2 temperature cursor displayed on the screen Continuous Auto S...

Страница 10: ...ty and pressing left right adjusts the temperature range 2 Selected Temperature Cursor SP1 The SP1 cursor can be moved around the screen on the thermal image by using the Navigation Action button i e...

Страница 11: ...sys co uk Please note that it is necessary to acquire the appropriate synchronization cable for a specific Pocket PC The URL links provided in Table 1 for cable suppliers are intended as an example Fo...

Страница 12: ...m display iii A new window will open on your Palm stating whether it is set up for a Local or Modem connection Make sure Local is selected iv Press the HotSync button on your cradle cable or on the Pa...

Страница 13: ...software from the Palm website http palmsource palmgear com index cfm fuseaction software showsoftware SID 5290900C CF18 AC90 838C210BE1658BDE PartnerREF prodID 1499 6 Double click on the AlwaysOn prc...

Страница 14: ...e mode Pressing Yes will save the image with the name Snapshot n snp where n is the next available number in the sequence Also the snapshot will be labelled with the date and time at which it was save...

Страница 15: ...achieve the accuracy of temperature readings see note 3 in Section 3 1 Colour Map The user can select one of three possible colour options o Greyscale o Red Blue o Green Blue Integration The number o...

Страница 16: ...hermal image by using the Navigation Action button i e up down left right When the Auto adjust is ON pressing the Nav Action button will cycle between the two temperature cursors only and not the manu...

Страница 17: ...ided Launch the IRISYS 1011 Imager program from the Desktop icon or from START PROGRAMS IRISYS IRISYS 1000 Series Imager When launched the window obtained will be similar to Figure 12 On initial launc...

Страница 18: ...o Fahrenheit or Kelvin Integration sets the number of frames to integrate up to ten maximum Figure 12 Thermal Imager launch window Adjusting the displayed Thermal Image The sensitivity and range can...

Страница 19: ...bmp file Snapshot takes a snapshot of the image and saves it as a scene data file The View menu allows the following Toolbar Turn the Tool Bar on and off Status Bar Turn the Status Bar on and off Con...

Страница 20: ...n a different colour To read the temperature of a cursor use the mouse to click on the corresponding oval colour as displayed in the temperature display window see Figure 14 The temperature graph plot...

Страница 21: ...erature measurements The camera should be positioned so that the item of interest appears within this area of the display Caution Do not adjust the lens focus The lens is fixed focus and factory set 3...

Страница 22: ...2 Open up the handle grip below the fastening clips 3 Un clip the cable connector cover 4 Detach the cover and put it to one side 5 Connect the serial synchronization cable into 6 Thread the other end...

Страница 23: ...rotated to 10 Example with the clip around the wrong accommodate different Pocket PC models way it may cover the Pocket PC power button 11 Example with the clip around the correct 12a Note the locato...

Страница 24: ...place the RS232 connector cover 16 Line up the holes on the back of the imager with the pegs on the handle 17 Push the imager down onto the pegs so 18 Coil up the serial synchronization cable so that...

Страница 25: ...ations 4 1 2 Preparing the Handle for use with a Palm PC Pocket PC Palm Cable cover Cable cover 1 Pocket PC Palm 2 Remove the Pocket PC hooks by unscrewing Hooks Hooks the two screws from the front of...

Страница 26: ...40060 Issue 9 Page 26 of 27 4 1 3 Removing the Imager from the Handle 1 Locate the release lever 2 Press the release lever down 3 Keeping the release lever pressed down remove the imager from the han...

Страница 27: ...ct Details IRI 1011 Thermal Imager Serial Number This can be found printed on the label near RS232 port Pocket PC Palm and PC Software Version installed Software version number can be found whilst sof...

Отзывы: