IQAmerica VD-8810L Скачать руководство пользователя страница 18

18

This function allows you to monitor the view from the Door Camera on the LCD 
display at any time. Please note - the Live Browsing feature is only available if the 
Door Camera Unit is powered via mains power (see page 11 for details). The 
feature is disabled when powered by batteries.
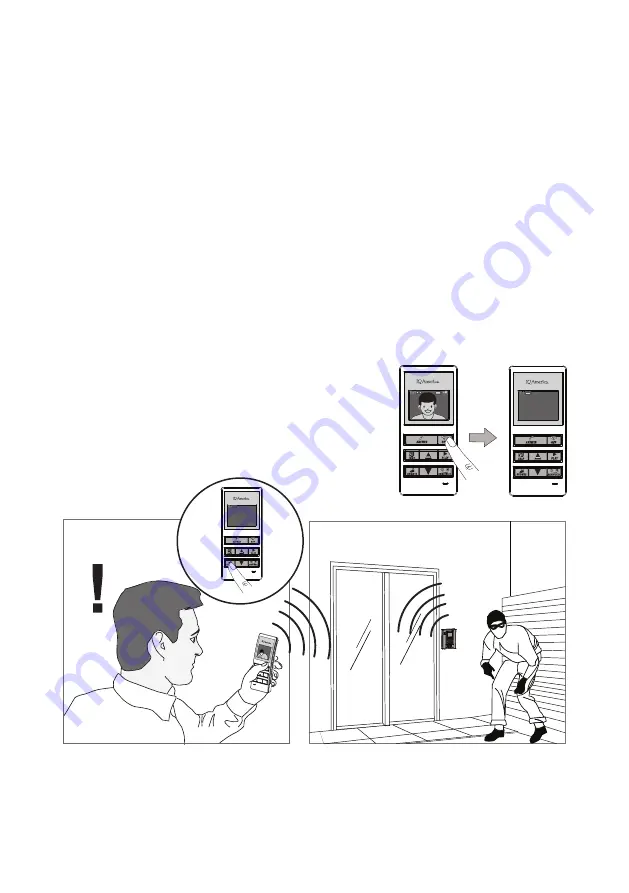
Live Browsing

1) Press the “BROWSE” button.

•  The Camera Door unit is activated.
•  The LCD monitor will display the 

image from the Camera Door unit.

•  Sound from the Camera Door unit 

microphone can be heard.

Notes:

•  After pressing the “BROWSE” or “ANSWER” button, it may take up to 4 seconds for the 

‘Live Browsing’ feature to activate.

•  Conversations are limited to a 60 second duration to conserve battery life should you 

forget to manually end the conversation by pressing the “OFF” button.

3) Press the “OFF” button to exit Live Browsing.

2) Press the “ANSWER” button.

•  The Camera Door unit is activated.
•  The LCD monitor will display the 

image from the Camera Door unit.

•  Sound from the Camera Door unit 

microphone can be heard.

•  You can talk to the person outside 

via the LCD monitor.

OR

Содержание VD-8810L

Страница 1: ...he camera door unit on the wall please confirm successful wireless signal transmission by testing the quality of the voice and video image Before installation and use please read this instruction manu...

Страница 2: ...unit 10 Charging the Indoor Portable LCD Display unit 13 Wall mounting the Charging Cradle 14 Setting the Date and Time 15 Using the system Answering a caller 16 Adjusting the Brightness Volume 17 Li...

Страница 3: ...dle Accessories 1 x AC Adaptor with plug for Indoor Portable LCD Display Unit 1 x AC DC Adaptor with 2 ends one red one black for Camera Door Unit 1 x Rechargeable Battery pack 6 x AA Lithium Batterie...

Страница 4: ...e the battery pack Do not dispose of in fire Use only the specified battery pack in the kit Do not use this battery pack in other equipment Only charge the battery pack using the charging cradle AC ad...

Страница 5: ...fore use please confirm that no such equipment is in use in your vicinity In the event that this unit causes unwanted interference to such device please discontinue use immediately and contact the cus...

Страница 6: ...ring button Wall mounting plate Indication light Camera Door Unit Removal of wall mounting plate Microphone Push button Terminals for external 16V supply Portable LCD Display Unit Microphone Rechargea...

Страница 7: ...od Low Please charge the battery Flat LCD Display Date and time indications The date and time is displayed at the bottom of the screen For date and time setting See page 15 4 3 Low battery indicator C...

Страница 8: ...and noxious fumes An enclosed area that may cause echo Where rain or water may directly hit the back of the unit The video image may be seriously impaired where the camera faces directly into the sun...

Страница 9: ...view a visitor 500mm from the camera Camera tilt angle 0 Deg this is the default setting Camera mounting height approx 1500mm SIDE VIEW 1500mm 1290mm 420mm 46 Deg 500mm 1710mm SHOOTING AREA TOP VIEW S...

Страница 10: ...ve the main unit from the mounting base 4 Adjust the camera lens angle The camera lens is adjustable to a maximum of 15 degrees Please note that the video image may become slightly distorted if the ca...

Страница 11: ...e screw cover Power supply wires 6 Optional ways of powering the camera door unit The Camera Door unit can be used without batteries by connecting it directly to the existing 12V 16V wired doorbell su...

Страница 12: ...ut Remove the Front Push and disconnect the wires Remove the cover from the Door Chime Disconnect the wire from the FRONT terminal in the chime base and re connect it to the TRANS terminal refer to Di...

Страница 13: ...e battery pack into the compartment 2 Re fit the battery cover do not remove the foam cushion 3 2 Assemble the charging cradle A full charge will take around 6 hours longer if the unit is used during...

Страница 14: ...lease button located behind of the charging stand pulling the cradle upwards 1 Remove the mounting plate from the charging cradle 2 Mount the mounting plate to the wall using the screws and pegs provi...

Страница 15: ...Press the PLAY button to move to the DATE selection Press the UP and DOWN arrows to select the date 4 Press the PLAY button to move to the HOUR selection Press the UP and DOWN arrows to select the hou...

Страница 16: ...OFF button to finish the conversation You have 150 seconds to answer a call and initiate a conversation If you do not answer a call an image of the visitor is stored in memory The PLAY button will bl...

Страница 17: ...ed display brightness is achieved 5 levels are available Default setting Level 4 Maximum Level 5 Sound off Default setting Level 4 Maximum Level 5 Sound off 2 Changing the voice volume Press the UP an...

Страница 18: ...nit Sound from the Camera Door unit microphone can be heard Notes After pressing the BROWSE or ANSWER button it may take up to 4 seconds for the Live Browsing feature to activate Conversations are lim...

Страница 19: ...163 images when this limit is reached the oldest image will be automatically deleted to allow a new image to be stored By default the number of images stored per visit is set to TWO this can be change...

Страница 20: ...AY button The most recently stored image will be displayed on the screen 2 Press the UP and DOWN arrow buttons to browse through the images stored 3 Press the OFF button to exit playback NO IMAGE 1 Pr...

Страница 21: ...contained in your kit hence no actions are necessary However if for some reason you have to replace the Door Camera unit or LCD Monitor follow the procedure below to pair the new units together 1 Remo...

Страница 22: ...fe please tape up the used battery pack or place it into a plastic bag then put it into a rechargeable battery recycling box See your local authority for information regards the location of such recyc...

Страница 23: ...t dry cloth Slightly moisten the cloth if required Portable indoor display unit Charging cradle Top view Caring for your system Wipe the charging terminals in the charging cradle with a soft cloth onc...

Страница 24: ...s Check the lens for condensation The whole video image shows up whitish or blackish Check that the brightness setting is correctly adjusted The video image shows up whitish or white lines or rings sh...

Страница 25: ...minals dirty Clean the charging terminals with a dry cloth Is the battery pack new or has the battery become completely exhausted Leave the unit on charge normal charging should resume after a short w...

Страница 26: ...ties express or implied including any warranty representation or condition of merchant ability of that the products are fit for any particular purpose or use and specifically in lieu of all special in...

Отзывы: