IQ-group E-636 Скачать руководство пользователя страница 8

SECTION FOUR

OPERATION AND TESTING

WALK TESTING PROCEDURE

The sensor will rotate from left to right, and tilt forward or backward. Adjust the sensor to point in
the desired direction.

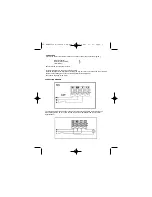
Set the two adjustment controls on the underside of the unit (diagram C) to the following
positions: 

TIME - Fully anti-clockwise
DUSK  - Fully clockwise

The unit will now operate during daytime as well as at night, illuminating the lamp for approx. 5
seconds each time. This allows testing to be carried out to establish the best position for the
sensor.
The lamp will immediately illuminate as the unit goes through its "warm-up" period. After
approximately 1 - 2 minutes the lamp will extinguish. Try to remain outside the detection area
during the warm-up period.
Walk across the detection area approx 5 metres from the unit. As you cross a detection "zone"
the lamp will illuminate. Now stand still until the lamp extinguishes (this should take approx. 5
seconds).
Start moving again. As you cross each "zone" the lamp will illuminate.
Repeat the above, walking at various distances and angles to the unit. This will help you to
establish the detection pattern.

If the detection area is too small for your requirements, try angling the sensor head up. This will
increase the coverage distance.  Angling the head downwards will reduce the range should a
smaller coverage area be required. 

SETTING UP FOR AUTOMATIC OPERATION.

When walk tests are complete, the unit can be switched to automatic operation :

The TIME setting controls how long the unit remains illuminated following activation & after all
motion ceases. The minimum time (fully anti-clockwise) is approx. 5 seconds, whilst the
maximum time (fully clockwise) is approx. 5 minutes. Set the control to the desired setting
between these limits.

The DUSK control determines the level of darkness required for the unit to start operating. The
setting is best achieved by the procedure below:

Set the DUSK control knob fully anti-clockwise

. The unit will now start operating at dusk. 

If you require the light to activate earlier, wait until the ambient light level reaches the level of
darkness at which you wish the lamp to become operative, SLOWLY rotate the control in a
clockwise direction until a point is reached where the lamp illuminates. Leave the control set at
this point.
At this position, the unit should become operative at approximately the same level of darkness
each evening. Observe the operation of the unit. If the unit is starting to operate too early (ie.
when it is quite light), adjust the control slightly anti-clockwise. If the unit starts to operate too late
(ie. dusk), adjust the control slightly clockwise. 
Continue to adjust until the unit operates as desired.

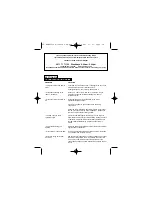
MASKING THE SENSOR LENS

To reduce the sensor coverage, preventing detection in unwanted areas, mask the sensor lens
using the lens masking tape provided (see diagram D).  For your information, the top section of
the lens covers long range detection, the bottom covers short range.  Similarly, the left and right
lens sections cover the left and right detection areas respectively.

SF-OEMCTV200-150&500-GR.qxd  16/05/2005  11:21  Page 8

Содержание E-636

Страница 1: ...oodlight E 636 E 638 IQ Europe Limited Sandbeck Lane Wetherby LS22 7TW Visit us at www iq europe co uk Installation helpline 0871 717 1100 V1 0 04 05 IQ OEMCTV200 150 GR IQ OEMCTV200 500 GR SF OEMCTV200 150 500 GR qxd 16 05 2005 11 21 Page 1 ...

Страница 2: ...ation ON CONDITION THAT The buyer takes advantage of any return to store scheme operated by the seller from whom it is bought If the product has a defect outside the period of any seller s return to store scheme it should be returned to IQ Europe Limited at Sandbeck Lane Wetherby W Yorks LS22 7TW England at the expense of the buyer together with evidence of the date of purchase it is the responsib...

Страница 3: ...or electrician SECTION TWO SELECTING THE LOCATION The motion detector has a number of detection zones at various vertical and horizontal angles as shown see diagram A A moving human body needs to cross enter one of these zones to activate the sensor The best all round coverage is achieved with the unit mounted at the optimum height of 2 5m Careful positioning of the sensor will be required to ensu...

Страница 4: ...ated onto the wall plate by two lugs which are inserted into the rectangular slots in the top of the wallplate To remove loosen but do not remove the fixing screw and lift the body of the floodlight upwards to release from the wall plate diagram F Mark the position of the fixing holes Ensure wall plate is correctly positioned Note the orientation of the wall plate diagram E Drill the holes Insert ...

Страница 5: ...ve Restrict RHS detection Restrict LHS detection Restrict long detection Restrict short detection Lens Mask Less sensitive 12m TOP VIEW SIDE VIEW 2 5m A 200º Dusk Time SF OEMCTV200 150 500 GR qxd 16 05 2005 11 21 Page 5 ...

Страница 6: ...E G UP F H wall plate fixing screw SF OEMCTV200 150 500 GR qxd 16 05 2005 11 21 Page 6 ...

Страница 7: ...light to the wall plate by locating the lugs onto into the recess on the top of the wall bracket lift the floodlight so it fits over the wall plate reverse diagram F Fully tighten the fixing screw fig E Mains Supply Isolation Switch The diagram below also shows the required connections for the addition of slave luminaires When adding slaves be sure not to exceed the maximum switchable load see Tec...

Страница 8: ...peration The TIME setting controls how long the unit remains illuminated following activation after all motion ceases The minimum time fully anti clockwise is approx 5 seconds whilst the maximum time fully clockwise is approx 5 minutes Set the control to the desired setting between these limits The DUSK control determines the level of darkness required for the unit to start operating The setting i...

Страница 9: ...e before resuming normal PIR operation Halogen Lamp Replacement CAUTION Always handle quartz halogen bulbs with a soft cloth Do not touch the bulb with your bare hand as it will shorten the life of the bulb 1 Switch off the floodlight Do not touch the Floodlight while it is in use or still hot Allow it to cool about 5 minutes before touching it 2 Replacement bulb type is 240V mains halogen 150W or...

Страница 10: ...ill not detect through glass The level of ambient light in the area may be too bright to allow operation at the current DUSK setting During the hours of darkness adjust the DUSK control slowly clockwise until the lamp illuminates Refer to previous section for more details Adjust the setting anti clockwise to lower the level of ambient light required for activation Unit may be poorly located See pr...

Страница 11: ... to 40 in running costs whilst also conserving precious natural resources LIGHT POLLUTION CONSIDERATE LIGHTING Please be aware of the annoyance over lighting an area can cause to your immediate neighbours Light pollution caused by incorrectly installing a unit or over lighting an area can be limited by carefully considering the location and position of your unit before installation The light sprea...

Отзывы: