background image

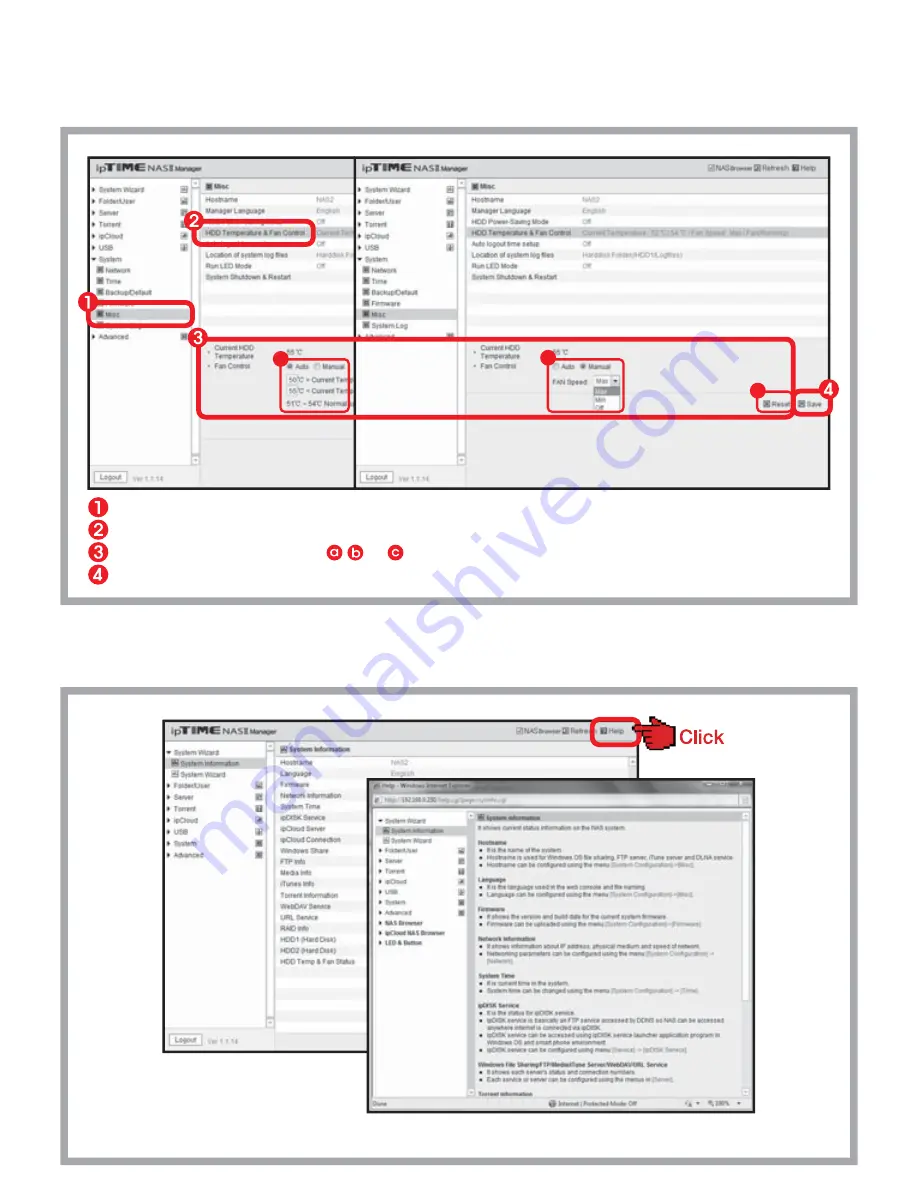
Controlling FAN

Seven.

On-Line Help

Select [System] > [Misc] menu.
Select [HDD Temperature & FAN control].
Select FAN mode or speed as    ,    or    .
Click [Save].

a

b

c

Click [Help] icon to see the on-line help.

※ Refer on-line manual for the menu not mentioned in this guide.

Содержание NAS 2

Страница 1: ... and using it User Install the utility software package and setup the NAS system using the system setup wizard Installation Guide Box Contents Thank you for buying ipTIME Thank you for buying ipTIME NAS NASⅡ All specifications and figures are subject to change without notice s Guide for Web console LAN cable 2m NAS system The box contents below are only for reference Software CD Manuals USB cable ...

Страница 2: ... other OS like Mac OS or Linux installation can be done using web browser manually According to this document check the contents in the box Box Contents Access shared folders of NAS using PCs or smart phones through internet or local network Using NAS User Install the utility software package and setup the NAS system using the system setup wizard This Guide Installation Guide Installation Guide s ...

Страница 3: ... the same way 1 Open the front panel 4 Insert the HDD into the tray Lock the HDD with screws 2 Unlock the screws from the tray 3 6 5 Pull out the tray NAS I I I I N A S II N A S II NAS I I I I Plug the tray to the system NAS I I I I Lock the screw to the tray 7 Close the front panel 8 9 Done ...

Страница 4: ...pictures below Use ipTIME IP router with firmware higher than 7 40 when connect NAS to network ipTIME NASⅡ ipTIME IP router N A S I I I I Click Power button on the rear panel of NAS and check the LEDs as above Connecting cables Two ...

Страница 5: ...he installation is finished 1 2 Insert CD Install the Utility 4 Finish Installation Click ipTIME NAS Utility Install when the CD launcher program is started The utility software for NASⅡ can be run on Windows 2000 XP Vista and Windows 7 OS environment In other OS like Mac OS or Linux installation can be done using web browser manually ...

Страница 6: ...and Format Disk Choose Yes or No for initialize Format Hard Disk and click Next button Formatting is not needed if the disk is already formatted Creating default folders for service Activate the shared folders for Windows and FTP Turn on the FTP and Window service and click Next button 11 Register ipDISK service Select New Registration for ipDISK service and click Next button 1 2 13Configure ipDIS...

Страница 7: ...by system wizard can be reviewed by the web console Click ipTIME NAS Console icon to login to the web console Adding a user creating a folder and other jobs can be done in the web console Refer User s Guide for Web Console Management for more detail information ...

Страница 8: ...cessed using smart phone apps also available can be easily accessed using smart phone apps also available According to this document check the contents in the box Box Contents Access shared folders of NAS using PCs or smart phones through internet or local network This Guide Using NAS User Install the utility software package and setup the NAS system using the system setup wizard Installation Guid...

Страница 9: ...also PC transferring including open URL NAS Browser in Web Console In local network Four It explains how to use NAS browser through the internet The NAS browser is embedded in its web console and can access all the files and folders in NAS The functions of NAS brower are Copying removing renaming and also PC transferring including open URL NAS Browser in Web Console Through the internet Five It ex...

Страница 10: ...n USB storage device is connected and ready to use Fast blinking Wait USB Copy event for 10 seconds To run USB Copy push the button Slow blinking Now USB copy action is running Off No USB device is connected LAN LED LAN LED shows the link status of LAN port On The link of LAN port is on Off The link of LAN port is off Power button It is for system power on off Power LED It show the status of NAS p...

Страница 11: ...e to finish setup Checking the Folder for Windows File Sharing 5 Running ipTIME NAS Console Double click the ipTIME NAS Console icon in the desktop window 1 Select the NAS from the searched list Choose Open NAS Web Console and click the Run Opening NAS web console 2 Login 3 Choose Web console and enter the user account and password Click the LOG IN to start the web console Running ipTIME NAS Folde...

Страница 12: ...hen the executing files cause problems copy the file to the local PC and use it Using NAS 4 Checking ipDISK service 4 Select the menu Server ipDISK Service from the left menu browser Make the service as on Click Save to finish setup Checking FTP Server for ipDISK service 6 Select the menu Server FTP Server from the left menu browser Make the service as on Click Save to finish setup 7 Checking the ...

Страница 13: ...e Use top down menu to edit or sort files and folders Use the File Transfer menu to up download files to from PC Running ipTIME NAS Console Double click the ipTIME NAS Console icon in the desktop window 1 Select the NAS from the searched list Choose Open NAS Web Console and click the Run Opening NAS web console 2 Login 3 Choose Web console and enter the user account and password Click the LOG IN t...

Страница 14: ... or sort files and folders Enter the ipDISK service URL and HTTP port number in the address field of internet browser as above ipDISK service URL can be found in the System Information menu The HTTP port number can be omitted when port number is 80 Changing to NAS Browser mode 3 Click NAS Browser to enter NAS browser mode 2 Login Enter the user account and the password Click LOG IN to open the web...

Страница 15: ... ipTIME NAS Console in the local network Double click ipTIME NAS Console in the desktop window Select the NAS and click Run from the NAS list 1 Enter the ipDISK service URL and HTTP port number in the address field of internet browser as above Connecting Web Console via the internet 2 or Login 3 Select URL service radio button and enter the user account and the password Click LOG IN to open the we...

Страница 16: ...lic URL Run File Transfer Get URL of file from the top down menu The public URL string for selected file will be displayed in popup window Getting Public URL 6 5 Changing to NAS Browser mode Adding All User Attribute 4 4 Running ipTIME NAS Console Double click the ipTIME NAS Console icon in the desktop window 1 Select the NAS from the searched list Choose Open NAS Web Console and click the Run Ope...

Страница 17: ...loaded to the NAS Download b The files in the NAS can be downloaded to the phone Touch Touch Upload a The files in the phone can be uploaded to the NAS Touch Touch Download c The files in the NAS can be downloaded to the phone Touch Touch The figures on smart phone can be different ipDISK APP can be downloaded from the Android market and Apple App store using the searching keyword ipDISK a Install...

Страница 18: ... have any question using NAS See the on line help when if you have any question using NAS According to this document check the contents in the box Box Contents Access shared folders of NAS using PCs or smart phones through internet or local network Using NAS Install the utility software package and setup the NAS system using the system setup wizard Installation Guide Login the web console manageme...

Страница 19: ...ick ipTIME NAS console in the Desktop screen Choose NAS from searching list Chose Open NAS Web Console Click Run button 4 Web console management system Web console management is displayed as above Login to the selected NAS as a The default password for admin is admin account admin ...

Страница 20: ...unt name and password for the new user Click Save Select Folder User User menu Select a user for changing Change the field wanted Click Save Select Folder User User menu Select a user for deleting Click Remove User icon to delete A Adding a User B Deleting a User C Changing Information Check to assign administrator authority ...

Страница 21: ...ll be activated below Enter a name for new folder and check the service for it Click Save Select Folder User Folder menu Select a folder for changing Change the field wanted Click Save Select Folder User User menu Select a folder for deleting Click Remove User icon to delete A Creating a Folder B Deleting a Folder C Changing Information User can be assigned to the folder when it is created ...

Страница 22: ...r off FTP service Click Save Select Server URL Service menu Turn on or off URL service Click Save A Windows File Sharing B FTP Server C URL Service The windows file sharing service for each folder can be enabled from Folder menu The FTP server service for each folder can be enabled from Folder menu The URL service for each folder can be enabled from Folder menu ...

Страница 23: ...t as an iTunes folder Select a folder and click Clear icon to deassing it from the iTunes service Click Save Run iTunes Select the NAS2 previously assigned from web console of NAS The files placed in the folder previously assigned to iTunes will be shown Setup for Media DLNA server is also same iTunes service Five ...

Страница 24: ...e Select the folder where files will be downloaded and click Set Download Folder Click Save B Using Torrent Select Torrent Torrent menu Click ADD TORRENT icon Select the torrent file for download Click Open to begin the download C Viewing Status The torrent file currently downloaded The download path ...

Страница 25: ... On Line Help Select System Misc menu Select HDD Temperature FAN control Select FAN mode or speed as or Click Save a b c Click Help icon to see the on line help Refer on line manual for the menu not mentioned in this guide ...

Отзывы: