background image

7

6

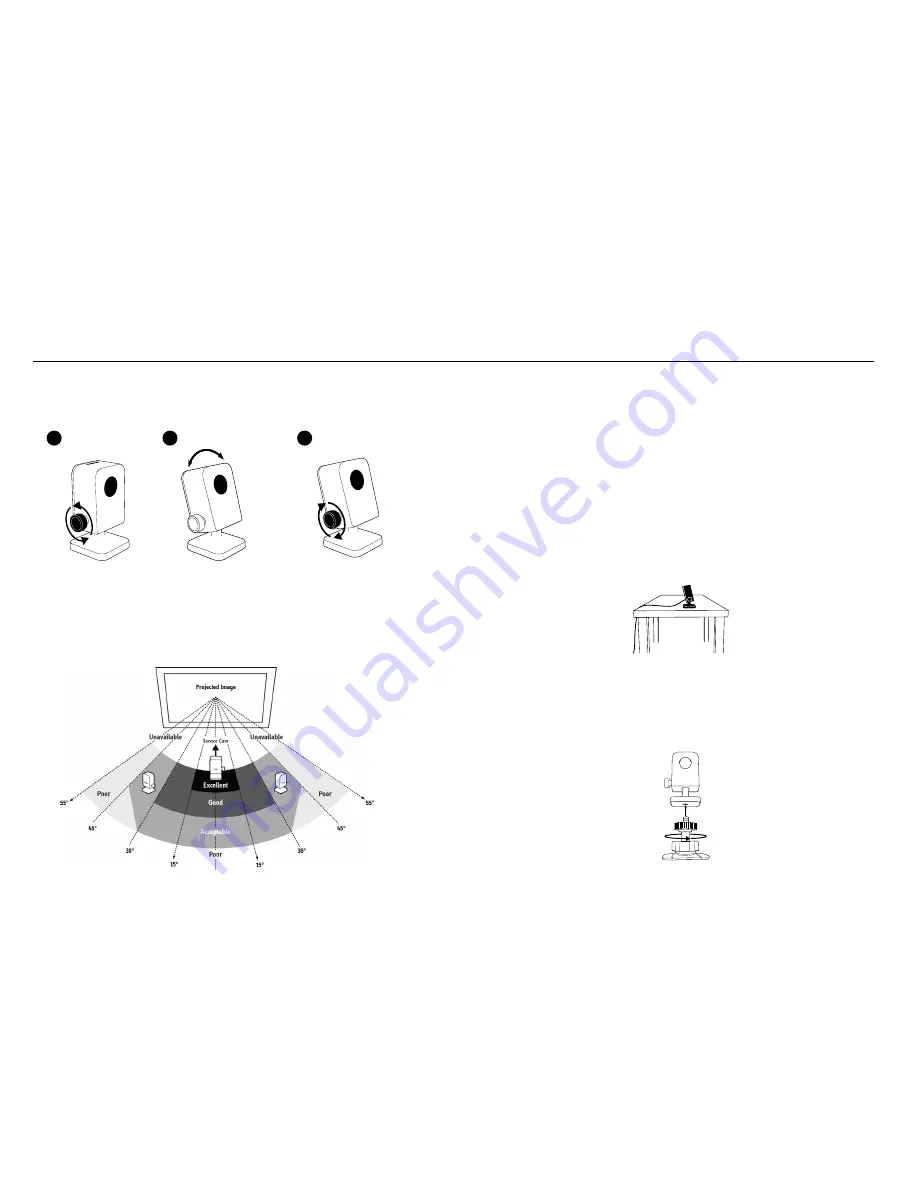
•   The Sensor Cam should face directly at the projection screen. Depending on your 

screen’s height, you will have to adjust the Sensor Cam’s Head to face upward or 
downward. Please refer to the steps below:

2

1

3

Loosen

Adjust Angle

Tighten

Installing It (cont’d)

•   The Sensor Cam is best placed opposite the center of the screen at a straight-on angle. 

However, a straight-on angle is not required for acceptable operation, and the 

   Sensor Cam may be placed at another angle if necessary. Please refer to the diagram 

below for placement zones according to accuracy quality:

As you can see:
•  Accuracy is better when the Sensor Cam is closer to the center.
•  Accuracy decreases as the angle increases.
•  Larger screens require more distance between the screen and the Sensor Cam.

Note: Please keep a clear path between the Sensor Cam and the projection screen to ensure proper operation.

3. Securing the Sensor Cam

Once you’ve found the right position, it’s important to make sure your Sensor Cam is steady 
and secure. There are three ways to secure your Sensor Cam, depending on your setup:

A. Placing on the desktop

Use a flat, smooth desktop surface. Make sure nothing is blocking the Sensor Cam’s path to 
the screen surface. Adjust the knob to angle the Sensor Cam directly at the center of the screen 
surface.

Sensor Cam Placement Zone

B. Using an upside-down Ceiling Mount

IS-01 can be mounted upside-down onto the ceiling or ceiling-mounted projector. To do so:

1.   Twist the Sensor Cam base onto the screw on the Ceiling Mount until tight. Turn the star-

shaped knob near the base for additional angle adjustment.

Содержание IS-01

Страница 1: ...Interactive Whiteboard System User Manual IS 01...

Страница 2: ...ontain the following The IPEVO Interactive Whiteboard System or IS 01 turns your large projection screen into an interactive touchscreen giving you the ability to easily draw and annotate for educatio...

Страница 3: ...me actions are not executable with the Pen such as hovering Annotate Your Text and Images Using IPEVO Annotator you can draw and write directly on your interactive whiteboard You can even draw on top...

Страница 4: ...ully utilize the potential of your IS 01 After downloading PC 1 Double click the downloaded file and follow the onscreen prompts to complete the installation for IS 01 Driver 2 Follow the onscreen pro...

Страница 5: ...screens require more distance between the screen and the Sensor Cam Note Please keep a clear path between the Sensor Cam and the projection screen to ensure proper operation 3 Securing the Sensor Cam...

Страница 6: ...the Interactive Pen and insert 2 AAA batteries Replace the cover Turn on the pen when ready to use 4 Connecting to the Computer Once you ve placed and secured the Sensor Cam connect it to your compute...

Страница 7: ...Sensor Cam Coverage Detection Tap each corner white square in any order with the tip of the Interactive Pen Make sure the resulting dots appear inside the center white box If not please move the Senso...

Страница 8: ...e tip onto the surface or press the IPEVO button once Double click Quickly tap the tip onto the surface twice or press the IPEVO button twice Right click Press and hold the tip onto the surface or pre...

Страница 9: ...g or annotating Choose a Fountain Pen or Disappearing Ink for more fun Basic Shapes Basic Shapes icon lets you draw basic shapes such as rectangles or ovals Compass tool available Enables you to draw...

Страница 10: ...area where the corresponding points do not appear Or move the Sensor Cam further away from the screen Run the calibration process again The cursor on my screen is jumping around abnormally and I am n...

Страница 11: ...O logo and other IPEVO marks are owned by IPEVO Inc and may be registered All other trademarks are the property of their respective owners Customer Service USA Email cs ipevo com Tel 1 408 490 3085 Cu...

Отзывы: