background image


31/75 


ii

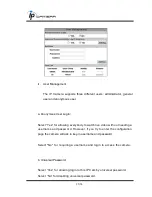
  User Management 


The  IP  Camera  supports  three  different  users:  administrator,  general 

user and anonymous user. 


a. Anonymous User Login: 


Select 

“Yes” for allowing everybody to watch live video without needing a 

username and password. However, if you try to enter the configuration 

page the camera will ask to key-in username and password. 


Select  "No"  for  requiring a username and login  to  access  the camera. 


b. Universal Password: 


Select “Yes” for allowing login to this IP Cam by universal password.   

Select “No” for disabling universal password. 

Содержание HLV-1WCF

Страница 1: ...1 75 User Manual IP VANDAL DOME CAMERA...

Страница 2: ...CT THROUGH VENTILATION GRILLS CAUTION CAUTION RISK OF ELECTRIC SHOCK DO NOT OPEN CAUTION TO REDUCE THE RISK OF ELECTRIC SHOCK DO NOT REMOVE COVER OR BACK NO USER SERVICEABLE PARTS INSIDE REFER SERVICI...

Страница 3: ...NSTALLATION 8 C IP ASSIGNMENT 14 D INSTALL ACTIVEX CONTROL 18 IV LIVE VIDEO 24 V IP CAMERA CONFIGURATION 28 A SYSTEM 29 B NETWORK 34 C A V SETTING 46 D EVENT LIST 54 VI NETWORK CONFIGURATION 64 VIII F...

Страница 4: ...k remotely With a user friendly interface it is an easy to use IP Camera designed for security applications II Product Specifications 5 Megapixel Vandal Dome Support Full HD 1080P Real Time External V...

Страница 5: ...io compression Input External Audio in Output External Line out Power over Ethernet Yes PoE Class 0 IEEE802 3af Power DC 12V Max 4 8W IR ON 6 1W IR OFF PoE Max 802 3af 5 8W IR ON 7 2W IR OFF Operating...

Страница 6: ...configurable Security Password protection IP address filtering HTTPS encrypted data transmission 802 1X port based authentication for network protection Firmware upgrade HTTP mode can be upgraded remo...

Страница 7: ...7 75 III Product Installation A Monitor Setting i Right Click on the desktop Select Properties ii Change color quality to highest 32bit...

Страница 8: ...Connector Instruction Open the cover to find the cable connector inside the Camera Connect power adaptor first then connect the IP Camera to PC or network and set up the network configurations accord...

Страница 9: ...Tips In order to ensure IP66 waterproof level please install the vandal dome according with following instructions a The Unused cable outlet hole must be closed and the waterproof connector on the us...

Страница 10: ...set smooth and closely flat with the surface c When you mount the camera housing on the ceiling or wall please use the screws with the black rubber o rings Without the o ring the water may seep into t...

Страница 11: ...op bottom sides will disappear d Turn and loose the control stick shift right and left to adjust the vari focal lens until the image becomes clear then turn and tighten the stick to fix it e Use the 3...

Страница 12: ...make sure that the black rubber band sticks to the inside of the cover completely Crook or uneven rubber band may cause the waterproof defective g Lock tightly the screws on the dome cover to ensure...

Страница 13: ...ard LAN infrastructure It enables power to be provided to a network device such as an IP phone or a network camera using the same cable as that used for network connection It eliminates the need for p...

Страница 14: ...ii IP installer supports two languages a IPInstallerCht exe Chinese version b IPInstallerEng exe English version iii There are 3 kinds of IP configuration a Fixed IP Public IP or Virtual IP b DHCP Dy...

Страница 15: ...ce to search again viii Click one of the IP Camera listed on the left side The network configuration of this IP camera will show on the right side You may change the name of the IP Camera to your pref...

Страница 16: ...dress 192 168 1 100 Different Subnets IP CAM IP address 192 168 2 200 PC IP address 192 168 1 100 To Change the PC IP address Control Panel Network Connections Local Area Connection Properties Interne...

Страница 17: ...access remote monitoring is to left click the mouse twice on a selected IP Camera listed on Device list of the IP Installer An IE browser will be opened xi Then please key in the default user name ad...

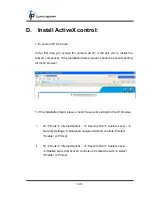
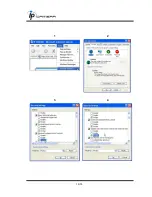
Страница 18: ...ck the security setting for the IE browser 1 If the installation failed please check the security setting for the IE browser i IE Tools Internet Options Security Tab Custom Level Security Settings Dow...

Страница 19: ...19 75 1 2 3 4...

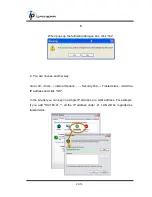
Страница 20: ...e another way Go to IE Tools Internet Options Security Tab Trusted sites Add the IP address and click OK In the site list you can key one single IP address or a LAN address For example if you add 192...

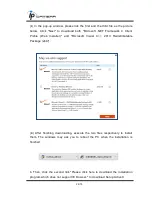
Страница 21: ...install necessary tools The following pictures are based on chrome a You may see the prompt message as the picture below First click the link Firstly please install Microsoft Visual C 2010 Redistribut...

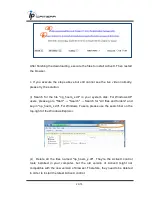
Страница 22: ...nstaller and Microsoft Visual C 2010 Redistributable Package x64 iii After finishing downloading execute the two files respectively to install them The windows may ask you to reboot the PC when the in...

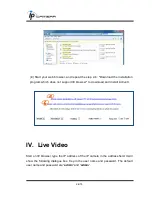
Страница 23: ...r Windows XP users please go to Start Search Search for All files and folders and key in np_hoem_x dll For Windows 7 users please use the search bar on the top right of the Windows Explorer ii Delete...

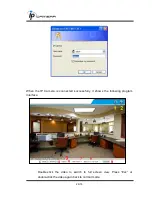
Страница 24: ...m which does not support IE browser to download and install ActiveX IV Live Video Start an IE browser type the IP address of the IP camera in the address field It will show the following dialogue box...

Страница 25: ...75 When the IP Camera is connected successfully it shows the following program interface Double click the video to switch to full screen view Press Esc or double click the video again back to normal m...

Страница 26: ...e PC and talk to the Camera side 7 Show how many people are connected to this IP camera 8 Tick the Relay out ON box to trigger the relay output for testing Tick Off to stop triggering 9 Focus Bar a fo...

Страница 27: ...ng right click the mouse again Select Record Stop The video format is AVI Use Microsoft Media Player to play the recorded file 3 Mute Turn off the audio Click again to turn it on 4 Full Screen Full sc...

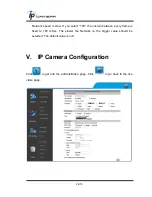
Страница 28: ...e interval between every frame is fixed to 100 mSec The slower the Network is the bigger value should be selected The default value is null V IP Camera Configuration Click to get into the administrati...

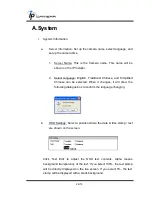
Страница 29: ...mplified Chinese can be selected When it changes it will show the following dialogue box to confirm the language changing b OSD Settings Select a position where the date time stamp text are shown on t...

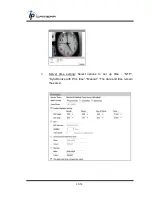
Страница 30: ...30 75 c Server time setting Select options to set up time NTP Synchronize with PC s time Manual The date and time remain the same...

Страница 31: ...rybody to watch live video without needing a username and password However if you try to enter the configuration page the camera will ask to key in username and password Select No for requiring a user...

Страница 32: ...guest user can only browse live video page and is not allowed to enter the configuration page d Click edit or delete in the user list to modify them The system will ask you to key in the password in t...

Страница 33: ...etting Management The user may download the current settings to PC or upgrade from previous saved settings 1 Settings download Right click the mouse button on Setting Download Select Save AS to save c...

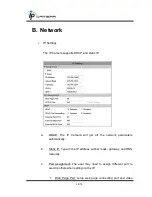
Страница 34: ...amera will get all the network parameters automatically b Static IP Type in the IP address subnet mask gateway and DNS manually c Port Assignment The user may need to assign different port to avoid co...

Страница 35: ...s on the router automatically so that video streams can be sent out from a LAN There are three external ports for being set Web Port Http Port and RTSP port To utilize of this feature make sure that y...

Страница 36: ...End Port in RTSP mode you may use TCP and UDP for connecting TCP connection uses RTSP Port 554 UDP connection uses RTP Start and End Port ii Advanced a Https Hypertext Transfer Protocol Secure Https c...

Страница 37: ...warning message will be shown Please set Yes to remove the security identification 2 Setting the security identification and apply it 3 Installed Certificate Another warning message will be shown 4 Th...

Страница 38: ...Name Authentication Type Authentication Password Encryption Type Encryption Password of Write mode and Read mode 3 Enable SNMPv1 SNMPv2 Trap for detecting the Trap server Please set what event needs t...

Страница 39: ...vices Code point DSCP specifies a simple mechanism for classifying and managing network traffic and provide QoS on IP networks DSCP is a 6 bit in the IP header for packet classification purpose Please...

Страница 40: ...e on a LAN or WLAN The EAPOL protocol support service identification and optional point to point encryption over the local LAN segment Please check what version of the authenticator and authentication...

Страница 41: ...lect Enabled to use PPPoE Key in Username and password for ADSL connection Send mail after dialed When it connects to the internet it will send a mail to a specific mail account b DDNS It supports DDN...

Страница 42: ...me and password 3 Set up the IP Schedule update refreshing rate 4 Click Apply 5 If the schedule update is too frequently the IP may be blocked In general an update every day 1440 minutes is recommende...

Страница 43: ...e has already been used Please change it 5 Update Failed please check your internet connection Network connection failed 6 Update Failed please check the account information you provided The server us...

Страница 44: ...44 75 FTP To send out the video via mail of FTP please set up the configuration first...

Страница 45: ...45 75 Samba Select this option to send the media files via a neighbor network when an event is triggered...

Страница 46: ...there are three areas that can be set up for privacy Click the Area button first then drag an area on the above image Remember to save your settings The masked area will not shown on both live view an...

Страница 47: ...lect the slower the shutter speed becomes so that the image will get brighter and moving subjects might be blurred e D WDR This function enables the camera to reduce the contrast in the view to avoid...

Страница 48: ...y single picture Note When you select a number in Shutter Time actually the shutter time varies in a range and controlled by camera automatically Following table shows the shutter time option and corr...

Страница 49: ...ing 2 Setting Basic mode Advanced mode and 3GPP mode Max Video Frame Rate for both streaming combined is 30 FPS a Streaming 1 2 Basic Mode 1 Resolution Stream 1 2592x1944 15fps 2048x1536 15fps 1920x10...

Страница 50: ...profile For example iPhone4 only supports Main profile 3 Quality There are 5 levels Best High Standard Medium Low The higher the quality is the bigger the file size is Not good for internet transmissi...

Страница 51: ...trol Mode There are CBR Constant Bit Rate and VBR Variable Bit Rate CBR 32Kbps 8Mbps the higher the CBR is the better the video quality is VBR 1 Low 10 High Compression rate the higher the compression...

Страница 52: ...P Path 3GPP output connecting path If the IP address of your camera is 192 168 40 150 and you key in 3g in the column the 3GPP path will be rtsp 192 168 40 150 3g 3 Audio The IP CAMERA supports 2 way...

Страница 53: ...53 75 c Audio from local PC to IP Camera Check chatting in the browsing page...

Страница 54: ...specific mail addresses trigger the output device or save video to FTP Micro SD card Samba If you select save to SD card the video or snapshot will be saved to Micro SD card If you also tick E mail FT...

Страница 55: ...By setting the interval on 30 seconds the camera lens will be covered during 10 40 sec At time point B the IP camera compares the view with time point A and sends an alarm when it found that the lens...

Страница 56: ...ith JPEG compression format 3 Single JPEG Single File with Interval Setting iv Record Time Setting When an event occurs the IP camera can record a video clip or take a snapshot and then send it via ma...

Страница 57: ...ecord to the SD card after the IP Camera detects network dis connected if set Save to SD card vi Network IP check After enable IP Check the IP camera can check if the network server is connecting If t...

Страница 58: ...rval time of the snapshot and the reserved file name of the snapshot c Interval The interval between two snapshots 3 I O Setting a Input Setting The IP Cam supports input and output When the input con...

Страница 59: ...fects the DO or relay out duration i ON Off Switch The camera triggers the external device for 10 seconds You can turn off the alarm manually by clicking off at the right bottom of the live video page...

Страница 60: ...failure 6 SD card a Playback Please Insert the Micro SD card before use it Make sure to push the Micro SD card into the slot completely Click the date listed on this page and it shows the list of the...

Страница 61: ...affect the operation of the IP Camera such as frame rate of the video c Copy to PC You can insert the Micro SD card to the PC and read the files directly or use FlashGet instead to download the files...

Страница 62: ...elect File Import Import list and find the link list file you just saved The file name may be called SD_list iii FlashGet will show you the link list and you can tick the files you want to copy to you...

Страница 63: ...63 75 iv Click OK to start download FlashGet is a free software that can be downloaded from FlashGet official website The example above is based on FlashGet ver 1 9 6...

Страница 64: ...real IP or one dynamic IP c Only the IP CAMERA is connected to the internet d For fixed real IP set up the IP into IP CAMERA For dynamic IP start PPPoE ii Configuration 2 a Internet Access ADSL or Cab...

Страница 65: ...o IP CAMERA and PC For dynamic IP start PPPoE iii Configuration 3 a Internet Access ADSL or Cable Modem b IP address one real IP or one dynamic IP c IP CAMERA and PC connect to the internet d Device n...

Страница 66: ...DO pin to the external relay buzzer device Please connect the GND DI pin to the external trigger device When no event occurs DO output is 5V DO and GND are disconnected When the camera detects event...

Страница 67: ...select N C in Input sensor setting when the external device or circuit makes DI and GND pin disconnected the camera input alarm is triggered and executes the action user has set for example send snaps...

Страница 68: ...the live video page to test if DO Relay Out works i On Off Switch mode Clicking ON will trigger the external output device for 10 seconds For example your alarm buzzer will continuously ring for 10 s...

Страница 69: ...69 75 ii Time Switch mode Click Pulse the camera will trigger the external output device for several seconds the duration length is according to the interval setting in Output Setting...

Страница 70: ...nd hold the button in the picture below Connect the power to the camera again and do not release the button during the system booting It will take around 30 seconds to boot the camera Release the butt...

Страница 71: ...ord will be valid only when you enable the function in User Management 1 First you need to know the IP address and MAC of your IP camera You can use IP installer to scan the LAN and see the IP address...

Страница 72: ...click encoder You will see a set of username and password appear as below The universal username and password are generated from the IP address and MAC you key in so if you change the camera IP addres...

Страница 73: ...in as the administrator The use of universal password does not affect the previous user settings so the administrator account password will not change until you edit it Please click Edit to give a new...

Страница 74: ...74 75 X Package contents The CD includes user manual and software tools IP Camera Adaptor Quick Installation Guide Hex Wrench Star Wrench CD Screws x4 O ring x4 Wall Plug x4...

Страница 75: ...cend SDHC class4 16GB SDHC class4 32GB SD class4 16GB SD class4 32GB SDHC class6 4GB SDHC class6 8GB SDHC class6 16GB SD class6 4GB SD class6 8GB SD class6 16GB SDHC class10 4GB SDHC class10 8GB SDHC...

Отзывы: