background image


2.3 First Time Setup: 

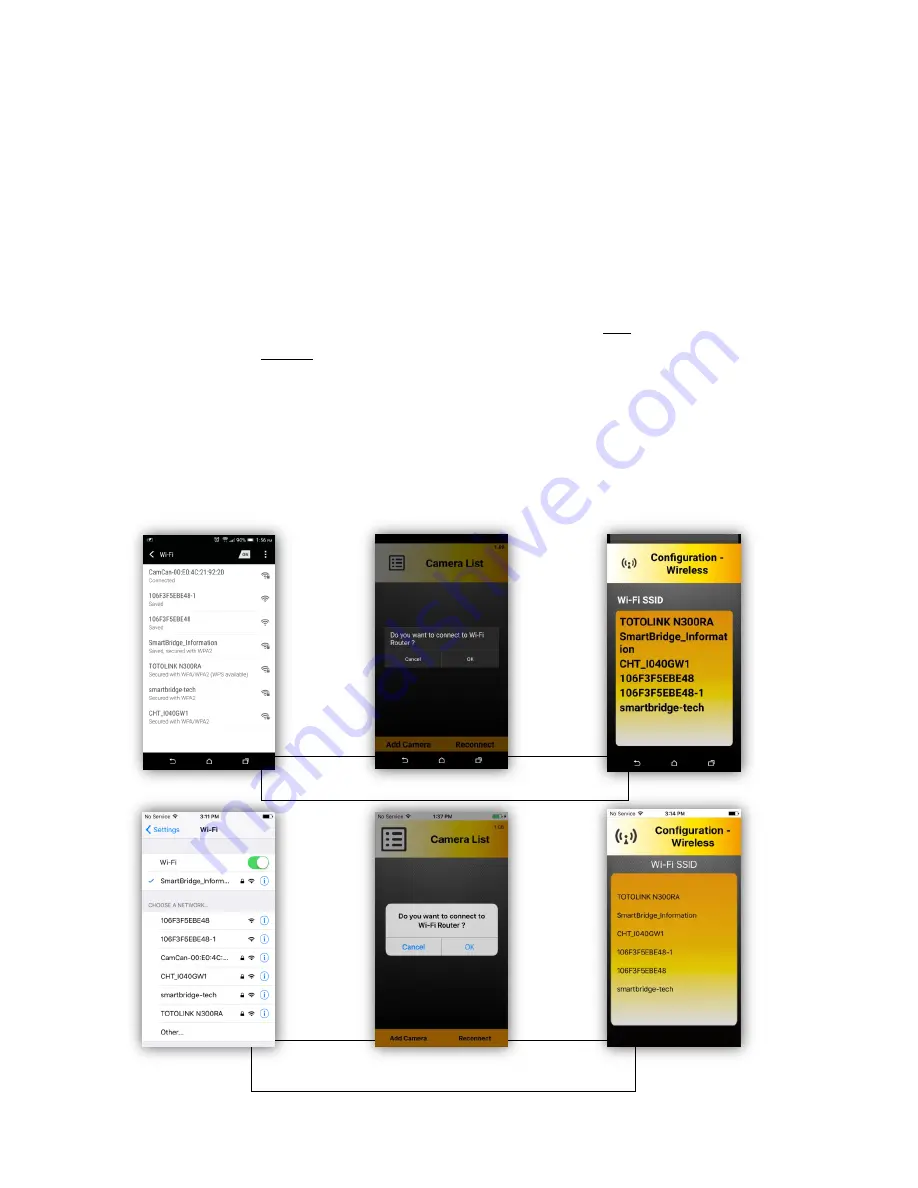
1  Connecting to the Camera with Wi-Fi Access Point mode


On your smart phone/ tablet, access your 

“Settings” and under “Wireless & Networks” click “Wi-Fi 

“(Pic.1). Find “Cam Can-XX:XX:XX:XX:XX:XX” and connect to it. (For iOS, click on the Settings 

shortcut and click on Wi-Fi) The default 

password is “

12345678

”. 

2  Adding camera to Application(APP)


Open “Cam Can” and it will show the message “

Do you want to connect to Wi-Fi Router

” (Pic.2); 

if you have a Wi-Fi router connected to the internet, please select 

“Yes”.   

If not, please select 

“Cancel”; the camera will connect to your smart phone/tablet directly; but you 

cannot use our system out of the 

camera’s wireless area. 

Turning IoT camera into client mode: 

When it displays a 

“Configuration–Wireless” screen (Pic.3), select the Wi-Fi router you want to use 

and enter your Wi-

Fi router’s password. Wait 30~40 seconds, when the LED turns to green, the 

setup was successful. Now, the camera will appear on 

“Camera List” page. 


  Pic.1                 


Pic.2                                   

        Pic.3 


iOS 

Android 

Содержание RF HC8301

Страница 1: ...IoT RF HC8301 HC8301A User s Manual V1 02...

Страница 2: ...Camera 8 3 Operation 9 3 1 Live View 9 3 2 Camera Settings 10 3 3 RF Device Paring and Configuration 13 3 3 1 IoT Devices 13 3 3 2 RF Devices 14 3 3 3 Pairing RF Device 14 3 4 RF Device Configuration...

Страница 3: ...ects with your smart phone or tablet anytime anywhere via wireless technology It s great for store surveillance office and home safety Keep a watchful eye on your children elders and pets Before you s...

Страница 4: ...duct Introduction 1 Light Sensor 2 Microphone 3 Lens 4 IR LED 5 Speaker 6 LED 7 Reset Button Notice HC8301A s light sensor is inside the head of IoT camera 1 Wi Fi Antenna 2 Power Connector 3 SD Card...

Страница 5: ...ad it and install it on your smart phone tablet Android iOS 2 2 Power Supply 1 Connect the power supply to IoT camera and plug it into the power outlet Then the LED on IoT camera will turn red Please...

Страница 6: ...e Do you want to connect to Wi Fi Router Pic 2 if you have a Wi Fi router connected to the internet please select Yes If not please select Cancel the camera will connect to your smart phone tablet dir...

Страница 7: ...n 4 If the APP does not show Do you want to connect to Wi Fi Router please follow process 2 4 P 7 2 3 2 Live View 1 Under Camera List please click on the IoT camera you want to watch 2 Sliding your fi...

Страница 8: ...nes are already connected to the router Key in password and press APP will add this IoT camera The default password is admin Please change your password after setup Notice If you input the wrong passw...

Страница 9: ...t by yourself Please use this website https www the qrcode generator com Input the 20 character UID into this website Then you can get the QR code picture 2 The default password is admin Please change...

Страница 10: ...e Listen and Speak 5 IoT Devices 6 Resolution of Live View 7 Cruise Mode 7 a pan left right 7 b tilt up down 8 Mirror for Live View 8 a up down inverse 8 b left right inverse 9 Return to Previous Scre...

Страница 11: ...e Camera Delete IoT Camera from Camera List 03 Event Viewer Check all events log from Motion Detection Vox Detection and IoT Devices alerts 04 Motion Detection When Motion Detection is triggered the I...

Страница 12: ...t phone tablet 06 Video Setting Configuration Video Power Frequency 50Hz 60Hz Please check your country to know 50Hz or 60Hz Video Resolution QVGA 320X180 VGA 640X360 HD 1280X720 HD H 264 Bit Rate 2Mb...

Страница 13: ...m Re enter your password to confirm 08 SD Safety Remove Please use this function before removing the SD card to protect your data on the SD card 09 Recording Setting Configure video quality when recor...

Страница 14: ...click the icon To enter IoT Devices 2 If sensors devices are successfully paired you will see the sensors devices on the IoT Device list For Android OS if it was not successful you will receive a pop...

Страница 15: ...Button for at least two seconds After releasing the button if the LED lights up constantly for 3 seconds the paring is successful after that you will see your sensors on IoT Devices list If not please...

Страница 16: ...e View After setup please click the Locate button The system will save your location setting 3 4 2 Door Window Sensor Configuration On the IoT Devices page click on Door Open Detector Unit device numb...

Страница 17: ...tings please press the long Set button in black to save all threshold information Alarm If the temperature or humidity is above Alarm threshold setting you set The system will sound the alarm and send...

Страница 18: ...with a clean soft cloth Keep the IoT camera dry and away from precipitation humidity and other lliquids containing minerals will erode the circuits Please do not use in dusty dirty areas Please avoid...

Отзывы: